บทเรียนต่อเนื่องเกี่ยวกับการพัฒนาเกมบน iPhone ด้วยภาษา Swift ร่วมกับ SpriteKit Template เพิ่มเติมในส่วนของการ สร้าง Class ของตัวละครในเกมเบื้องต้น
ต่อเนื่องจากบทความก่อนหน้า: เขียนเกมบน iPhone ด้วย SpriteKit กับ Swift ตอนที่ 1 จัดการ Scene
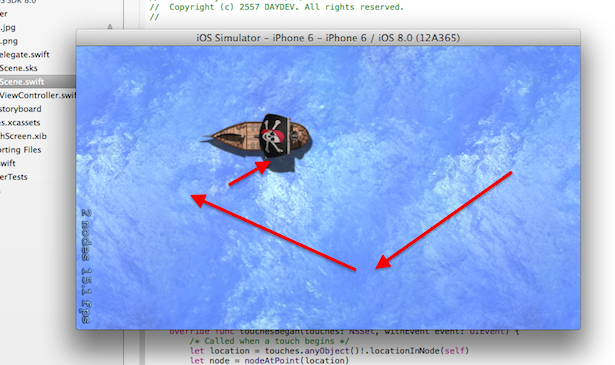
รอบนี้เป็นการเพิ่มส่วนของ Class ในการควบคุมตัวละคร ให้เรือโจรสลัดของเราเดินทางตามนิ้วเราที่ชี้ไป
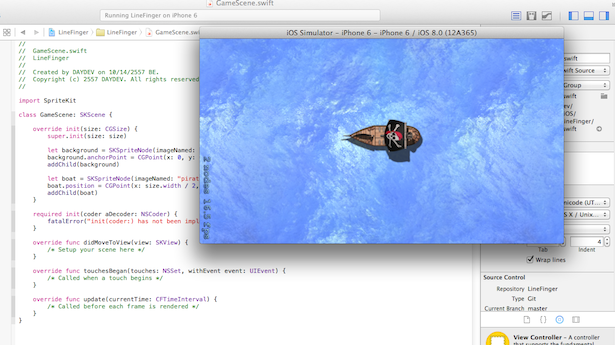
บทความที่แล้วเราจะเห็นว่า เกมของเราจะอยู่ที่ผลลัพธ์ส่วนนี้
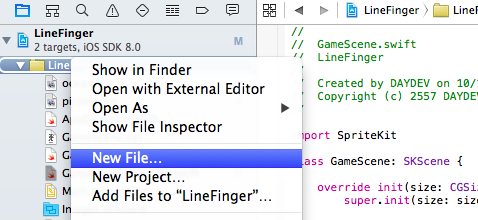
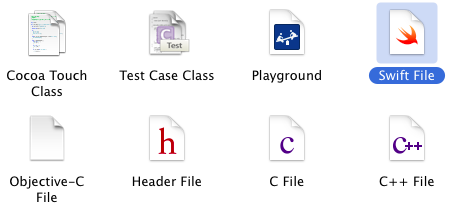
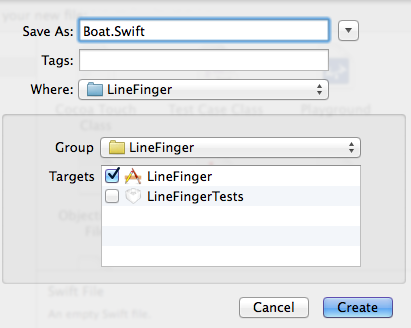
เราจะทำการสร้าง Class ของเรือโจรสลัดขึ้นมาทันที ให้ทำการ New File ใหม่เข้าไปใน Project ของเราเป็น Swift File ชื่อว่า Boat.swift
เปิดไฟล์ Boat.Swift ขึ้นมา ทำการเพิ่ม Class ของ SpriteKit เข้าไปเพื่อให้ Project ของเราทำความเข้าใจว่า ไฟล์ Boat.Swift นี้เป็น SpriteKitNode ตัวหนึ่งของเกม
import Foundation
import SpriteKit
class Boat: SKSpriteNode {
}
ทีนี้เกมของเราจะรู้แล้วว่า Boat.Swift มี Class ชื่อ Boat จะเป็น SubClass ของ GameScene ทันที เราก็ต้องมาตั้งค่าของ init() เริ่มต้นให้กับไฟล์ Boat เพื่อที่มันจะได้ทำงานร่วมกับ ตัวแปร boat ที่เราสร้างไว้จาก GameScene ให้เพิ่มคำสั่งต่อไปนี้ลงไปใน Class Boat ในไฟล์ Boat.Swift
init(imageNamed name: String!) {
  let texture = SKTexture(imageNamed: name)
  super.init(texture: texture, color: nil, size: texture.size())
}

required init(coder aDecoder: NSCoder) {
  super.init(coder: aDecoder)
}
ภาพรวมของไฟล์นี้จะเป็น
import Foundation
import SpriteKit
class Boat: SKSpriteNode {

    init(imageNamed name: String!) {
        let texture = SKTexture(imageNamed: name)
        super.init(texture: texture, color: nil, size: texture.size())
    }

    required init(coder aDecoder: NSCoder) {
        super.init(coder: aDecoder)
    }
}
ต่อมาเราต้องตั้งค่าตัวแปร คงที่ let ขึ้นมาหน่อย เป็นค่าความเร็วในการเคลื่อนไหวของ เรือเรา
let POINTS_PER_SEC: CGFloat = 80.0
ตามด้วย กำหนดตัวแปร สำหรับ กำหนดตำแหน่ง และความเร็วในการเคลื่อนไหวที่คงที่ของ เรือโจรสลัดของเราครับ
var wayPoints: [CGPoint] = []
var velocity = CGPoint(x: 0, y: 0)
ให้นำ code ทั้ง 3 บรรทัดนี้ไปวางใต้บรรทัด
class Boat: SKSpriteNode {
จะได้คำสั่งทั้งหมดตามนี้
import Foundation
import SpriteKit
class Boat: SKSpriteNode {

    let POINTS_PER_SEC: CGFloat = 80.0
    var wayPoints: [CGPoint] = []
    var velocity = CGPoint(x: 0, y: 0)
    ...
}
สร้าง เมธอดสำหรับเก็บพิกัด Array ของตำแหน่ง ใหม่ขึ้นมาชื่อว่า addMovingPoint()
func addMovingPoint(point: CGPoint) {
  wayPoints.append(point)
}
และสร้าง เมธอดสำหรับ เคลื่อนไหวของตัวเรือโจรสลัดของเราว่า move() ไปควบคุมการเคลื่อนไหวอีกที
func move(dt: NSTimeInterval) {
  let currentPosition = position
  var newPosition = position

  if wayPoints.count > 0 {
    let targetPoint = wayPoints[0]

    if frame.contains(targetPoint) {
      wayPoints.removeAtIndex(0)
    }
  }
}
ขั้นตอนต่อไปจะเป็นการเพิ่ม Movement Logic ซึ่งเป็น Function หนึ่งที่มีใน SpriteKit อยู่แล้ว ซึ่งเป็นฟังก์ชันที่ง่ายต่อการคำนวณ ระยะทาง จากพิกัดหนึ่งไป ยังพิกัดหนึ่ง หากใครที่เคยเขียน SpriteKit ร่วมกับ Objective-C อยู่แล้วจะรู้ว่ามันทำงานร่วมกับ CGPoint ตำแหน่งหน้าจอของแอพพลิเคชันเกมเราได้ง่าย
let offset = CGPoint(x: targetPoint.x - currentPosition.x, y: targetPoint.y - currentPosition.y)
let length = Double(sqrtf(Float(offset.x * offset.x) + Float(offset.y * offset.y)))
let direction = CGPoint(x:CGFloat(offset.x) / CGFloat(length), y: CGFloat(offset.y) / CGFloat(length))
velocity = CGPoint(x: direction.x * POINTS_PER_SEC, y: direction.y * POINTS_PER_SEC)

newPosition = CGPoint(x:currentPosition.x + velocity.x * CGFloat(dt), y:currentPosition.y + velocity.y * CGFloat(dt))
position = newPosition
นำ Code ข้างบน ไปแทรกใน เมธอด move() ให้เป็นแบบนี้
func move(dt: NSTimeInterval) {
        let currentPosition = position
        var newPosition = position

        if wayPoints.count > 0 {
            let targetPoint = wayPoints[0]

            let offset = CGPoint(x: targetPoint.x - currentPosition.x, y: targetPoint.y - currentPosition.y)
            let length = Double(sqrtf(Float(offset.x * offset.x) + Float(offset.y * offset.y)))
            let direction = CGPoint(x:CGFloat(offset.x) / CGFloat(length), y: CGFloat(offset.y) / CGFloat(length))
            velocity = CGPoint(x: direction.x * POINTS_PER_SEC, y: direction.y * POINTS_PER_SEC)

            newPosition = CGPoint(x:currentPosition.x + velocity.x * CGFloat(dt), y:currentPosition.y + velocity.y * CGFloat(dt))
            position = newPosition

            if frame.contains(targetPoint) {
                wayPoints.removeAtIndex(0)
            }
        }
    }
หลังจากนั้นให้ กลับไปแก้ไขไฟล์ GameScene.Swift ใสส่วนของตัวแปร boat ใหม่ให้อ้างถึง SpriteKitNode ของ Boat อีกที ให้แก้ไขไฟล์ GameScene.Swift ในส่วนของบรรทัดนี้
let pig = SKSpriteNode(imageNamed: "pirate")
ให้เป็น
let boat = Boat(imageNamed: "pirate")
boat.name = "boat"
เขียนคำสั่งในฟังก์ชัน touchesBegan ให้สั่งทำงานเมื่อมีแตะหน้าจอ ดังนี้
override func touchesBegan(touches: NSSet, withEvent event: UIEvent) {
        /* Called when a touch begins */
        let location = touches.anyObject()!.locationInNode(self)
        let node = nodeAtPoint(location)

        if node.name? == "boat" {
            let boat = node as Boat
            boat.addMovingPoint(location)
            movingPlayer = boat
        }
    }
เพิ่มฟังก์ชัน touchesMoved ขึ้นมาเพื่อรับค่าพิกัดของ ตำแหน่งเดิม และตำแหน่งใหม่ที่จะเคลื่อนที่ไป
override func touchesMoved(touches: NSSet, withEvent event: UIEvent) {
        let location = touches.anyObject()!.locationInNode(scene)
        if let boat = movingPlayer {
            boat.addMovingPoint(location)
        }
    }
ตามด้วย ฟังก์ชัน touchesEnded เพื่อทำการหยุดการเคลื่อนไหวของ Boat ครับ
override func touchesEnded(touches: NSSet, withEvent event: UIEvent) {
        movingPlayer = nil
    }
การเคลื่อนไหวทั้งหมดนี้จะไม่เกิดขึ้น เพราะเกมทุกเกมต้องมี Interval กำหนดเวลาจังหวะให้กับมันครับ SpriteKit จะมีฟังก์ชัน update() มาให้อยู่แล้วเข้าไปเขียนคำสั่งนี้เพิ่มเลยครับ
override func update(currentTime: CFTimeInterval) {
        /* Called before each frame is rendered */
        dt = currentTime - lastUpdateTime
        lastUpdateTime = currentTime

        enumerateChildNodesWithName("boat", usingBlock: {node, stop in
            let boat = node as Boat
            boat.move(self.dt)
        })
    }
เป็นการสร้าง Interval ให้กับเกมแบบเสร็จสรรพเพื่อนำไปคำนวณ การเคลื่อนไหวของ Node ที่ชื่อว่า “boat” หรือเรือโจรสลัดของเราอีกที
ทำการ Run ตัว Project ของเราดูเลยครับ
เห็นไหมว่ามันเคลื่อนไหวตาม ตำแหน่งการปาดนิ้วของเราแล้ว การเขียนเกมด้วย SpriteKit และ Swift ก็คงไม่ยากเกินจะศึกษาเท่าไรครับลองทำกันดู Source code ดาวน์โหลดได้ที่นี่ https://www.daydev.com/download/LineFinger.zip