
ตัวอย่างการสร้างระบบ Web Service สำหรับทำฟังก์ชัน Login เข้าสู่ระบบเพื่อให้ ionic framework สามารถเรียกใช้ผ่าน http protocol ด้วย ภาษา PHP และ AngularJSทบทวนบทเรียนย้อนหลังได้ที่ https://www.daydev.com/category/developer/angularjs
จากบทเรียนก่อนหน้านี้คือ: การสร้างระบบ Login สำหรับ ionic framework ด้วย AngularJS ที่เป็นเพียงการใช้ controller.js เรียกตรวจสอบการเข้าระบบด้วย if else ธรรมดาๆ ผมมั่นใจว่านักพัฒนาชาวไทยเก่งสู้ต่างชาติได้ และนักพัฒนาชาวไทยก็ขี้เกียจมากกว่าต่างชาติแน่ๆ ว่ามันจะ Login ผ่าน Web Service ได้หรือเปล่าผมเลยทำตัวอย่างต่อเนื่องทันทีเพื่อจะได้ลดการตอบ Message บน Inbox Page จำนวนมหาศาลให้ครับ
ใช้เรียกใช้ตัวอย่างก่อนหน้านี้ได้ แต่ก่อนจะแก้ไขให้สร้างไฟล์ PHP ขึ้นมาพัฒนา code โดยอ้างอิงจากบทความก่อนหน้านี้ AngularJS กับการสร้างหน้า Login และทำงานร่วมกับ Session API
<?php
$postdata = file_get_contents("php://input");
$request = json_decode($postdata);
@$username = $request->username;
@$password = $request->password;

if($username=="admin" && $password=="admin"){
	session_start();
	$_SESSION["username"] = $username;
	print 'true';
}else{
	print 'false';
}
header("Access-Control-Allow-Origin: *");
?>
ผมเขียนและอัพโหลดไว้ที่
https://www.daydev.com/demo/login.php
การ return ก็ง่ายๆ ถ้าเป็น admin,admin ก็เป็น true เก็บ Session ถ้าไม่ก็เป็น false ไม่เก็บ session อย่าลืมแค่
header("Access-Control-Allow-Origin: *");
ก็พอครับ
ต่อมาเราก็แก้ไข controller.js ใหม่เล็กน้อยครับเพิ่ม $http เข้าไปบน function หลัก
angular.module('starter.controllers', [])
.controller('AppCtrl', function($scope, $ionicModal, $timeout, $ionicPopup, $http)
แก้ไข dologin() ใหม่ให้เรียก URL ที่เป็น Web Service แล้วส่งค่า api เป็น POST Method ไป
$scope.doLogin = function() {
    console.log('Doing login', $scope.loginData);
		var request = $http({
                method: "post",
                url: "http://daydev.com/demo/login.php",
                data: {
                    username: $scope.loginData.username,
                    password: $scope.loginData.password
                },
                headers: { 'Content-Type': 'application/x-www-form-urlencoded' }
            });
            request.success(function (data) {
                $scope.message = "Console : "+data;
				if(data=="false"){
					$scope.showAlertFail();
				}else{
					$scope.showAlertSuccess();
				}
         });
  };
ภาพรวมไฟล์เป็นดังนี้
angular.module('starter.controllers', [])
.controller('AppCtrl', function($scope, $ionicModal, $timeout, $ionicPopup, $http) {

  // With the new view caching in Ionic, Controllers are only called
  // when they are recreated or on app start, instead of every page change.
  // To listen for when this page is active (for example, to refresh data),
  // listen for the $ionicView.enter event:
  //$scope.$on('$ionicView.enter', function(e) {
  //});

  // Form data for the login modal
  $scope.loginData = {};

  // Create the login modal that we will use later
  $ionicModal.fromTemplateUrl('templates/login.html', {
    scope: $scope
  }).then(function(modal) {
    $scope.modal = modal;
  });

  // Triggered in the login modal to close it
  $scope.closeLogin = function() {
    $scope.modal.hide();
  };

  // Open the login modal
  $scope.login = function() {
    $scope.modal.show();
  };

  // Perform the login action when the user submits the login form
  $scope.doLogin = function() {
    console.log('Doing login', $scope.loginData);
		var request = $http({
                method: "post",
                url: "http://daydev.com/demo/login.php",
                data: {
                    username: $scope.loginData.username,
                    password: $scope.loginData.password
                },
                headers: { 'Content-Type': 'application/x-www-form-urlencoded' }
            });
            request.success(function (data) {
                $scope.message = "Console : "+data;
				if(data=="false"){
					$scope.showAlertFail();
				}else{
					$scope.showAlertSuccess();
				}
         });
  };

  $scope.showAlertFail = function() {
	   var alertPopup = $ionicPopup.alert({
		 title: 'Login Fail!',
		 template: 'Invalid Username and Password '
	   });
  };

  $scope.showAlertSuccess = function() {
	   var alertPopup = $ionicPopup.alert({
		 title: 'Login Success!',
		 template: 'Welcome Back: "'+ $scope.loginData.username +'"'
	   });
	   $scope.modal.hide();
  };
})


.controller('PlaylistsCtrl', function($scope) {
  $scope.playlists = [
    { title: 'Reggae', id: 1 },
    { title: 'Chill', id: 2 },
    { title: 'Dubstep', id: 3 },
    { title: 'Indie', id: 4 },
    { title: 'Rap', id: 5 },
    { title: 'Cowbell', id: 6 }
  ];
})


.controller('PlaylistCtrl', function($scope, $stateParams) {
});
ทดสอบเล็กน้อยดูที่ log บน console
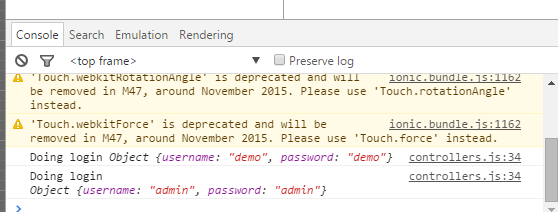
ทดสอบก็จะได้ว่าทำงานได้ 100%
ทบทวนบทเรียนย้อนหลังได้ที่ https://www.daydev.com/category/developer/angularjs