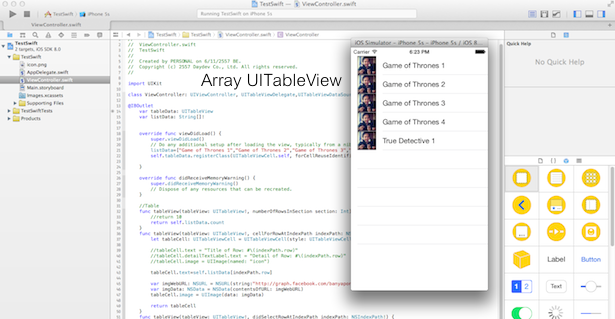
ตัวอย่างวิธีการเขียนแอพพลิเคชันบน iPhone ระบบปฏิบัติการ iOS8 ด้วยภาษา Swift ในการนำชุดตัวแปรข้อมูล Array มาแสดงผลผ่าน UITableView อย่างง่ายด้วย XCode6 BETA
ตัวอย่างเดียวหากินนาน เลยกับภาษา Swift ซึ่งในรอบนี้ก็ยังคงขอแนะนำให้ศึกษาบทความก่อนหน้านี่ก่อนเหมือนเดิมเพื่อความเข้าใจ
- รู้จักภาษาโปรแกรม Swift สำหรับแพลตฟอร์ม iOS ของ Apple
- Fundamental พื้นฐานของภาษา Swift ตอนที่ 1
- เขียนแอพ iPhone บน iOS8 ภาษา Swift ด้วย Xcode6 BETA
- เขียนแอพ iPhone บน iOS8 ภาษา Swift กับ UITableView
- เขียนแอพ iPhone ภาษา Swift กับการแทรก Image บน UITableView
- เขียนแอพ iPhone ภาษา Swift ใช้ UIAlertView ร่วมกับ UITableView
รอบนี้จะใช้ ตัวอย่าง จากบทความ
มาใช้ประกอบการพัฒนาแอพพลิเคชัน เริ่มต้นให้ลอง เปิดไฟล์ ViewController.swift ขึ้นมา
พิจารณาส่วนบรรทัดนี้ครับ
import UIKit

class ViewController: UIViewController, UITableViewDelegate{

    override func viewDidLoad() {
ให้เพิ่ม UITableViewDataSource และ IBOutlet ขึ้นมาใหม่ แก้ไขจากเดิมให้เป็นดังนี้
import UIKit

class ViewController: UIViewController, UITableViewDelegate,UITableViewDataSource{

@IBOutlet
    var tableData: UITableView
    var listData: String[]!


    override func viewDidLoad() {
โดยมีการกำหนด ตัวแปร tableData ขึ้นมาเก็บค่าของ UITableView และสร้างชุดข้อมูล String ขึ้นมา ต่อมาให้แก้ไขที่ Function viewDidLoad() ครับ
 override func viewDidLoad() {
        super.viewDidLoad()
        // Do any additional setup after loading the view, typically from a nib.
        listData=[
            "Game of Thrones 1",
            "Game of Thrones 2",
            "Game of Thrones 3",
            "Game of Thrones 4",
            "True Detective 1"]
        self.tableData.registerClass(UITableViewCell.self, forCellReuseIdentifier: "Cell")

    }
สร้างชุด Array ข้อมูลของรายการหนังซีรีย์ที่ดูอยู่ก่อนแล้วกัน เก็บลงในตัวแปร Array ชื่อ listData
ต่อมาเราจับข้อมูลมาโชว์ลงใน UITableView ทันทีครับ โดยการแก้ไข สอง Function นี้
//Table
    func tableView(tableView: UITableView!, numberOfRowsInSection section: Int) -> Int{
        return 10

    }
    func tableView(tableView: UITableView!, cellForRowAtIndexPath indexPath: NSIndexPath!) -> UITableViewCell{
        let tableCell: UITableViewCell = UITableViewCell(style: UITableViewCellStyle.Subtitle, reuseIdentifier: "Cell")

        tableCell.text = "Title of Row: #\(indexPath.row)"
        tableCell.detailTextLabel.text = "Detail of Row: #\(indexPath.row)"
        //tableCell.image = UIImage(named: "icon")


        var imgWebURL: NSURL = NSURL(string:"http://graph.facebook.com/banyapon/picture/")
        var imgData: NSData = NSData(contentsOfURL: imgWebURL)
        tableCell.image = UIImage(data: imgData)

        return tableCell
    }
ให้เป็น
//Table
    func tableView(tableView: UITableView!, numberOfRowsInSection section: Int) -> Int{
        return self.listData.count
    }
    func tableView(tableView: UITableView!, cellForRowAtIndexPath indexPath: NSIndexPath!) -> UITableViewCell{
        let tableCell: UITableViewCell = UITableViewCell(style: UITableViewCellStyle.Subtitle, reuseIdentifier: "Cell")

        tableCell.text=self.listData[indexPath.row]

        var imgWebURL: NSURL = NSURL(string:"http://graph.facebook.com/banyapon/picture/")
        var imgData: NSData = NSData(contentsOfURL: imgWebURL)
        tableCell.image = UIImage(data: imgData)

        return tableCell
    }
อธิบายคือการ Return ค่าแถวให้เป็น return listData และ ให้ แสดงผลข้อมูล Cell
tableCell.text=self.listData[indexPath.row]
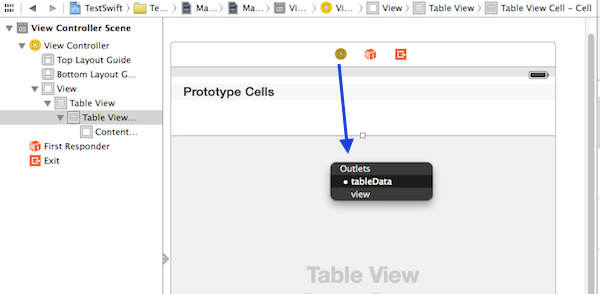
ไปที่ MainStoryBoard ทำการกด Ctrl แล้วคลิกจาก ViewController iCon ไปที่ TableView เหมือนรูป
ทำการ Run แอพพลิเคชัน ของเราอีกครั้ง ก็เรียบร้อยครับ