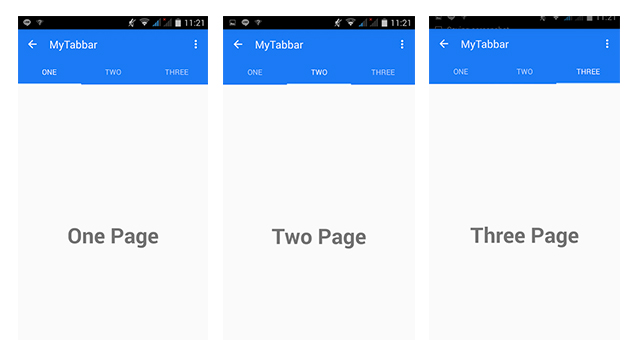
การออกแบบ UI บนแอพพลิเคชัน Android ด้วย Material Design ในการเรียกใช้ Tab และการจับการ Swipe ตอนสัมผัสหน้าจอร่วมกับ Fragment เบื้องต้นสำหรับผู้ออกแบบ UIApps
ก่อนจะเข้าบทเรียนนี้แนะนำให้ศึกษาบทเรียนต่อไปนี้ครับ
- บทเรียน Android เบื้องต้น
- เขียนแอพ Android การปรับ UI ด้วย Material Design
- เขียนแอพ Android การใช้ CardView ร่วมกับ UI
- เขียนแอพ Android แต่ง UI ToolBar ด้วย Material Design
ถ้าศึกษาเรียบร้อยแล้วเรามาเริ่มบทเรียนนี้กัน จะเป็นการใช้ Android Styles และ Tab แบบ Material Design ครับ
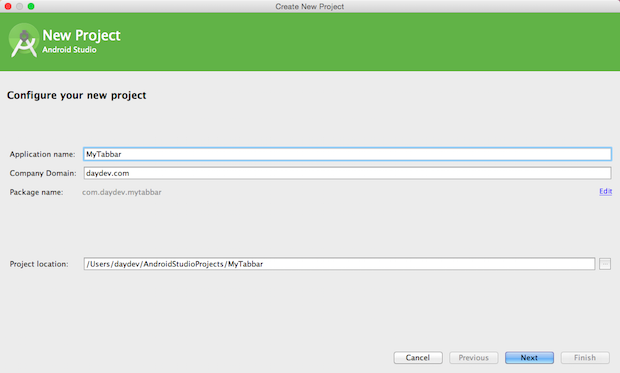
สร้าง New Project ใหม่เป็น Blank Activity ครับ เสร็จแล้วแก้ไข gradle.app (Build) ต่อไปนี้ครับ
dependencies {
    compile fileTree(dir: 'libs', include: ['*.jar'])
    compile 'com.android.support:appcompat-v7:23.0.1'
    compile 'com.android.support:design:23.0.1'
}
หากมีการ Sync แล้วมีการอัพเด็ตเพิ่มให้อัพเด็ตไปเลย
สร้างไฟล์ colors.xml ใน Folder ชื่อ values ครับ
<?xml version="1.0" encoding="utf-8"?>
<resources>
    <color name="colorPrimary">#1c7af5</color>
    <color name="colorPrimaryDark">#1c7af5</color>
    <color name="textColorPrimary">#FFFFFF</color>
    <color name="windowBackground">#FFFFFF</color>
    <color name="navigationBarColor">#000000</color>
    <color name="colorAccent">#c8e8ff</color>
</resources>
เลือกสีตามใจชอบครับ แล้วต่อด้วยปรับแก้ไฟล์ dimens.xml
<resources>
    <!-- Default screen margins, per the Android Design guidelines. -->
    <dimen name="activity_horizontal_margin">16dp</dimen>
    <dimen name="activity_vertical_margin">16dp</dimen>
    <dimen name="tab_max_width">264dp</dimen>
    <dimen name="tab_padding_bottom">16dp</dimen>
    <dimen name="tab_label">14sp</dimen>
    <dimen name="custom_tab_layout_height">72dp</dimen>
</resources>
แก้ไขไฟล์ styles.xml ให้เราสร้าง ธีมใหม่เข้าไปครับตั้งชื่อว่า “MyThemeDaydev”
<resources>

    <style name="MyThemesDaydev" parent="MyMaterialTheme.Base">

    </style>

    <style name="MyMaterialTheme.Base" parent="Theme.AppCompat.Light.DarkActionBar">
        <item name="windowNoTitle">true</item>
        <item name="windowActionBar">false</item>
        <item name="colorPrimary">@color/colorPrimary</item>
        <item name="colorPrimaryDark">@color/colorPrimaryDark</item>
        <item name="colorAccent">@color/colorAccent</item>
    </style>
</resources>
สุดท้ายแก้ไขไฟล์ AndroidManifest.xml
<?xml version="1.0" encoding="utf-8"?>
<manifest xmlns:android="http://schemas.android.com/apk/res/android"
    package="com.daydev.mytabbar" >

    <application
        android:allowBackup="true"
        android:icon="@mipmap/ic_launcher"
        android:label="@string/app_name"
        android:theme="@style/MyThemesDaydev" >
        <activity
            android:name=".MainActivity"
            android:label="@string/app_name" >
            <intent-filter>
                <action android:name="android.intent.action.MAIN" />

                <category android:name="android.intent.category.LAUNCHER" />
            </intent-filter>
        </activity>
    </application>

</manifest>
สังเกตจะเห็นว่าแก้ไขแค่ส่วนของ
android:theme="@style/MyThemesDaydev" >
เท่านั้น แก้ไขเพียงจุดเดียว
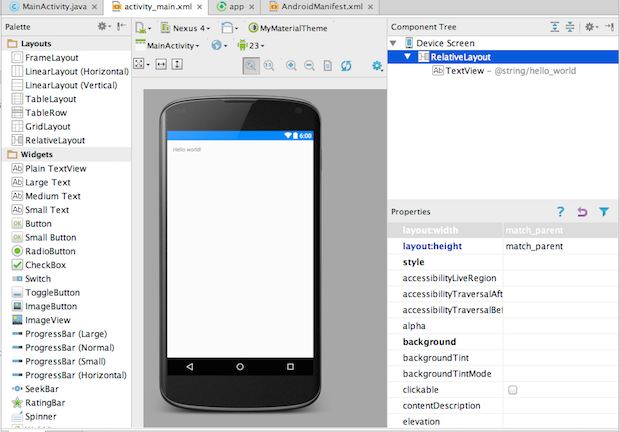
ทดสอบดูก็จะเห็นว่าสวยดี ต่อมาเราจะสร้างหน้า Detail สำหรับใช้ร่วมกับ Tab Bar ครับ ให้เราคลิกสร้าง Blank Fragment Activity ตามนี้ครับ
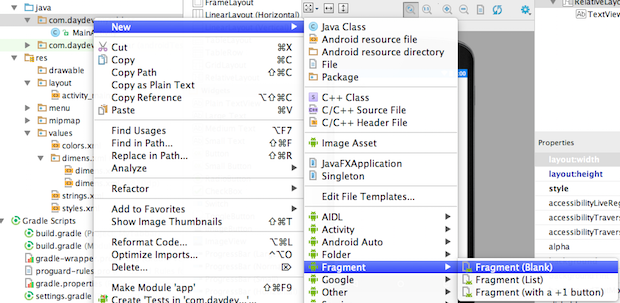
ตั้งชื่อว่า OneFragment.java และ fragment_one.xml ซะ
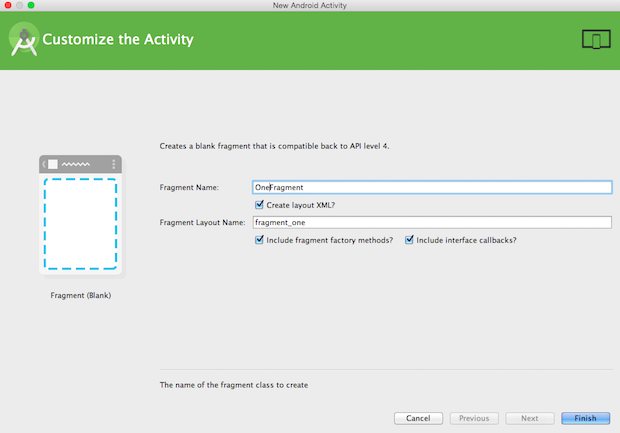
ใส่ code ครับไฟล์ OneFragment.java ให้แก้ไขเป็นดังนี้
package com.daydev.mytabbar;

import android.app.Activity;
import android.net.Uri;
import android.os.Bundle;
import android.support.v4.app.Fragment;
import android.view.LayoutInflater;
import android.view.View;
import android.view.ViewGroup;

public class OneFragment extends Fragment {
    public OneFragment() {
        // Required empty public constructor
    }

    @Override
    public void onCreate(Bundle savedInstanceState) {
        super.onCreate(savedInstanceState);
    }

    @Override
    public View onCreateView(LayoutInflater inflater, ViewGroup container,
                             Bundle savedInstanceState) {
        // Inflate the layout for this fragment
        return inflater.inflate(R.layout.fragment_one, container, false);
    }

}
และแก้ไขไฟล์ fragment_one.xml ตามนี้
<RelativeLayout xmlns:android="http://schemas.android.com/apk/res/android"
    xmlns:tools="http://schemas.android.com/tools"
    android:layout_width="match_parent"
    android:layout_height="match_parent"
    tools:context="com.daydev.mytabbar.OneFragment">

    <TextView
        android:layout_width="wrap_content"
        android:layout_height="wrap_content"
        android:text="@string/one"
        android:textSize="40dp"
        android:textStyle="bold"
        android:layout_centerInParent="true"/>

</RelativeLayout>
ทำซ้ำสเต็ปเดิมคือ สร้าง Blank Fragment ใหม่แต่ตั้งชื่อว่า TwoFragment, ThreeFragment
แก้ไขแค่
public class TwoFragment extends Fragment {
    public TwoFragment() {
        // Required empty public constructor
    }
และไฟล์ fragment_two.xml คือ
<RelativeLayout xmlns:android="http://schemas.android.com/apk/res/android"
    xmlns:tools="http://schemas.android.com/tools"
    android:layout_width="match_parent"
    android:layout_height="match_parent"
    tools:context="com.daydev.mytabbar.TwoFragment">
ทำแบบเดียวกันกับ ThreeFragment.java และ fragment_three.xml
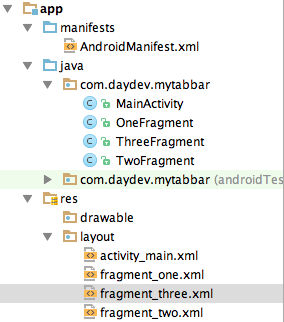
นำ Android Design ของ V23.0.1 มาใช้กับ โดยแก้ไขไฟล์ activity_main.xml ดังนี้
<android.support.design.widget.CoordinatorLayout xmlns:android="http://schemas.android.com/apk/res/android"
    xmlns:app="http://schemas.android.com/apk/res-auto"
    android:layout_width="match_parent"
    android:layout_height="match_parent">

    <android.support.design.widget.AppBarLayout
        android:layout_width="match_parent"
        android:layout_height="wrap_content"
        android:theme="@style/ThemeOverlay.AppCompat.Dark.ActionBar">

        <android.support.v7.widget.Toolbar
            android:id="@+id/toolbar"
            android:layout_width="match_parent"
            android:layout_height="?attr/actionBarSize"
            android:background="?attr/colorPrimary"
            app:layout_scrollFlags="scroll|enterAlways"
            app:popupTheme="@style/ThemeOverlay.AppCompat.Light" />

        <android.support.design.widget.TabLayout
            android:id="@+id/tabs"
            android:layout_width="match_parent"
            android:layout_height="wrap_content"
            app:tabMode="fixed"
            app:tabGravity="fill"/>
    </android.support.design.widget.AppBarLayout>

    <android.support.v4.view.ViewPager
        android:id="@+id/viewpager"
        android:layout_width="match_parent"
        android:layout_height="match_parent"
        app:layout_behavior="@string/appbar_scrolling_view_behavior"  />
</android.support.design.widget.CoordinatorLayout>
เป็นการสร้าง Tabs ขึ้นมาบนรูปแบบของ Material Design ครับ ต่อมาให้ไปแก้ไข MainActivity.java ตามนี้
ประกาศ Header ก่อน
import android.support.v7.app.ActionBarActivity;
import android.os.Bundle;
import android.view.Menu;
import android.view.MenuItem;
import android.support.design.widget.TabLayout;
import android.support.v4.app.Fragment;
import android.support.v4.app.FragmentManager;
import android.support.v4.app.FragmentPagerAdapter;
import android.support.v4.view.ViewPager;
import android.support.v7.app.AppCompatActivity;
import android.support.v7.widget.Toolbar;

import java.util.ArrayList;
import java.util.List;

import com.daydev.mytabbar.R;
import com.daydev.mytabbar.OneFragment;
import com.daydev.mytabbar.TwoFragment;
import com.daydev.mytabbar.ThreeFragment;
บน OnCreate() แก้เพิ่มดังนี้
public class MainActivity extends AppCompatActivity {

    private Toolbar toolbar;
    private TabLayout tabLayout;
    private ViewPager viewPager;

    @Override
    protected void onCreate(Bundle savedInstanceState) {
        super.onCreate(savedInstanceState);
        setContentView(R.layout.activity_main);

        toolbar = (Toolbar) findViewById(R.id.toolbar);
        setSupportActionBar(toolbar);

        getSupportActionBar().setDisplayHomeAsUpEnabled(true);

        viewPager = (ViewPager) findViewById(R.id.viewpager);
        setupViewPager(viewPager);

        tabLayout = (TabLayout) findViewById(R.id.tabs);
        tabLayout.setupWithViewPager(viewPager);
    }
สร้าง class เพิ่มคือ
class ViewPagerAdapter extends FragmentPagerAdapter {
        private final List<Fragment> mFragmentList = new ArrayList<>();
        private final List<String> mFragmentTitleList = new ArrayList<>();

        public ViewPagerAdapter(FragmentManager manager) {
            super(manager);
        }

        @Override
        public Fragment getItem(int position) {
            return mFragmentList.get(position);
        }

        @Override
        public int getCount() {
            return mFragmentList.size();
        }

        public void addFragment(Fragment fragment, String title) {
            mFragmentList.add(fragment);
            mFragmentTitleList.add(title);
        }

        @Override
        public CharSequence getPageTitle(int position) {
            return mFragmentTitleList.get(position);
        }
    }
เพิ่มฟังก์ชันเรียกใช้ Fragment View ไปยัดใน Tab item
private void setupViewPager(ViewPager viewPager) {
        ViewPagerAdapter adapter = new ViewPagerAdapter(getSupportFragmentManager());
        adapter.addFragment(new OneFragment(),"One");
        adapter.addFragment(new TwoFragment(),"Two");
        adapter.addFragment(new ThreeFragment(),"Three");
        viewPager.setAdapter(adapter);
    }
ภาพรวมไฟล์ MainActivity.java
package com.daydev.mytabbar;

import android.support.v7.app.ActionBarActivity;
import android.os.Bundle;
import android.view.Menu;
import android.view.MenuItem;
import android.support.design.widget.TabLayout;
import android.support.v4.app.Fragment;
import android.support.v4.app.FragmentManager;
import android.support.v4.app.FragmentPagerAdapter;
import android.support.v4.view.ViewPager;
import android.support.v7.app.AppCompatActivity;
import android.support.v7.widget.Toolbar;

import java.util.ArrayList;
import java.util.List;

import com.daydev.mytabbar.R;
import com.daydev.mytabbar.OneFragment;
import com.daydev.mytabbar.TwoFragment;
import com.daydev.mytabbar.ThreeFragment;

public class MainActivity extends AppCompatActivity {

    private Toolbar toolbar;
    private TabLayout tabLayout;
    private ViewPager viewPager;

    @Override
    protected void onCreate(Bundle savedInstanceState) {
        super.onCreate(savedInstanceState);
        setContentView(R.layout.activity_main);

        toolbar = (Toolbar) findViewById(R.id.toolbar);
        setSupportActionBar(toolbar);

        getSupportActionBar().setDisplayHomeAsUpEnabled(true);

        viewPager = (ViewPager) findViewById(R.id.viewpager);
        setupViewPager(viewPager);

        tabLayout = (TabLayout) findViewById(R.id.tabs);
        tabLayout.setupWithViewPager(viewPager);
    }

    private void setupViewPager(ViewPager viewPager) {
        ViewPagerAdapter adapter = new ViewPagerAdapter(getSupportFragmentManager());
        adapter.addFragment(new OneFragment(),"One");
        adapter.addFragment(new TwoFragment(),"Two");
        adapter.addFragment(new ThreeFragment(),"Three");
        viewPager.setAdapter(adapter);
    }


    class ViewPagerAdapter extends FragmentPagerAdapter {
        private final List<Fragment> mFragmentList = new ArrayList<>();
        private final List<String> mFragmentTitleList = new ArrayList<>();

        public ViewPagerAdapter(FragmentManager manager) {
            super(manager);
        }

        @Override
        public Fragment getItem(int position) {
            return mFragmentList.get(position);
        }

        @Override
        public int getCount() {
            return mFragmentList.size();
        }

        public void addFragment(Fragment fragment, String title) {
            mFragmentList.add(fragment);
            mFragmentTitleList.add(title);
        }

        @Override
        public CharSequence getPageTitle(int position) {
            return mFragmentTitleList.get(position);
        }
    }


    @Override
    public boolean onCreateOptionsMenu(Menu menu) {
        // Inflate the menu; this adds items to the action bar if it is present.
        getMenuInflater().inflate(R.menu.menu_main, menu);
        return true;
    }

    @Override
    public boolean onOptionsItemSelected(MenuItem item) {
        // Handle action bar item clicks here. The action bar will
        // automatically handle clicks on the Home/Up button, so long
        // as you specify a parent activity in AndroidManifest.xml.
        int id = item.getItemId();

        //noinspection SimplifiableIfStatement
        if (id == R.id.action_settings) {
            return true;
        }

        return super.onOptionsItemSelected(item);
    }
}
ทดสอบการทำงาน โดยการ Swipe หน้าจอไปมา หรือแตะที่ Tab ดูเพื่อทดสอบ
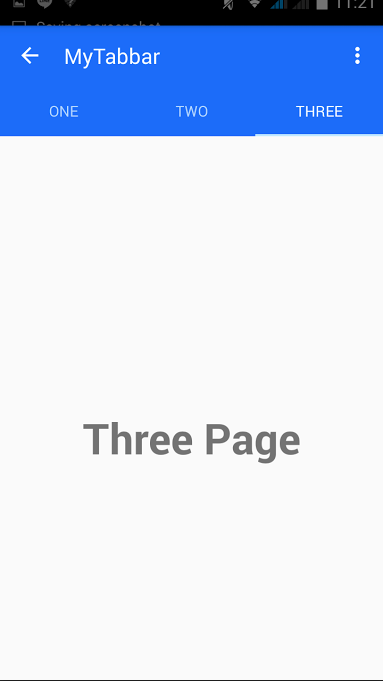
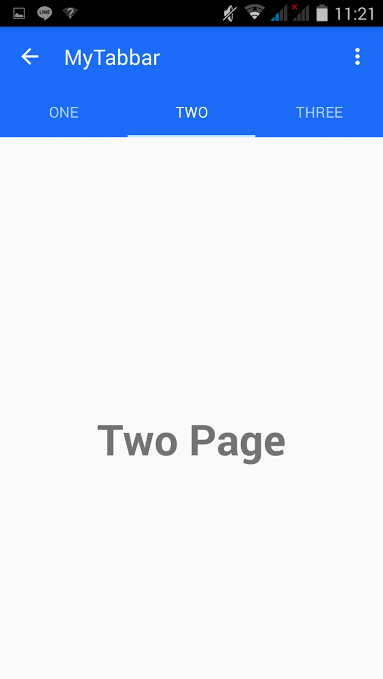

สนุกไหมล่ะ Material Design สำหรับ Android