บทเรียนการเขียนเกมแนว Temple Run ด้วย Unity 3D ตอนที่ 4 การใส่ Game Logic เข้าไปในเกมของเราให้เกิดเงื่อนไขเวลาที่ ชน เหรียญได้คะแนน หรือชนศัตรูแล้วเสียแต้ม
ก่อนจะศึกษาบทเรียนนี้แนะนำให้ศึกษาบทเรียนก่อนหน้านี้
- Workshop เขียนเกมแนว Temple Run ด้วย Unity 3D ตอนที่ 1
- Workshop เขียนเกมแนว Temple Run ด้วย Unity 3D ตอนที่ 2
- Workshop เขียนเกมแนว Temple Run ด้วย Unity 3D ตอนที่ 3
ในบทเรียนนี้จะเป็นการ ใส่ Game Logic หรือ Game Play ลงไปในเกมของเรา ซึ่งถ้าเราได้มีการออกแบบ Game Worlds และ Storyboard ไว้แล้ว
Game Logic ที่คิดไว้กับ Workshop ตัวนี้จะเป็นดังนี้
เมื่อเริ่มเกม
- คะแนนจะเป็น 0 เวลาเริ่มต้นของเกมจะเริ่มที่ 10 วินาที และลดลงทีละ 1 วินาที
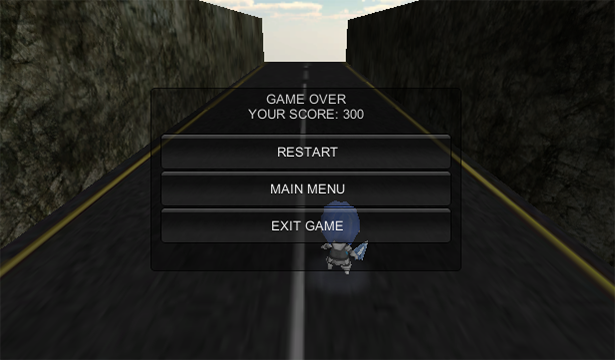
- หากเวลาเป็น 0 จะแสดงหน้าจอ Game Over พร้อมประกาศผลคะแนน และปุ่ม Restart เพื่อเล่นเกมใหม่
ตัวละคร
- คะแนนจะเพิ่มเมื่อเก็บเหรียญได้ ทีละ 50 แต้มโดยนำไปคูณกับจำนวนเวลาที่เหลือ
- เวลาในเกมจะมีผลกับตัวละครเมื่อเก็บเหรียญได้ เวลาจะเพิ่มขึ้น
- เมื่อชนตัวศัตรู เวลาจะลดลง ทำให้เวลาในเกมนับถอยหลังเหลือเวลาน้อยลง มีผลต่อคะแนน
หน้าจอของเกม
- มี GUI บอกเวลานับถอยหลัง
- มี GUI บอกจำนวน Score ของเรา
มาเริ่มกันดีกว่า
ในบทเรียนก่อนหน้านี้จะมี GameObject ที่เป็น Empty Object ที่เราสร้างไว้เพื่อกำหนดในบทความ
เราจะทำการเพิ่ม Component ส่วนของ Code C# มาอีกตัว ก่อนอื่นให้เราสร้างไฟล์ C# มาใหม่ชื่อว่า GameLogic.cs
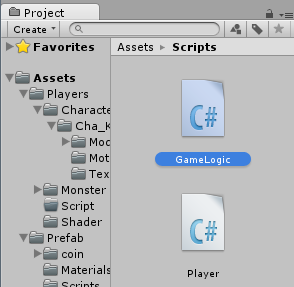
ประกาศ Public ไว้
float timeRemaining = 10;
float timeExtension = 3f;
float timeDeduction = 2f;
float totalTimeElapsed = 0;
float score=0f;
public bool isGameOver = false;
เวลาเริ่มต้นในเกมคือ 10 วินาที จะมีการเพิ่มและลดคือ 2f คะแนนเป็น Score เก็บไว้เริ่มต้นที่ 0 สร้างตัวแปร Boolean ว่า isGameOver สำหรับบอกสถานะว่า Game Over หรือยังปรับให้เป็น False เมื่อเริ่มต้น
เพิ่มคำสั่งใน ฟังก์ชัน Update() ทันทีตามนี้
if(isGameOver)
    return;

   totalTimeElapsed += Time.deltaTime;
   score = totalTimeElapsed*50;
   timeRemaining -= Time.deltaTime;
	if(timeRemaining <= 0){
		isGameOver = true;
	}
ถ้า GameOver ให้ออกจากฟังก์ชัน คะแนน Score จะเพิ่มจากเวลาที่เหลือ จากลดหรือเพิ่ม คูณ 50 คะแนน ถ้า timeRemaining หรือเวลาในเกมเหลือ 0 ให้เปลี่ยนสถานะของ isGameOver เป็น True นั่นคือ Game Over ครับ
สร้างฟังก์ชันใหม่ขึ้นมาคือ OnGUI() เขียนคำสั่งเกี่ยวกับ GUI หน้าจอเมนูเมื่อเกม Game Over ลงไปดังนี้
void OnGUI()
	{

		if(!isGameOver)
		{
			GUI.Label(new Rect(10, 10, Screen.width/5,
			                   Screen.height/6),
			"TIME LEFT: "+((int)timeRemaining).ToString());
			GUI.Label(new Rect(Screen.width-(Screen.width/6), 10,
			                   Screen.width/6, Screen.height/6),
			"SCORE: "+((int)score).ToString());
		}

		else
		{
			Time.timeScale = 0;

			//Show Total Score
			GUI.Box(new Rect(Screen.width/4,
			                 Screen.height/4,
			                 Screen.width/2,
			                 Screen.height/2),
			"GAME OVER\nYOUR SCORE: "+(int)score);

			//Restart Game
			if (GUI.Button(new Rect(Screen.width/4+10,
			                        Screen.height/4+Screen.height/10+10,
			                        Screen.width/2-20, Screen.height/10),
			    "RESTART")){
				Application.LoadLevel(Application.loadedLevel);
			}
		}
	}
ถ้ายังไม่อยู่ในสถานะ Game Over ให้สร้าง Label ขึ้นมาอยู่มุมซ้าย และ ขวา บนของเกม เป็นการแสดงผลตัวแปร Score และ Time Remaining ของเรา
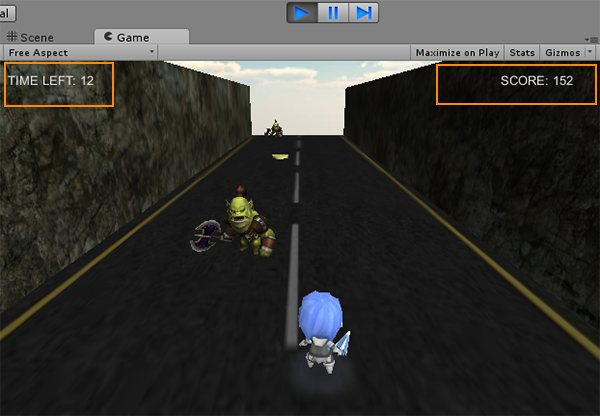
หากอยู่ในสถานะของ Game Over แล้วให้เข้าเงื่อนไขการสร้าง GUI ใหม่คือ
//Show Total Score
			GUI.Box(new Rect(Screen.width/4,
			                 Screen.height/4,
			                 Screen.width/2,
			                 Screen.height/2),
			"GAME OVER\nYOUR SCORE: "+(int)score);

			//Restart Game
			if (GUI.Button(new Rect(Screen.width/4+10,
			                        Screen.height/4+Screen.height/10+10,
			                        Screen.width/2-20, Screen.height/10),
			    "RESTART")){
				Application.LoadLevel(Application.loadedLevel);
			}
เพื่อบอก คะแนน Total Score ของเรา และแสดงปุ่ม Restart เกมเพื่อเริ่มเกมใหม่ ใช้คำสั่งโหลดเกมเข้า Scene เดิมตามนี้
Application.LoadLevel(Application.loadedLevel);
ไปที่ Hierarchy เลือก GameObject ที่เราสร้างไว้ชื่อ “GameController”

ทำการ Add Component ส่วนของ Script GameLogic.cs เข้าไป
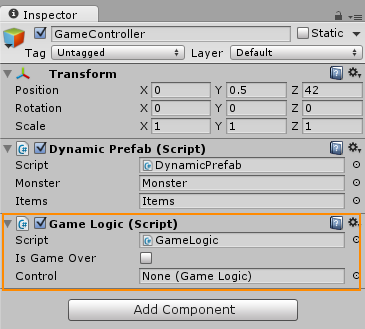
แก้ไข GameLogic.cs อีกครั้งใน Mono Develop ให้เพิ่มฟังก์ชันชื่อ GetItems() และ CrashMonster() เข้าไปเพื่อทำเงื่อนไข เพิ่มเวลาเมื่อได้เหรียญ และ ลดเวลาเมื่อชนศัตรู
public void GetItems()
	{
		timeRemaining += timeExtension;
	}

	public void CrashMonster()
	{
		timeRemaining -= timeDeduction;
	}
ภาพรวมของไฟล์ GameLogic.cs จะเป็นดังนี้
using UnityEngine;
using System.Collections;

public class GameLogic : MonoBehaviour {
	float timeRemaining = 10;
	float timeExtension = 3f;
	float timeDeduction = 2f;
	float totalTimeElapsed = 0;
	float score=0f;
	public bool isGameOver = false;

	void Start () {
		Time.timeScale = 1;
	}


	void Update () {
		if(isGameOver)
			return;      //move out of the function

		totalTimeElapsed += Time.deltaTime;
		score = totalTimeElapsed*50;
		timeRemaining -= Time.deltaTime;
		if(timeRemaining <= 0){
			isGameOver = true;
		}
	}

	public void GetItems()
	{
		timeRemaining += timeExtension;
	}

	public void CrashMonster()
	{
		timeRemaining -= timeDeduction;
	}

	void OnGUI()
	{

		if(!isGameOver)
		{
			GUI.Label(new Rect(10, 10, Screen.width/5,
			                   Screen.height/6),
			"TIME LEFT: "+((int)timeRemaining).ToString());
			GUI.Label(new Rect(Screen.width-(Screen.width/6), 10,
			                   Screen.width/6, Screen.height/6),
			"SCORE: "+((int)score).ToString());
		}

		else
		{
			Time.timeScale = 0;

			//Show Total Score
			GUI.Box(new Rect(Screen.width/4,
			                 Screen.height/4,
			                 Screen.width/2,
			                 Screen.height/2),
			"GAME OVER\nYOUR SCORE: "+(int)score);

			//Restart Game
			if (GUI.Button(new Rect(Screen.width/4+10,
			                        Screen.height/4+Screen.height/10+10,
			                        Screen.width/2-20, Screen.height/10),
			    "RESTART")){
				Application.LoadLevel(Application.loadedLevel);
			}

		}
	}

}
กลับมาที่ ตัวละครของเราให้คลิกที่ตัว player แก้ไขไฟล์ Player.cs อีกครั้ง ทำการ Include ไฟล์ GameLogic.cs ให้ใช้ตัวแปรร่วมใน Player.cs ได้
using UnityEngine;
using System.Collections;

public class Player : MonoBehaviour {

   	public GameLogic control; //เพิ่มเข้าไป
แล้วนำฟังก์ชันจาก GameLogic.cs ไปใส่ในเงื่อนไข OnTrigger ใน Player ได้เลย
void OnTriggerEnter(Collider other)
	{
		if(other.gameObject.name == "Items(Clone)")
		{
			control.GetItems();
		}
		else if(other.gameObject.name == "Monster(Clone)")
		{
			control.CrashMonster();
		}
		Destroy(other.gameObject);            //destroy the snag or powerup if colllected by the player

	}
ภาพรวมไฟล์ Player.cs จะเป็นดังนี้
using UnityEngine;
using System.Collections;

public class Player : MonoBehaviour {

	public GameLogic control;

	CharacterController controller;
	bool isGrounded= false;
	public float PlayerSpeed = 6.0f;
	public float PlayerJumpSpeed = 8.0f;
	public float gravity = 20.0f;
	private Vector3 PlayerMoveDirection = Vector3.zero;

	void Start () {
		controller = GetComponent<CharacterController>();
	}
	void Update () {
		if (controller.isGrounded) {
			animation.Play("Walk");
			PlayerMoveDirection = new Vector3(Input.GetAxis("Horizontal"), 0, 0);
			PlayerMoveDirection = transform.TransformDirection(PlayerMoveDirection);
			PlayerMoveDirection *= PlayerSpeed;

			if (Input.GetButton ("Jump")) {
				animation.Stop("run");
				animation.Play("Attack");
				PlayerMoveDirection.y = PlayerJumpSpeed;
			}
			if(controller.isGrounded)
				isGrounded = true;
		}

		PlayerMoveDirection.y -= gravity * Time.deltaTime;
		controller.Move(PlayerMoveDirection * Time.deltaTime);
	}


	void OnTriggerEnter(Collider other)
	{
		if(other.gameObject.name == "Items(Clone)")
		{
			//Items
			control.GetItems();
		}
		else if(other.gameObject.name == "Monster(Clone)")
		{
			//Monster
			control.CrashMonster();
		}
		Destroy(other.gameObject);

	}

}
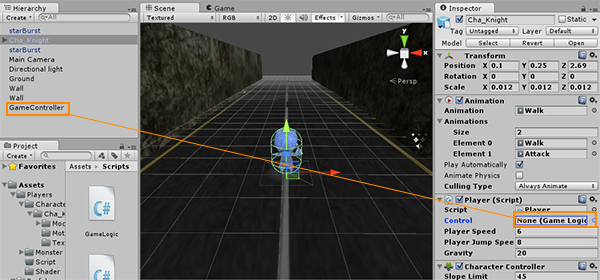
ไปที่ ส่วนของ Component ใน Inspector เราจะพบว่า Control ยังเป็นค่าว่าง
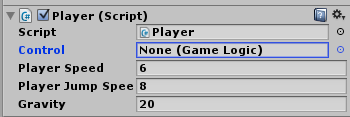
ให้ลาก GameController จาก Hierarchy ไปวางในส่วน Control ทันที
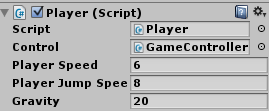
เมื่อเสร็จแล้วจะเป็นดังนี้
ทดสอบการ Run ตัว Game ของเราทันที
ส่วนของวีดีโอ ผลลัพธ์ เป็นดังนี้