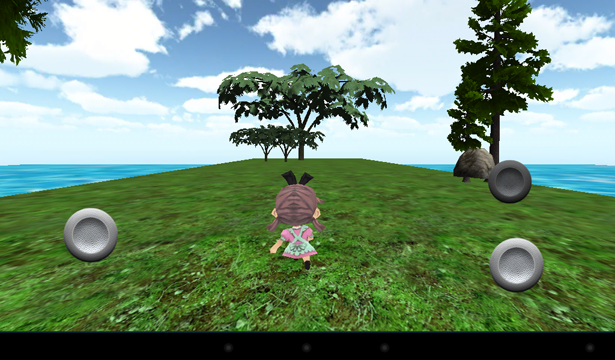
บทเรียนในตอนนี้จะเป็นการควบคุมตัวละครด้วย Mobile Joystick ซึ่งเป็น Assets Package หนึ่งของ Unity 3D สำหรับคนที่ต้องการสร้างเกมบน Mobile ครับ
ก่อนจะเรียนรู้ในบทเรียนนี้แนะนำให้ไปศึกษาบทเรียนก่อนๆ หน้านี้ที่ https://www.daydev.com/category/developer/s11-game-development
เริ่มต้นด้วยการเปิด โปรแกรมขึ้นมา แล้วสร้าง Scene ตามใจชอบได้เลยครับ
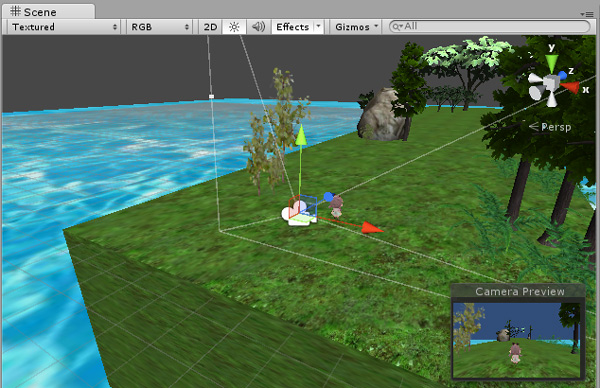
ทีนี้ก็ส่วนของตัวละคร ผมเลือกซื้อจาก Asset Store ของ Unity เวลามันลดราคาครับเพราะขี้เกียจ Rigged 3D โมเดลเองดังนั้นพอซื้อเสร็จก็ลากไปใช้ในเกมเลย เปลี่ยน Texture เล็กน้อย
หลังจากนั้นให้ไปที่ Assets > Import Package เลือก Standard Assets (Mobile) เพื่อเรียกเจ้า Virtual JoyStick มาใช้งานครับ
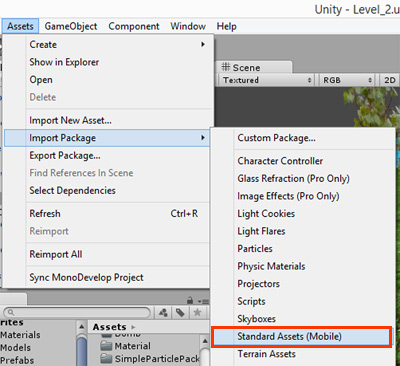
ใน Standard Assets (Mobile) นั้นจะมี Prefabs ให้เราเลือกใช้ดังนี้ครับ
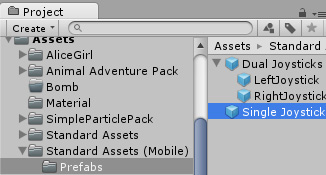
ลากเจ้า Double JoyStick และ Single JoyStick ไปวางใน Hierarchy เลย
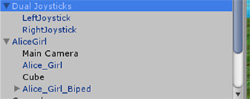
จัดตำแหน่งหน้าจอดีๆ และขนาดปุ่มดีๆ
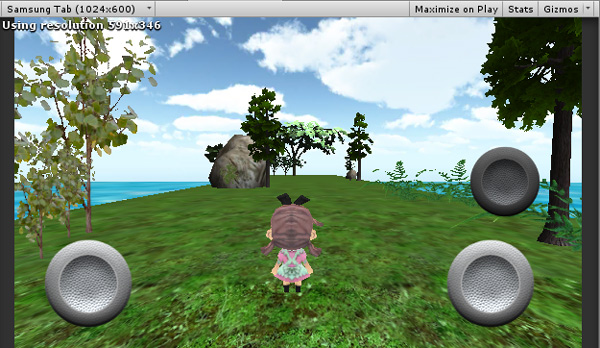
ถ้าเป็น Unity 4.6 จะมี Code Javascript มาให้ถ้าเก่ากว่านั้นให้ ใส่ Code ชื่อ Joystick.js ลงไปที่ปุ่ม LeftJoyStick และ RightJoystick ครับ

#pragma strict

@script RequireComponent( GUITexture )

// A simple class for bounding how far the GUITexture will move
class Boundary
{
	var min : Vector2 = Vector2.zero;
	var max : Vector2 = Vector2.zero;
}

static private var joysticks : Joystick[];					// A static collection of all joysticks
static private var enumeratedJoysticks : boolean = false;
static private var tapTimeDelta : float = 0.3;				// Time allowed between taps

var touchPad : boolean; 									// Is this a TouchPad?
var touchZone : Rect;
var deadZone : Vector2 = Vector2.zero;						// Control when position is output
var normalize : boolean = false; 							// Normalize output after the dead-zone?
var position : Vector2; 									// [-1, 1] in x,y
var tapCount : int;											// Current tap count

private var lastFingerId = -1;								// Finger last used for this joystick
private var tapTimeWindow : float;							// How much time there is left for a tap to occur
private var fingerDownPos : Vector2;
private var fingerDownTime : float;
private var firstDeltaTime : float = 0.5;

private var gui : GUITexture;								// Joystick graphic
private var defaultRect : Rect;								// Default position / extents of the joystick graphic
private var guiBoundary : Boundary = Boundary();			// Boundary for joystick graphic
private var guiTouchOffset : Vector2;						// Offset to apply to touch input
private var guiCenter : Vector2;							// Center of joystick

function Start()
{
	// Cache this component at startup instead of looking up every frame
	gui = GetComponent( GUITexture );

	// Store the default rect for the gui, so we can snap back to it
	defaultRect = gui.pixelInset;

    defaultRect.x += transform.position.x * Screen.width;// + gui.pixelInset.x; // -  Screen.width * 0.5;
    defaultRect.y += transform.position.y * Screen.height;// - Screen.height * 0.5;

    transform.position.x = 0.0;
    transform.position.y = 0.0;

	if ( touchPad )
	{
		// If a texture has been assigned, then use the rect ferom the gui as our touchZone
		if ( gui.texture )
			touchZone = defaultRect;
	}
	else
	{
		// This is an offset for touch input to match with the top left
		// corner of the GUI
		guiTouchOffset.x = defaultRect.width * 0.5;
		guiTouchOffset.y = defaultRect.height * 0.5;

		// Cache the center of the GUI, since it doesn't change
		guiCenter.x = defaultRect.x + guiTouchOffset.x;
		guiCenter.y = defaultRect.y + guiTouchOffset.y;

		// Let's build the GUI boundary, so we can clamp joystick movement
		guiBoundary.min.x = defaultRect.x - guiTouchOffset.x;
		guiBoundary.max.x = defaultRect.x + guiTouchOffset.x;
		guiBoundary.min.y = defaultRect.y - guiTouchOffset.y;
		guiBoundary.max.y = defaultRect.y + guiTouchOffset.y;
	}
}

function Disable()
{
	//gameObject.active = false;
	gameObject.SetActive(false);
	enumeratedJoysticks = false;
}

function ResetJoystick()
{
	// Release the finger control and set the joystick back to the default position
	gui.pixelInset = defaultRect;
	lastFingerId = -1;
	position = Vector2.zero;
	fingerDownPos = Vector2.zero;

	if ( touchPad )
		gui.color.a = 0.025;
}

function IsFingerDown() : boolean
{
	return (lastFingerId != -1);
}

function LatchedFinger( fingerId : int )
{
	// If another joystick has latched this finger, then we must release it
	if ( lastFingerId == fingerId )
		ResetJoystick();
}

function Update()
{
	if ( !enumeratedJoysticks )
	{
		// Collect all joysticks in the game, so we can relay finger latching messages
		joysticks = FindObjectsOfType( Joystick ) as Joystick[];
		enumeratedJoysticks = true;
	}

	var count = Input.touchCount;

	// Adjust the tap time window while it still available
	if ( tapTimeWindow > 0 )
		tapTimeWindow -= Time.deltaTime;
	else
		tapCount = 0;

	if ( count == 0 )
		ResetJoystick();
	else
	{
		for(var i : int = 0;i < count; i++) 		{ 			var touch : Touch = Input.GetTouch(i);			 			var guiTouchPos : Vector2 = touch.position - guiTouchOffset; 	 			var shouldLatchFinger = false; 			if ( touchPad ) 			{				 				if ( touchZone.Contains( touch.position ) ) 					shouldLatchFinger = true; 			} 			else if ( gui.HitTest( touch.position ) ) 			{ 				shouldLatchFinger = true; 			}		 	 			// Latch the finger if this is a new touch 			if ( shouldLatchFinger && ( lastFingerId == -1 || lastFingerId != touch.fingerId ) ) 			{ 				 				if ( touchPad ) 				{ 					gui.color.a = 0.15; 					 					lastFingerId = touch.fingerId; 					fingerDownPos = touch.position; 					fingerDownTime = Time.time; 				} 				 				lastFingerId = touch.fingerId; 				 				// Accumulate taps if it is within the time window 				if ( tapTimeWindow > 0 )
					tapCount++;
				else
				{
					tapCount = 1;
					tapTimeWindow = tapTimeDelta;
				}

				// Tell other joysticks we've latched this finger
				for ( var j : Joystick in joysticks )
				{
					if ( j != this )
						j.LatchedFinger( touch.fingerId );
				}
			}

			if ( lastFingerId == touch.fingerId )
			{
				// Override the tap count with what the iPhone SDK reports if it is greater
				// This is a workaround, since the iPhone SDK does not currently track taps
				// for multiple touches
				if ( touch.tapCount > tapCount )
					tapCount = touch.tapCount;

				if ( touchPad )
				{
					// For a touchpad, let's just set the position directly based on distance from initial touchdown
					position.x = Mathf.Clamp( ( touch.position.x - fingerDownPos.x ) / ( touchZone.width / 2 ), -1, 1 );
					position.y = Mathf.Clamp( ( touch.position.y - fingerDownPos.y ) / ( touchZone.height / 2 ), -1, 1 );
				}
				else
				{
					// Change the location of the joystick graphic to match where the touch is
					gui.pixelInset.x =  Mathf.Clamp( guiTouchPos.x, guiBoundary.min.x, guiBoundary.max.x );
					gui.pixelInset.y =  Mathf.Clamp( guiTouchPos.y, guiBoundary.min.y, guiBoundary.max.y );
				}

				if ( touch.phase == TouchPhase.Ended || touch.phase == TouchPhase.Canceled )
					ResetJoystick();
			}
		}
	}

	if ( !touchPad )
	{
		// Get a value between -1 and 1 based on the joystick graphic location
		position.x = ( gui.pixelInset.x + guiTouchOffset.x - guiCenter.x ) / guiTouchOffset.x;
		position.y = ( gui.pixelInset.y + guiTouchOffset.y - guiCenter.y ) / guiTouchOffset.y;
	}

	// Adjust for dead zone
	var absoluteX = Mathf.Abs( position.x );
	var absoluteY = Mathf.Abs( position.y );

	if ( absoluteX < deadZone.x )
	{
		// Report the joystick as being at the center if it is within the dead zone
		position.x = 0;
	}
	else if ( normalize )
	{
		// Rescale the output after taking the dead zone into account
		position.x = Mathf.Sign( position.x ) * ( absoluteX - deadZone.x ) / ( 1 - deadZone.x );
	}

	if ( absoluteY < deadZone.y )
	{
		// Report the joystick as being at the center if it is within the dead zone
		position.y = 0;
	}
	else if ( normalize )
	{
		// Rescale the output after taking the dead zone into account
		position.y = Mathf.Sign( position.y ) * ( absoluteY - deadZone.y ) / ( 1 - deadZone.y );
	}
}
ถ้ามีอยู่แล้วก็ตรวจสอบส่วนของ
function Disable()
{
	gameObject.active = false;
	enumeratedJoysticks = false;
}
แก้ไขเป็น
function Disable()
{
	gameObject.SetActive(false);
	enumeratedJoysticks = false;
}
ก็พอครับ
มาที่ตัวละครของเราครับให้ เพิ่ม Javascript เข้าไปใหม่ชื่อว่า Movement.js ใส่ในตัวละครของเรา (ในตัวอย่าง Model ที่ผมใช้มี Animation แนบมาให้ใช้ได้พร้อมสรรพ แล้วเลยสบาย)
#pragma strict

var speed : float = 3.0;
var rotateSpeed : float = 3.0;

var moveJoystick : Joystick;
var rotateJoystick : Joystick;


var rotationSpeed : float = 10;
var walkspeed : float= 7;
var gravity : float = 20;
private var yRot : float;
var body : Transform;


//Add
private var isGrounded : boolean = false;

function Start () {
    Time.timeScale = 1;
}

function Update () {
    var controller : CharacterController = GetComponent(CharacterController);
	//Add new code thailand
		var vertical : Vector3 = transform.TransformDirection(Vector3.forward);
		var horizontal : Vector3 = transform.TransformDirection(Vector3.right);
		var height : Vector3 = transform.TransformDirection(Vector3.up);
		// Rotate around y - axis
	    animation.CrossFade("Idle",0.2);

	    var rotatePos = Input.GetAxis ("Horizontal") ?
	                       Input.GetAxis ("Horizontal") : joyStickInput(rotateJoystick);
	    transform.Rotate(0, rotatePos * rotateSpeed, 0);

	    // Move forward / backward
	    var forward = transform.TransformDirection(Vector3.forward);
	    var movePos = Input.GetAxis ("Vertical") ?
	                     Input.GetAxis ("Vertical") : joyStickInput(moveJoystick);

	   var curSpeed = speed * movePos;
	   controller.SimpleMove(forward * curSpeed);


	    if(joyStickInput(moveJoystick)){
	    	animation.CrossFade("Run",0.2);
			animation["Run"].speed = speed/10;
	    }else{
	    	animation.CrossFade("Idle",0.2);
	    }
	//Add new code thailand
}

//ส่วนนี้ไปหามาจากใน Net ในการหมุนตามกล้อง
function LateUpdate(){
  if(Input.GetAxis("Vertical") == 0){
    if(Input.GetAxis("Horizontal") > 0){
      body.localEulerAngles.y = 180;
    }else if(Input.GetAxis("Horizontal") < 0){       body.localEulerAngles.y = 0;     }   }else if(Input.GetAxis("Vertical") > 0){
    if(Input.GetAxis("Horizontal") > 0){
      body.localEulerAngles.y = 135;
    }else if(Input.GetAxis("Horizontal") < 0){
      body.localEulerAngles.y = 45;
    }
  }else if(Input.GetAxis("Vertical") < 0){     if(Input.GetAxis("Horizontal") == 0){       body.localEulerAngles.y = -90;     }else if(Input.GetAxis("Horizontal") > 0){
      body.localEulerAngles.y = -135;
    }else if(Input.GetAxis("Horizontal") < 0){       body.localEulerAngles.y = -45;     }   } } function joyStickInput (joystick : Joystick) {     var absJoyPos = Vector2 (Mathf.Abs(joystick.position.x),                                    Mathf.Abs(joystick.position.y));     var xDirection = (joystick.position.x > 0) ? 1 : -1;
    var yDirection = (joystick.position.y > 0) ? 1 : -1;
    return ( ( absJoyPos.x > absJoyPos.y) ? absJoyPos.x * xDirection : absJoyPos.y * yDirection);
}

@script RequireComponent(CharacterController)
จะเห็นว่า ตัว Player ของเราที่มี Movement.js ไว้ทำงานนั้นจะมีช่องให้ ใส่ GameObject เพิ่มมาคือ “moveJoystick” และ “rotateJoystick” ให้เราลากตัว Joystick จากฝั่ง Hierarchy ไปวางใส่ใน Movement.js ได้เลย
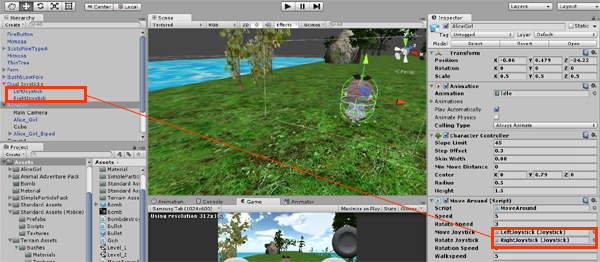
กำหนด Character Controller, RigidBody (no gravity) และ Capsule Collider (เพิ่ม Triger) ให้กับ Player ของเราให้เรียบร้อย
ทดสอบ Run ตัวเกมดูสักครั้ง
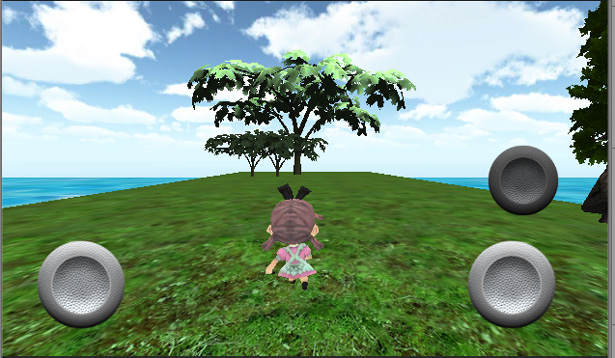
เราจะบังคับตัวละครด้วย คีย์บอร์ดได้แต่จุดประสงค์หลักของ บทความนี้ คือ Mobile นี่ดังนั้นเราต้อง Export ตัวเกมเราเป็นไฟล์ apk เพื่อไปทดสอบบน สมาร์ทโฟน หรือ แท็บเล็ค ระบบปฏิบัติการ Android ครับ
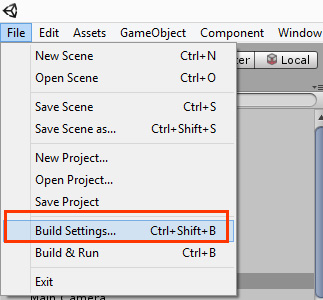
ไปที่ File > Build & Setting
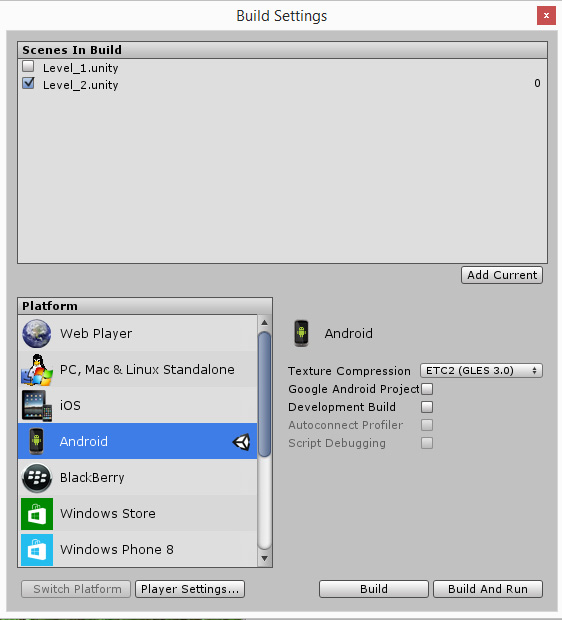
พบหน้าต่างนี้ให้ตั้งค่าของ android apk ไฟล์ของเราให้เรียบร้อยแล้วกด Build
เอาล่ะผมก็หยิบเจ้า Samsung Galaxy Tab 2 7′ ตัวเก่าของผม Android Version 4.1 กว่าๆ มาใช้ Run เกมสักหน่อย
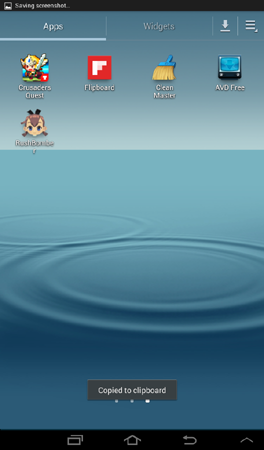
ทดสอบตัวเกมจะพบ หน้าจอ Splash Screen ก่อน

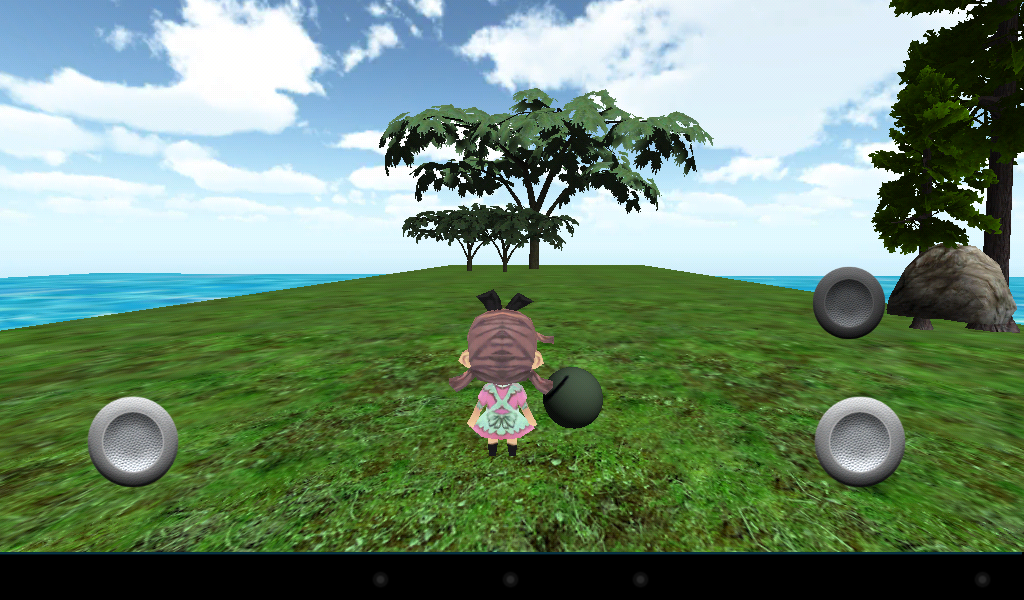
เอาล่ะลองบังคับเกมดู
จะเห็นว่าการควบคุมตัวละครด้วย Virtual Joystick สำหรับสมาร์ทโฟน ผ่าน Standard Assets (Mobile) นั้นไม่ค่อยยากเลยใช่ไหมครับ ลองเอาไปเขียนคำสั่ง กระโดด และ ยิงกระสุนเพิ่มเติมได้เลยนะ
เหมือนตัวอย่างข้างล่างนี้ (Code รอก่อนนะ)
ศึกษาการพัฒนาเกมอื่นๆ ได้ที่ https://www.daydev.com/category/developer/s11-game-development