

บทเรียนการเขียนแอพพลิเคชัน ควบคุม Arduino ด้วย Android ผ่าน Firebase RealTime Database สำหรับผู้เริ่มต้นการทำ IoT เพื่อศึกษาการทำงาน
ก่อนจะเริ่มบนเรียนนี้ควรศึกษาสิ่งเหล่านี้:
- บทเรียนการเขียน Android
- เริ่มต้นกับ Internet of Things หรือ IoT
- การเชื่อมต่อ IoT Arduino เข้ากับ Firebase Real-time Database
เมื่อพร้อมแล้วเราจะเข้าใจว่าเราสามารถเขียนแอพพลิเคชันง่ายๆ ไปควบคุมการเปิดปิดไฟของ Arduino ได้ตามแนวคิดของ Internet of Things ได้เลย
เราจะใช้บทเรียน การเชื่อมต่อ IoT Arduino เข้ากับ Firebase Real-time Database ในการศึกษาต่อเนื่องจากที่เรามีโครงสร้างของ Firebase Database ของเรา
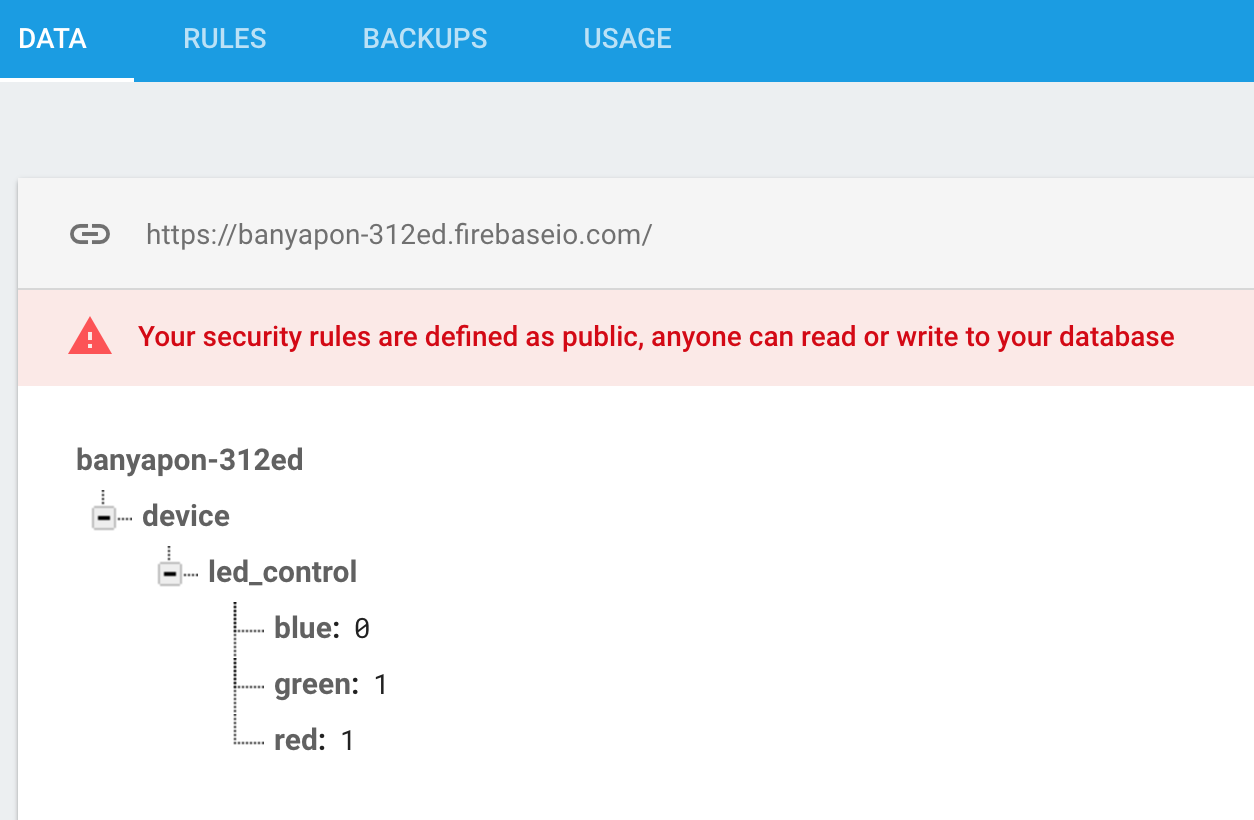
โครงสร้างเดิมคือเราจะควบคุมการเปิดปิดไฟ 3 สี โดยค่าสีไหนเป็น 0 คือไฟติด ถ้าเป็น 1 สีของ LEDs ก็จะดับไปทันที
เปิด Android Studio ขึ้นมา ทำการ New Project ขึ้นมาใหม่ เป็น Empty Project หลังจากพร้อมใช้งานให้เราไปที่ File->Setting ถ้า OSX ก็ File->Preference เลือก “Plugin” ทำการค้นหาคำว่า Firebase เมื่อพบ Package ทั้งหมดให้กด Shift เลือกทั้งหมด
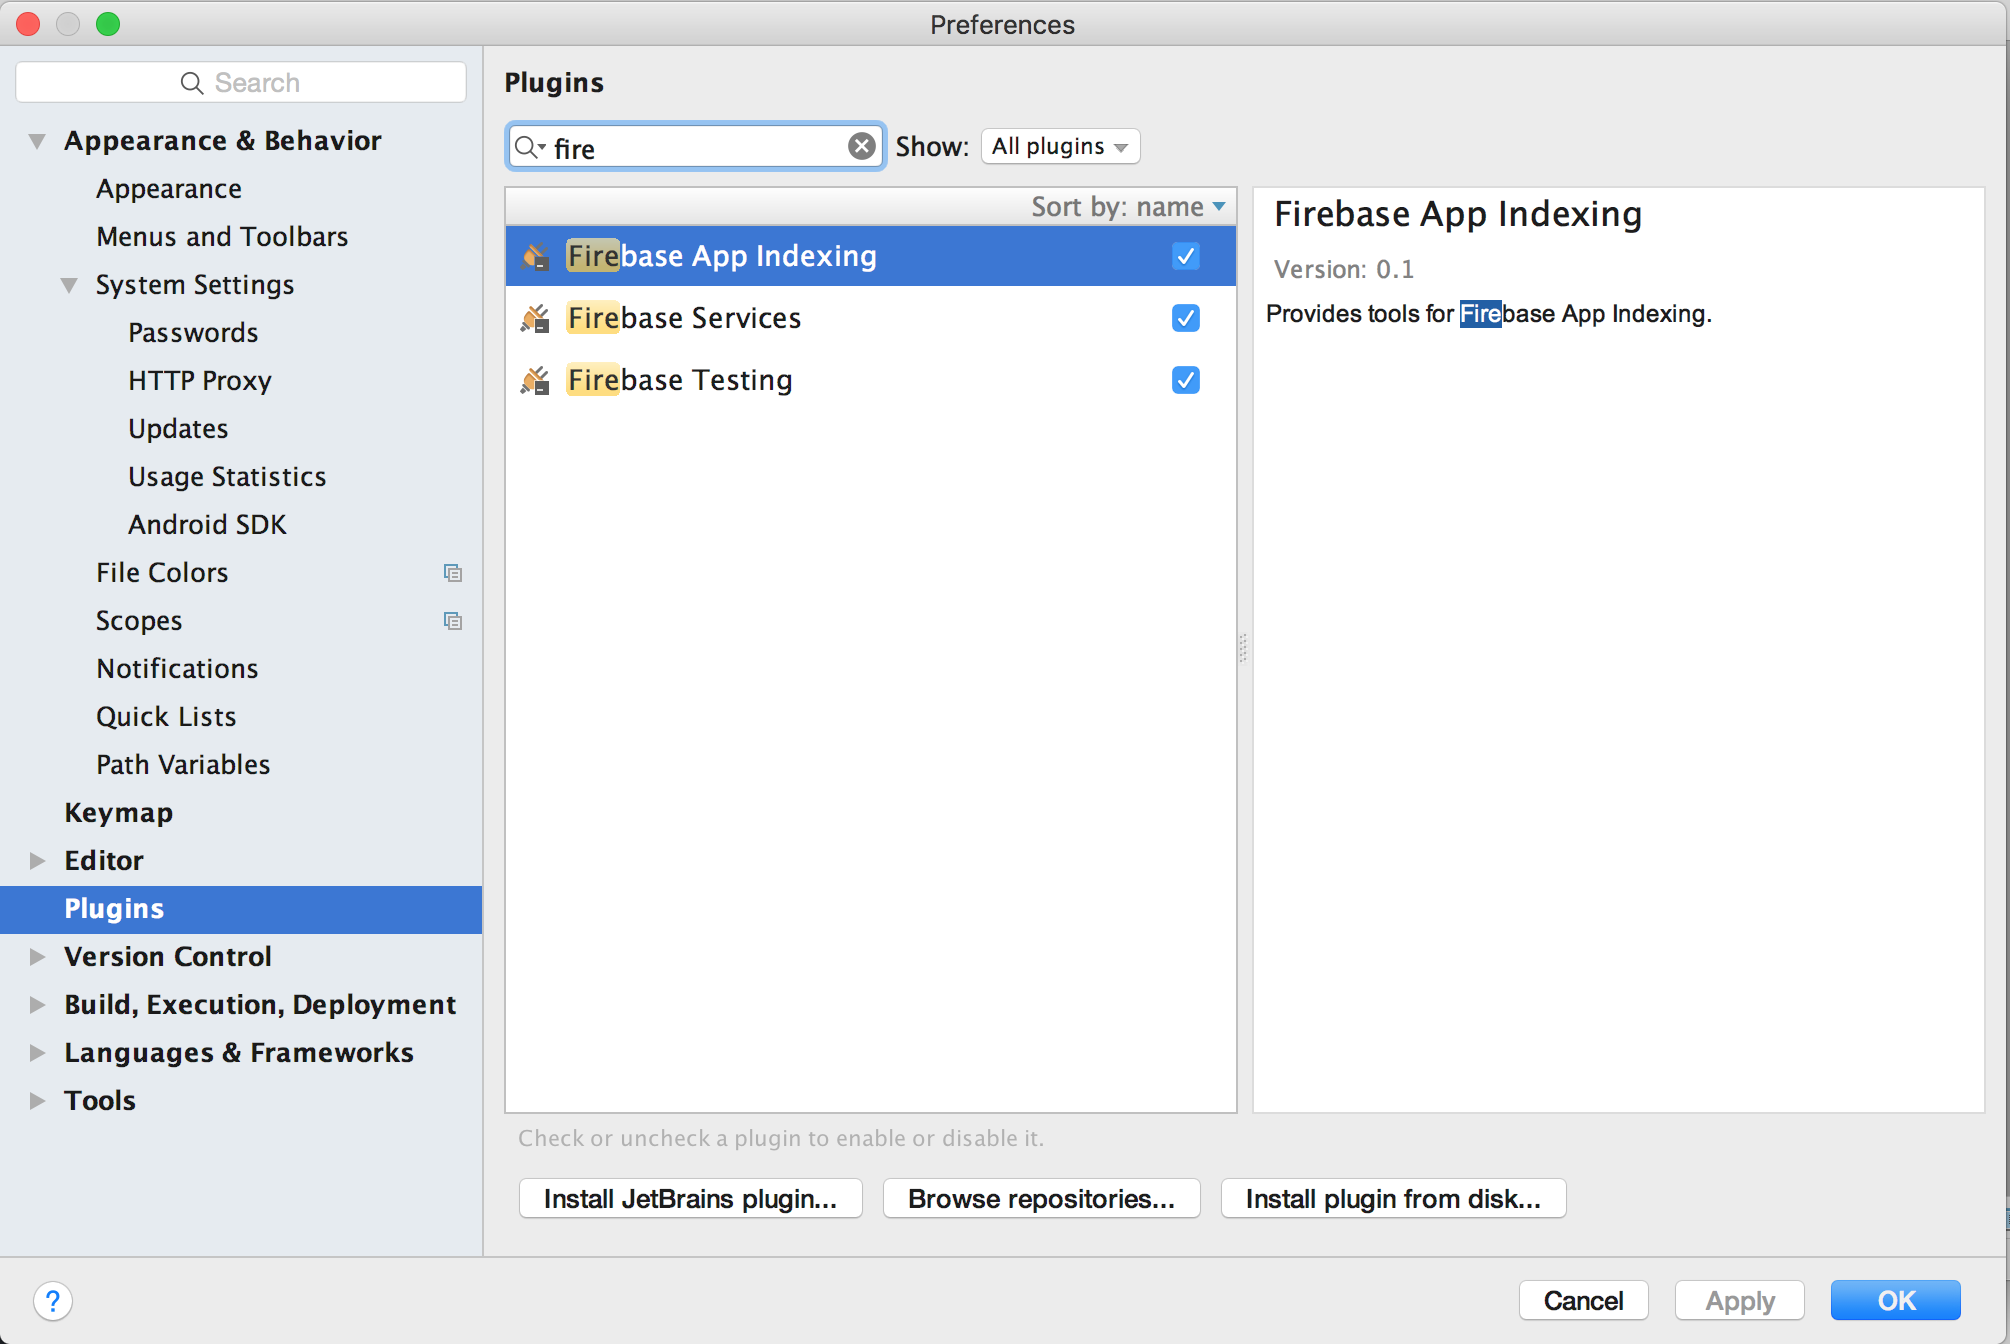
ติดตั้งให้เรียบร้อยแล้วกด OK
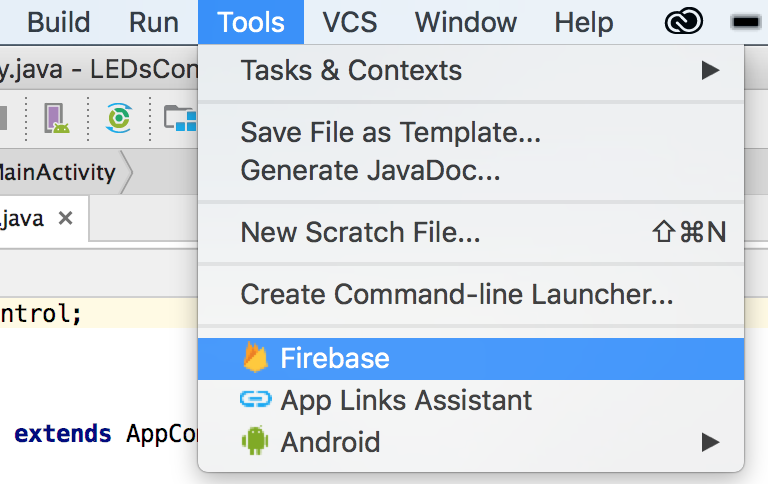
หากขั้นตอนการติดตั้งเสร็จเรียบร้อย เราจะมีเมนู Assistance ให้ Android Studio ของเราติดตั้ง Firebase ได้ง่ายขึ้น ที่ Tools->Firebase
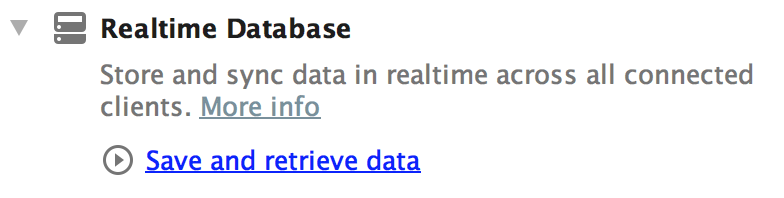
ขั้นตอนต่อไปคือการจัดการ วิธีการติดตั้ง firebase กับ Project ที่เราสร้างขึ้นมาใหม่ ในตัวอย่างนี้จะใช้งาน Database ของ Firebase เลือก RealTime Database
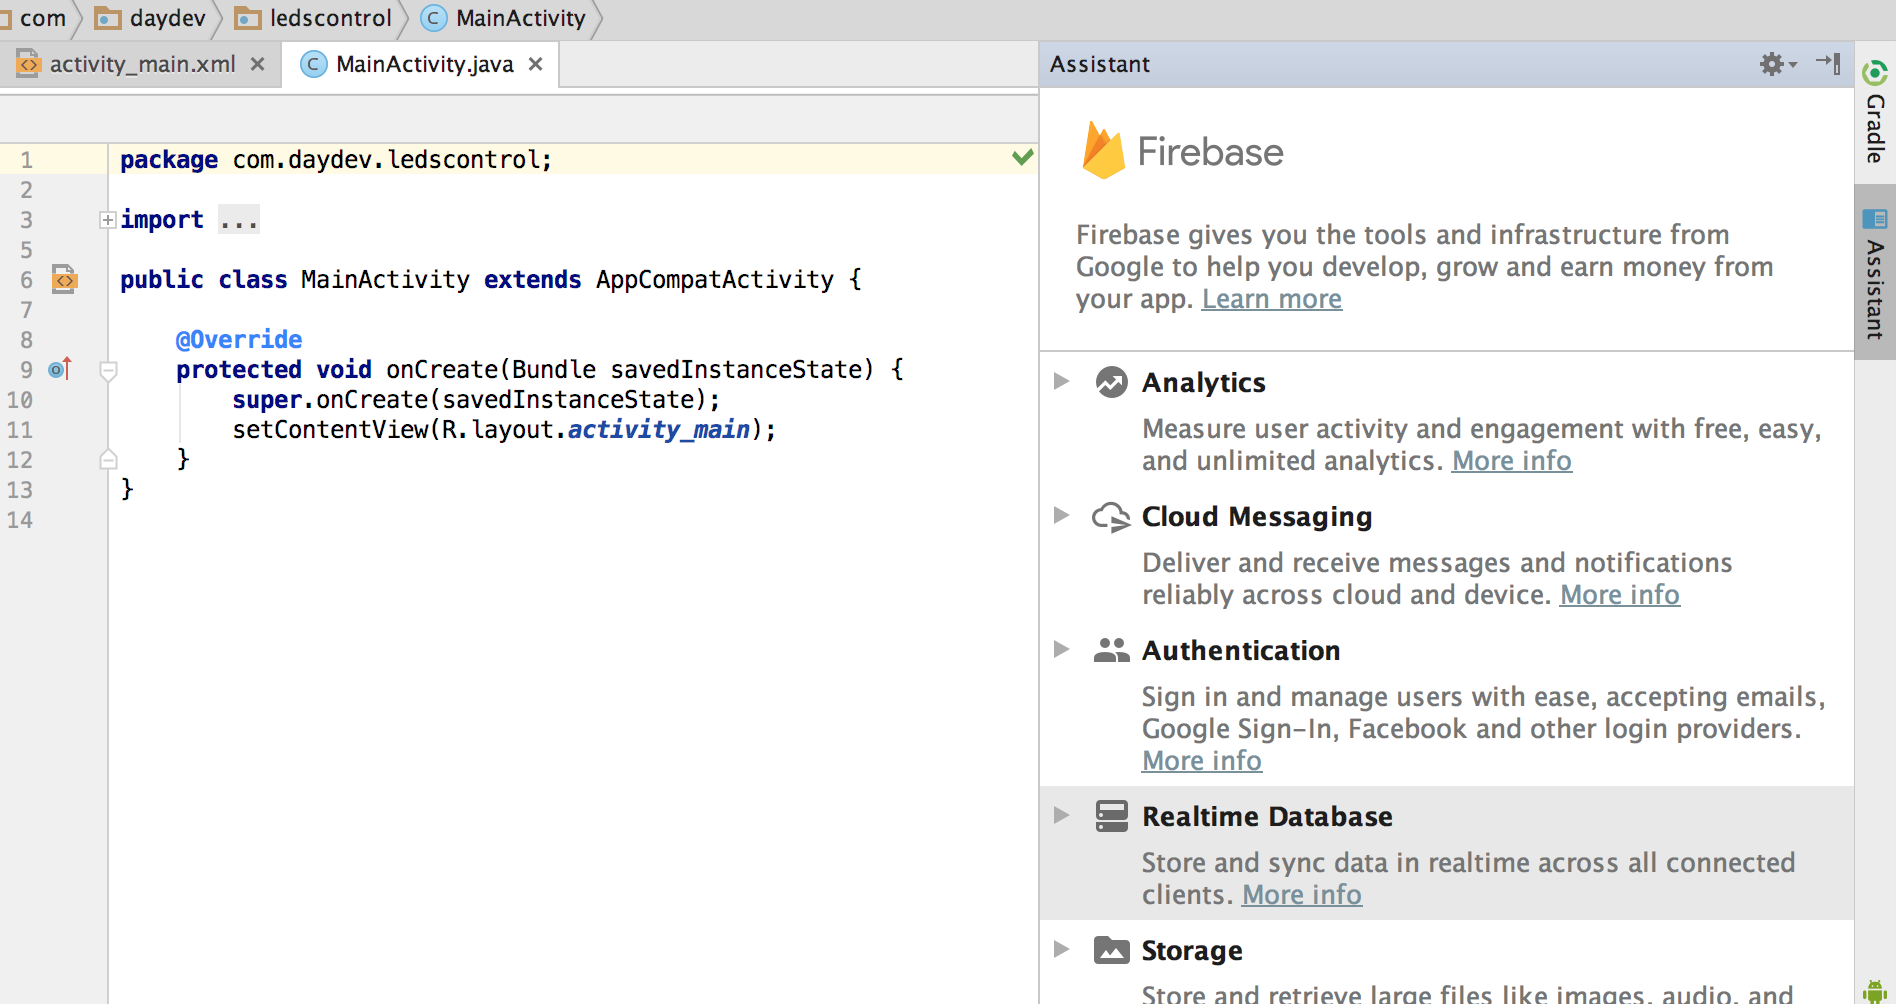
แล้วเลือก Save and Retrieve Data จะสามารถทำการ Connect to Firebase ผ่าน Android Studio ขั้นตอนจะทำให้เรา 3 ขั้นตอนง่ายๆ ทันที
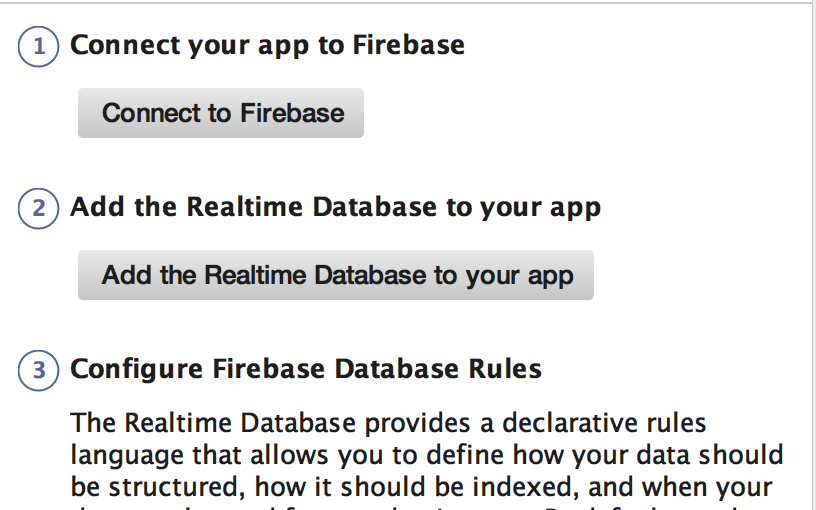
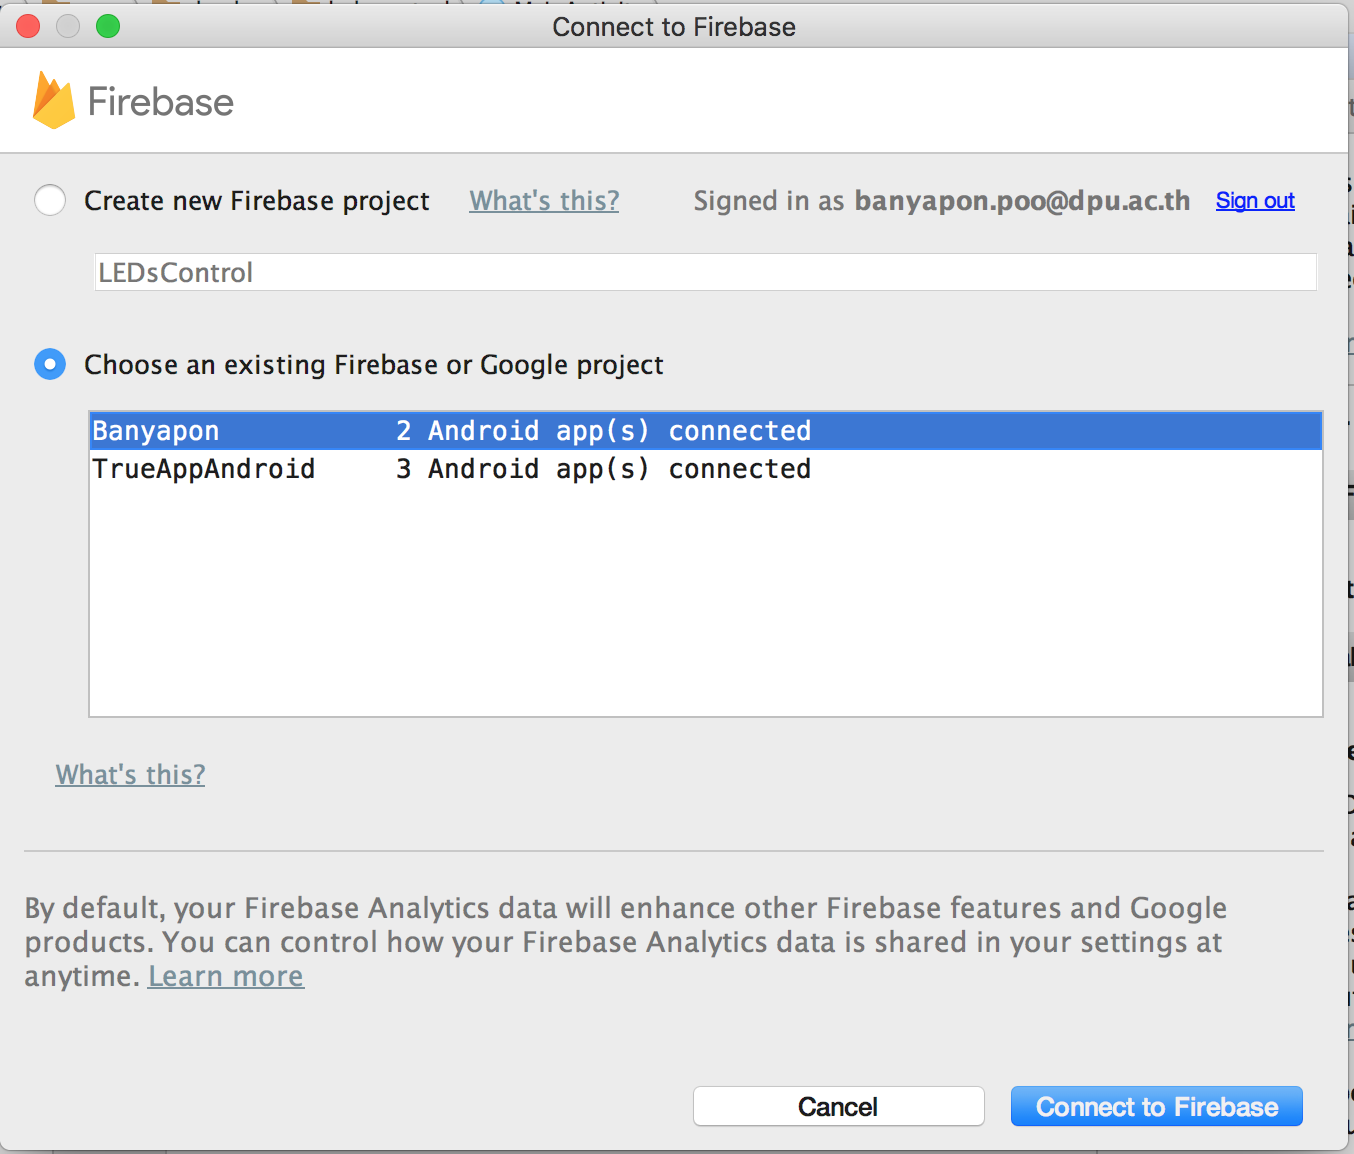
ขั้นตอนการติดตั้งให้ทำตาม 1-2-3 โดยเวลาที่เรามี Project อยู่แล้วก็ให้เราเลือก Project ที่เราสร้างอยู่ใน firebase ขั้นตอนแรกคือกด Connect to Firebase
ตอน connect to firebase จะมีหน้าต่างแบบนี้ให้เลือก:
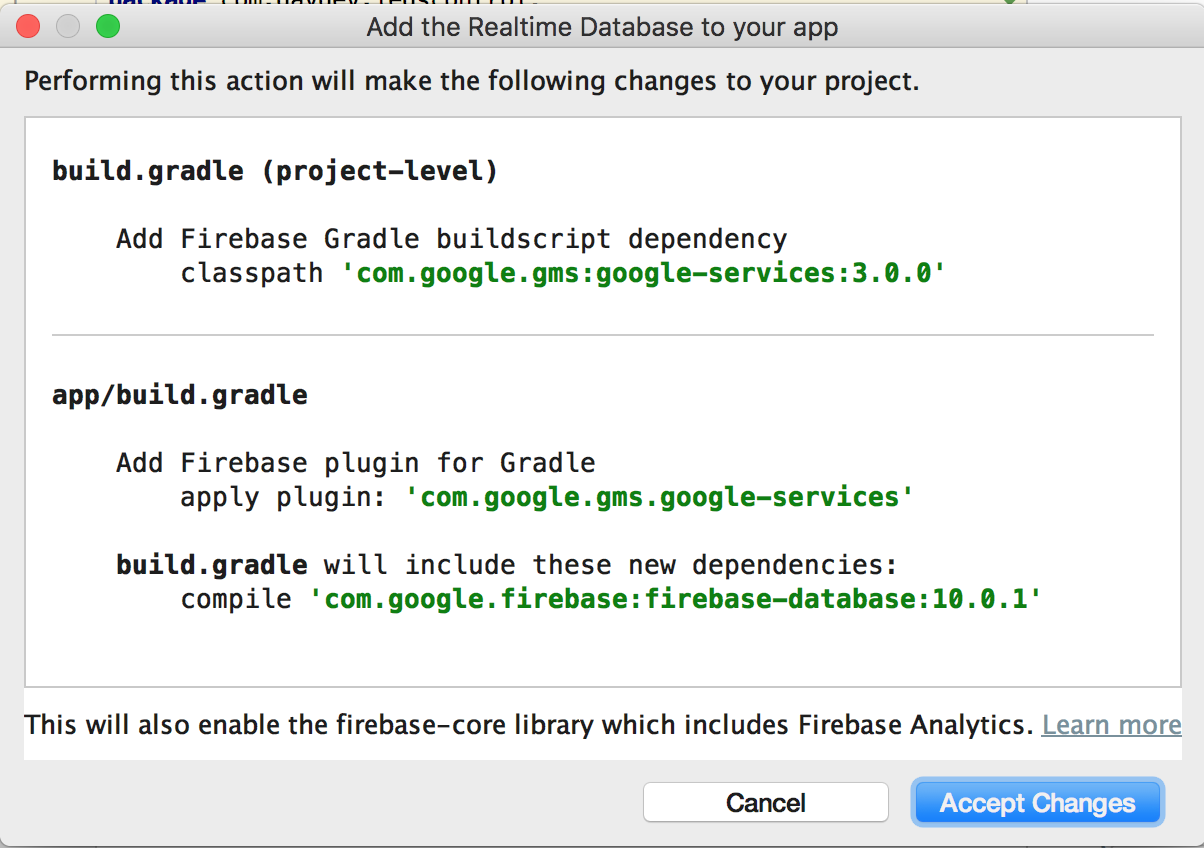
ขั้นตอนที่ 2 คือ กด Add the Realtime Database to your app จะเห็นว่าระบบจะทำการ sync Gradle และจัดการขั้นตอนการสร้าง google-services.json ให้เลย โดยไม่ต้อง Manual เหมือนขั้นตอนก่อนๆ
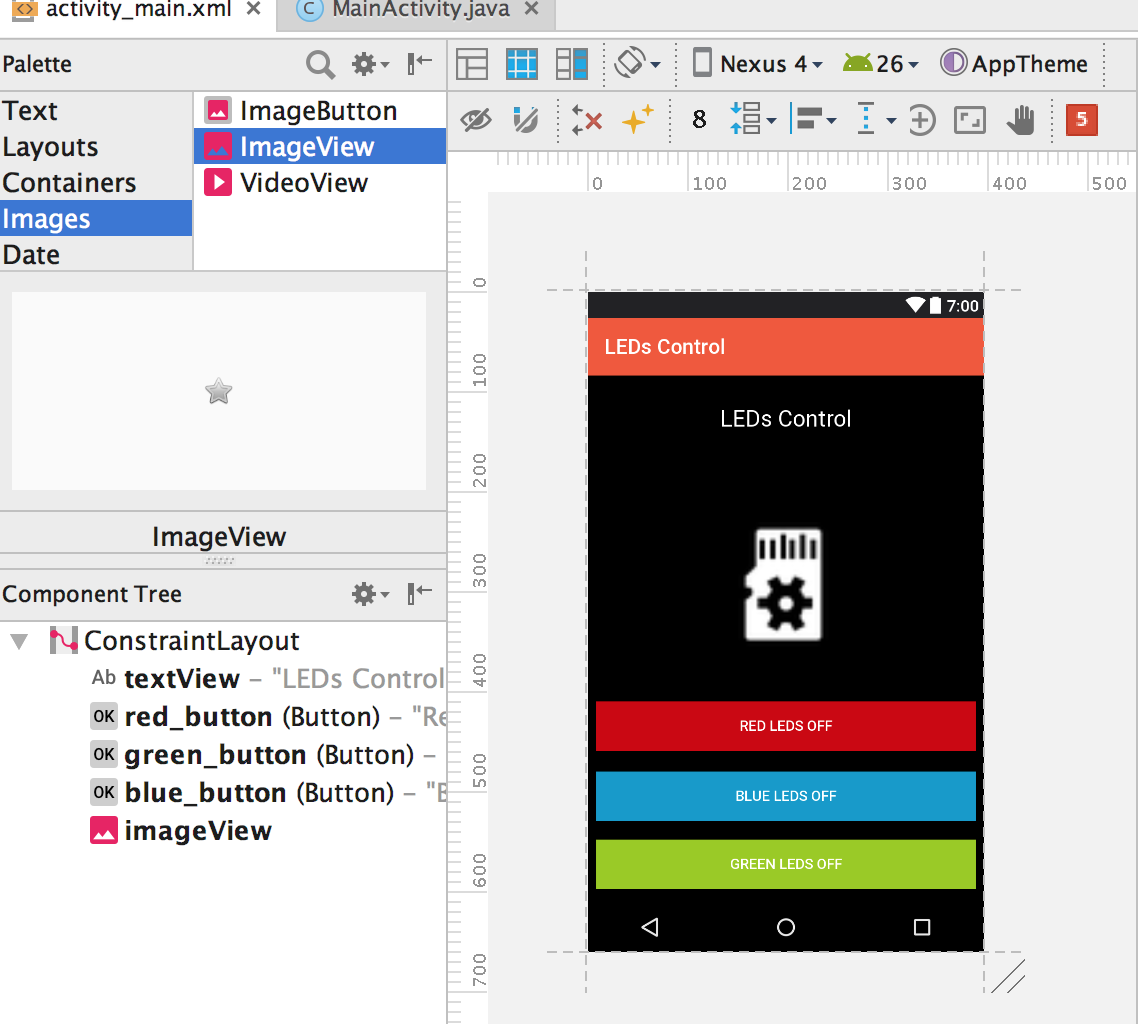
ต่อมาก็คือการเขียน Class สำหรับควบคุม LEDs แล้ว ให้ทำการออกแบบหน้า Layout ดังนี้:
<?xml version="1.0" encoding="utf-8"?>
<android.support.constraint.ConstraintLayout xmlns:android="http://schemas.android.com/apk/res/android"
    xmlns:app="http://schemas.android.com/apk/res-auto"
    xmlns:tools="http://schemas.android.com/tools"
    android:layout_width="match_parent"
    android:layout_height="match_parent"
    android:background="@android:color/black"
    tools:context="com.daydev.ledscontrol.MainActivity">

    <TextView
        android:id="@+id/textView"
        android:layout_width="0dp"
        android:layout_height="wrap_content"
        android:text="LEDs Control"
        android:textAlignment="center"
        android:textColor="@android:color/background_light"
        android:textSize="22sp"
        app:layout_constraintBottom_toBottomOf="parent"
        app:layout_constraintLeft_toLeftOf="parent"
        app:layout_constraintRight_toRightOf="parent"
        app:layout_constraintTop_toTopOf="parent"
        app:layout_constraintVertical_bias="0.06" />

    <Button
        android:id="@+id/red_button"
        android:layout_width="0dp"
        android:layout_height="wrap_content"
        android:layout_marginEnd="8dp"
        android:layout_marginLeft="8dp"
        android:layout_marginRight="8dp"
        android:layout_marginStart="8dp"
        android:layout_marginTop="51dp"
        android:background="@android:color/holo_red_dark"
        android:text="Red LEDs OFF"
        android:textColor="@android:color/background_light"
        app:layout_constraintHorizontal_bias="0.0"
        app:layout_constraintLeft_toLeftOf="parent"
        app:layout_constraintRight_toRightOf="parent"
        app:layout_constraintTop_toBottomOf="@+id/imageView" />

    <Button
        android:id="@+id/green_button"
        android:layout_width="0dp"
        android:layout_height="wrap_content"
        android:layout_marginBottom="8dp"
        android:layout_marginEnd="8dp"
        android:layout_marginLeft="8dp"
        android:layout_marginRight="8dp"
        android:layout_marginStart="8dp"
        android:layout_marginTop="8dp"
        android:background="@android:color/holo_green_light"
        android:text="Green LEDs Off"
        android:textColor="@android:color/background_light"
        app:layout_constraintBottom_toBottomOf="parent"
        app:layout_constraintHorizontal_bias="0.0"
        app:layout_constraintLeft_toLeftOf="parent"
        app:layout_constraintRight_toRightOf="parent"
        app:layout_constraintTop_toBottomOf="@+id/blue_button"
        app:layout_constraintVertical_bias="0.666" />

    <Button
        android:id="@+id/blue_button"
        android:layout_width="0dp"
        android:layout_height="wrap_content"
        android:layout_marginEnd="8dp"
        android:layout_marginLeft="8dp"
        android:layout_marginRight="8dp"
        android:layout_marginStart="8dp"
        android:layout_marginTop="20dp"
        android:background="@android:color/holo_blue_dark"
        android:text="Blue LEDS Off"
        android:textColor="@android:color/background_light"
        app:layout_constraintHorizontal_bias="0.0"
        app:layout_constraintLeft_toLeftOf="parent"
        app:layout_constraintRight_toRightOf="parent"
        app:layout_constraintTop_toBottomOf="@+id/red_button" />

    <ImageView
        android:id="@+id/imageView"
        android:layout_width="141dp"
        android:layout_height="123dp"
        android:layout_marginLeft="8dp"
        android:layout_marginRight="8dp"
        android:layout_marginTop="87dp"
        app:layout_constraintLeft_toLeftOf="parent"
        app:layout_constraintRight_toRightOf="parent"
        app:layout_constraintTop_toBottomOf="@+id/textView"
        app:srcCompat="@android:drawable/stat_notify_sdcard_prepare" />

</android.support.constraint.ConstraintLayout>
จะได้หน้าจอแอพพิลเคชันของเราดังนี้:
เปิด Permission ใน AndroidManiFest.xml ดังนี้:
<uses-permission android:name="android.permission.INTERNET"/>
เปิดคลาส MainActivity.java ขึ้นมาทำการประกาศ Global Class ดังนี้
public FirebaseDatabase firebaseDatabase;
public DatabaseReference databaseReference_red, databaseReference_blue, databaseReference_green;
private static final String TAG = "LEDS Control";
ไปที่เมธอด onCreate() ทำการเรียก Database References ให้ตรงกับ โครงสร้างของตัวอย่างก่อนหน้าคือ devices/led_control/สีของไฟ เป็นต้น ลงไปในส่วนของเมธอด:
firebaseDatabase = FirebaseDatabase.getInstance();
databaseReference_red = firebaseDatabase.getReference("device/led_control/red");
databaseReference_blue = firebaseDatabase.getReference("device/led_control/blue");
databaseReference_green = firebaseDatabase.getReference("device/led_control/green");
สำหรับการ Retrieve ข้อมูลจาก Firebase นั้นหลักการทำก็จะเป็นการเรียก DataSnapshot เช่นเดิม โดยจะเริ่มต้นที่ Leds ของสีแดงก่อน เพิ่มคำสั่งต่อไปนี้ลงไป
databaseReference_red.addValueEventListener(new ValueEventListener() {
            @Override
            public void onDataChange(DataSnapshot dataSnapshot) {
                String value = dataSnapshot.getValue(String.class);
                Log.d(TAG, "Value is: " + value);
            }

            @Override
            public void onCancelled(DatabaseError error) {
                // Failed to read value
                Log.w(TAG, "Failed to read value.", error.toException());
            }
        });
ระบบจะดึงค่า Real-Time Database ของ led_control ของ red มาแสดงผลว่า 0 หรือ 1 ให้เราประกาศ Button ของ red_button ก่อน
public Button red_button,blue_button,green_button;
public Integer value,value_refer;
และ
red_button = (Button)findViewById(R.id.red_button);
blue_button = (Button)findViewById(R.id.blue_button);
green_button = (Button)findViewById(R.id.green_button);
เพิ่มค่าของ onDataChange() ส่วน
@Override
public void onDataChange(DataSnapshot dataSnapshot) {
  value = dataSnapshot.getValue(Integer.class);
  Log.d(TAG, "Value is: " + value);
  if(value==0){
      red_button.setText("RED LEDS ON");
      value_refer = 1;
  }else{
      red_button.setText("RED LEDS OFF");
      value_refer = 0;
  }
}
เพื่อเป็นการเปลี่ยนสถานของปุ่มให้เปลี่ยน Title ต่อมาให้ประกาศ Action ของปุ่ม ดังนี้เพิ่มเข้าไปเป็น setOnClickListener()
red_button.setOnClickListener(new View.OnClickListener() {
  @Override
  public void onClick(View view) {
         databaseReference_red.setValue(value_refer);
  }
});
ทดสอบการทำงาน โดยการ Build APK เข้าเครื่อง Android ของเรา
ดังนั้นใช้กระบวนการเดิมในการเพิ่มปุ่มเปิดปิดไฟ คลาสของ MainActivity.java
package com.daydev.ledscontrol;

import android.support.v7.app.AppCompatActivity;
import android.os.Bundle;
import android.util.Log;
import android.view.View;
import android.widget.Button;

import com.google.firebase.database.DataSnapshot;
import com.google.firebase.database.DatabaseError;
import com.google.firebase.database.DatabaseReference;
import com.google.firebase.database.FirebaseDatabase;
import com.google.firebase.database.ValueEventListener;

public class MainActivity extends AppCompatActivity {
    public FirebaseDatabase firebaseDatabase;
    public DatabaseReference databaseReference_red, databaseReference_blue, databaseReference_green;
    private static final String TAG = "LEDS Control";
    public Button red_button,blue_button,green_button;
    public Integer value,value_refer;

    @Override
    protected void onCreate(Bundle savedInstanceState) {
        super.onCreate(savedInstanceState);
        setContentView(R.layout.activity_main);
        firebaseDatabase = FirebaseDatabase.getInstance();
        databaseReference_red = firebaseDatabase.getReference("device/led_control/red");
        databaseReference_blue = firebaseDatabase.getReference("device/led_control/blue");
        databaseReference_green = firebaseDatabase.getReference("device/led_control/green");

        red_button = (Button)findViewById(R.id.red_button);
        blue_button = (Button)findViewById(R.id.blue_button);
        green_button = (Button)findViewById(R.id.green_button);

        databaseReference_red.addValueEventListener(new ValueEventListener() {
            @Override
            public void onDataChange(DataSnapshot dataSnapshot) {
                value = dataSnapshot.getValue(Integer.class);
                Log.d(TAG, "Value is: " + value);
                if(value==0){
                    red_button.setText("RED LEDS ON");
                    value_refer = 1;
                }else{
                    red_button.setText("RED LEDS OFF");
                    value_refer = 0;
                }
            }

            @Override
            public void onCancelled(DatabaseError error) {
                // Failed to read value
                Log.w(TAG, "Failed to read value.", error.toException());
            }
        });

        red_button.setOnClickListener(new View.OnClickListener() {
            @Override
            public void onClick(View view) {
                databaseReference_red.setValue(value_refer);
            }
        });

        databaseReference_blue.addValueEventListener(new ValueEventListener() {
            @Override
            public void onDataChange(DataSnapshot dataSnapshot) {
                value = dataSnapshot.getValue(Integer.class);
                Log.d(TAG, "Value is: " + value);
                if(value==0){
                    blue_button.setText("RED LEDS ON");
                    value_refer = 1;
                }else{
                    blue_button.setText("RED LEDS OFF");
                    value_refer = 0;
                }
            }

            @Override
            public void onCancelled(DatabaseError error) {
                // Failed to read value
                Log.w(TAG, "Failed to read value.", error.toException());
            }
        });

        blue_button.setOnClickListener(new View.OnClickListener() {
            @Override
            public void onClick(View view) {
                databaseReference_blue.setValue(value_refer);
            }
        });

        databaseReference_green.addValueEventListener(new ValueEventListener() {
            @Override
            public void onDataChange(DataSnapshot dataSnapshot) {
                value = dataSnapshot.getValue(Integer.class);
                Log.d(TAG, "Value is: " + value);
                if(value==0){
                    green_button.setText("RED LEDS ON");
                    value_refer = 1;
                }else{
                    green_button.setText("RED LEDS OFF");
                    value_refer = 0;
                }
            }

            @Override
            public void onCancelled(DatabaseError error) {
                // Failed to read value
                Log.w(TAG, "Failed to read value.", error.toException());
            }
        });

        green_button.setOnClickListener(new View.OnClickListener() {
            @Override
            public void onClick(View view) {
                databaseReference_green.setValue(value_refer);
            }
        });

    }
}
บทเรียนนี้น่าจะเป็นไอเดียสำหรับควบคุมการเปิดปิด ระบบไฟของ IoT ผ่านแอพพลิเคชัน android ที่เราพัฒนาขึ้นมาเองครับ

2 Comments