บทเรียนนี้เป็นการเริ่มต้นเขียนแอพพลิเคชันบนแพลตฟอร์ม Android สร้าง ListView ที่ดึงข้อมูลมาจากฐานข้อมูล SQLite แบบง่ายครับ มาเริ่มต้นพัฒนากันดีกว่า
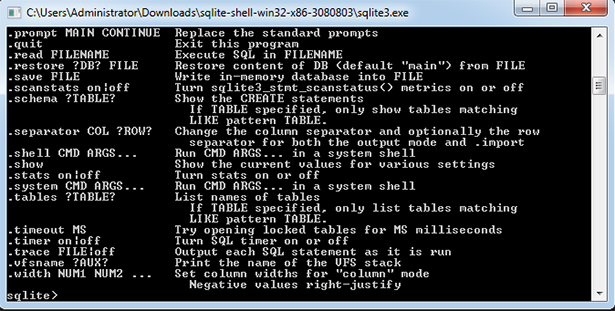
สำหรับ SQlite นั้นเราสามารถไปดาวน์โหลดติดตั้งลงเครื่องเราได้ที่ http://www.sqlite.org ได้อย่างง่ายๆ พอดาวน์โหลดมาแล้วก็ Run Command Line ปรกติให้เกิดการ Activated ได้สบายๆ ประเด็นคือ Android Studio นั้นมีการทำงานของ SQLite ติดตัวมาอยู่แล้วดังนั้น เราสามารถพัฒนาแอพพลิเคชันของ Android ของเราร่วมกับ SQLite ได้ง่ายๆ ทันทีได้เลยเพียงแค่คุณต้องแม่นยำ Data Fields ของ ฐานข้อมูลเล็กน้อยเพราะมันต้องใช้จิตนาการประมาณหนึ่ง
กำหนดเงื่อนไขไว้ในใจดังนี้ ฐานข้อมูลชื่อ moviestore สร้างตารางชื่อว่า movies ครับ ประกอบไปด้วย Fields ดังนี้ title เป็น varchar, description เป็น textและ cover เป็น textเช่นกันครับ พร้อมกันนั้นให้เอา id เป็น primary key และเป็นเลขรันไปเรื่อยแบบ Autoincrement
ถ้าจะทำการ สร้าง ตารางเราต้อง Run คำสั่ง
CREATE TABLE movies (_id INTEGER PRIMARY KEY AUTOINCREMENT, title VARCHAR, description TEXT, cover VARCHAR);
ก็จะได้ตาราง movies เรียบร้อยใน SQLite ประเด็นคือ Android เราต้องสร้างมันผ่านคำสั่ง db.exeSQL ครับซึ่งเป็นหนึ่งใน Library ของ SQLiteOpenHelper() นั่นเอง
ดังนั้นเราต้องดำเนินการตามขั้นตอนดังนี้
เริ่มต้นพัฒนา
เปิด Android Studio ขึ้นมาครับทำการ New Project ใหม่ขึ้นมาชื่อว่า SQLiteTut เลือก Target เป็น Android Version 4.3 ก่อนให้เรียบร้อย
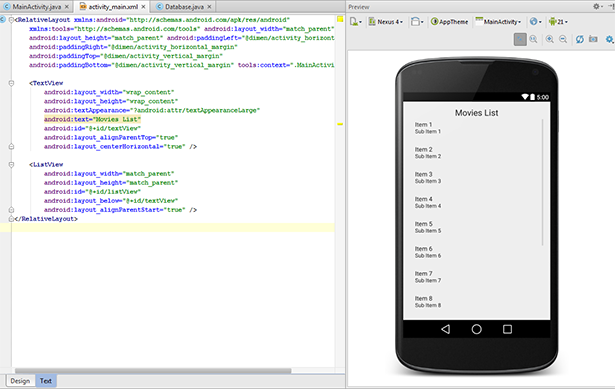
หน้า Layout ที่เราจะทำงานนั้นคือไฟล์ activity_main.xml ให้เราเลือกใช้ Large TextView และ ListView Widget มาใช้ออกแบบตามนี้ครับ ตั้งชื่อว่า listView
<RelativeLayout xmlns:android="http://schemas.android.com/apk/res/android"
    xmlns:tools="http://schemas.android.com/tools" android:layout_width="match_parent"
    android:layout_height="match_parent" android:paddingLeft="@dimen/activity_horizontal_margin"
    android:paddingRight="@dimen/activity_horizontal_margin"
    android:paddingTop="@dimen/activity_vertical_margin"
    android:paddingBottom="@dimen/activity_vertical_margin" tools:context=".MainActivity">

    <TextView
        android:layout_width="wrap_content"
        android:layout_height="wrap_content"
        android:textAppearance="?android:attr/textAppearanceLarge"
        android:text="Movies List"
        android:id="@+id/textView"
        android:layout_alignParentTop="true"
        android:layout_centerHorizontal="true" />

    <ListView
        android:layout_width="match_parent"
        android:layout_height="match_parent"
        android:id="@+id/listView"
        android:layout_below="@+id/textView"
        android:layout_alignParentStart="true" />
</RelativeLayout>
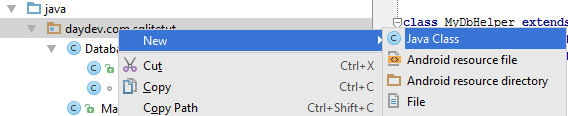
ทำการ New Class ใหม่ใต้ Package ของโปรเจ็คเราตั้งชื่อว่า Database.java
ทำการประกาศ Import ส่วนของ Header ตามนี้
import android.content.Context;
import android.database.sqlite.SQLiteDatabase;
import android.database.sqlite.SQLiteOpenHelper;
ต่อจากนั้นให้เราสร้าง Class ใหม่ขึ้นมาดังนี้
class MyDbHelper extends SQLiteOpenHelper {
    private static final String DB_NAME = "moviestore";
    private static final int DB_VERSION = 1;
    public static final String TABLE_NAME = "movies";
    public static final String COL_NAME = "title";
    public static final String COL_DESC = "description";
    public static final String COL_COVER = "cover";

    public MyDbHelper(Context context) {
        super(context, DB_NAME, null, DB_VERSION);
    }

    public void onCreate(SQLiteDatabase db) {
        db.execSQL("CREATE TABLE " + TABLE_NAME +" (_id INTEGER PRIMARY KEY AUTOINCREMENT, "
                + COL_NAME + " VARCHAR, " + COL_DESC + " TEXT, "
                + COL_COVER + " VARCHAR);");
        db.execSQL("INSERT INTO " + TABLE_NAME + " (" + COL_NAME + ", " + COL_DESC
                + ", " + COL_COVER + ") VALUES ('American Horror Story Season 1', 'The first season of American Horror Story takes place in a haunted house', '1.png');");
        db.execSQL("INSERT INTO " + TABLE_NAME + " (" + COL_NAME + ", " + COL_DESC
                + ", " + COL_COVER + ") VALUES ('American Horror Story Season 2', 'A horror drama anthology, with each season as a self-contained story.','2.png');");
        db.execSQL("INSERT INTO " + TABLE_NAME + " (" + COL_NAME + ", " + COL_DESC
                + ", " + COL_COVER + ") VALUES ('American Horror Story Season 3', 'Coven is the subtitle for the third season, or miniseries, of American Horror Story', '3.png');");
        db.execSQL("INSERT INTO " + TABLE_NAME + " (" + COL_NAME + ", " + COL_DESC
                + ", " + COL_COVER + ") VALUES ('American Horror Story Season 4', 'A ventriloquist arrives at the freak show, bringing fresh horror and surprising arousal.', '4.png');");
        db.execSQL("INSERT INTO " + TABLE_NAME + " (" + COL_NAME + ", " + COL_DESC
                + ", " + COL_COVER + ") VALUES ('Game of Thrones Season 1', 'an American fantasy drama television series created for HBO', '5.png');");
        db.execSQL("INSERT INTO " + TABLE_NAME + " (" + COL_NAME + ", " + COL_DESC
                + ", " + COL_COVER + ") VALUES ('Game of Thrones Season 2', 'an American fantasy drama television series created for HBO', '6.png');");
        db.execSQL("INSERT INTO " + TABLE_NAME + " (" + COL_NAME + ", " + COL_DESC
                + ", " + COL_COVER + ") VALUES ('Game of Thrones Season 3', 'an American fantasy drama television series created for HBO', '7.png');");
        db.execSQL("INSERT INTO " + TABLE_NAME + " (" + COL_NAME + ", " + COL_DESC
                + ", " + COL_COVER + ") VALUES ('Game of Thrones Season 4', 'an American fantasy drama television series created for HBO', '8.png');");
    }

    public void onUpgrade(SQLiteDatabase db, int oldVersion, int newVersion) {
        db.execSQL("DROP TABLE IF EXISTS " + TABLE_NAME);
        onCreate(db);
    }
}
ภาพรวม Code ของไฟล์ Database.java จะเป็นดังนี้
package daydev.com.sqlitetut;

/**
 * Created by Banyapon on 5/3/2558.
 */
import android.content.Context;
import android.database.sqlite.SQLiteDatabase;
import android.database.sqlite.SQLiteOpenHelper;

class MyDbHelper extends SQLiteOpenHelper {
    private static final String DB_NAME = "moviestore";
    private static final int DB_VERSION = 1;
    public static final String TABLE_NAME = "movies";
    public static final String COL_NAME = "title";
    public static final String COL_DESC = "description";
    public static final String COL_COVER = "cover";

    public MyDbHelper(Context context) {
        super(context, DB_NAME, null, DB_VERSION);
    }

    public void onCreate(SQLiteDatabase db) {
        db.execSQL("CREATE TABLE " + TABLE_NAME +" (_id INTEGER PRIMARY KEY AUTOINCREMENT, "
                + COL_NAME + " VARCHAR, " + COL_DESC + " TEXT, "
                + COL_COVER + " VARCHAR);");
        db.execSQL("INSERT INTO " + TABLE_NAME + " (" + COL_NAME + ", " + COL_DESC
                + ", " + COL_COVER + ") VALUES ('American Horror Story Season 1', 'The first season of American Horror Story takes place in a haunted house', '1.png');");
        db.execSQL("INSERT INTO " + TABLE_NAME + " (" + COL_NAME + ", " + COL_DESC
                + ", " + COL_COVER + ") VALUES ('American Horror Story Season 2', 'A horror drama anthology, with each season as a self-contained story.','2.png');");
        db.execSQL("INSERT INTO " + TABLE_NAME + " (" + COL_NAME + ", " + COL_DESC
                + ", " + COL_COVER + ") VALUES ('American Horror Story Season 3', 'Coven is the subtitle for the third season, or miniseries, of American Horror Story', '3.png');");
        db.execSQL("INSERT INTO " + TABLE_NAME + " (" + COL_NAME + ", " + COL_DESC
                + ", " + COL_COVER + ") VALUES ('American Horror Story Season 4', 'A ventriloquist arrives at the freak show, bringing fresh horror and surprising arousal.', '4.png');");
        db.execSQL("INSERT INTO " + TABLE_NAME + " (" + COL_NAME + ", " + COL_DESC
                + ", " + COL_COVER + ") VALUES ('Game of Thrones Season 1', 'an American fantasy drama television series created for HBO', '5.png');");
        db.execSQL("INSERT INTO " + TABLE_NAME + " (" + COL_NAME + ", " + COL_DESC
                + ", " + COL_COVER + ") VALUES ('Game of Thrones Season 2', 'an American fantasy drama television series created for HBO', '6.png');");
        db.execSQL("INSERT INTO " + TABLE_NAME + " (" + COL_NAME + ", " + COL_DESC
                + ", " + COL_COVER + ") VALUES ('Game of Thrones Season 3', 'an American fantasy drama television series created for HBO', '7.png');");
        db.execSQL("INSERT INTO " + TABLE_NAME + " (" + COL_NAME + ", " + COL_DESC
                + ", " + COL_COVER + ") VALUES ('Game of Thrones Season 4', 'an American fantasy drama television series created for HBO', '8.png');");
    }

    public void onUpgrade(SQLiteDatabase db, int oldVersion, int newVersion) {
        db.execSQL("DROP TABLE IF EXISTS " + TABLE_NAME);
        onCreate(db);
    }
}

public class Database {
}
หากสังเกตุเราจะเห็น คำสั่ง db.exeSQL() ทำงานอยู่คือ CREATE TABLE และ INSERT TABLE ในบรรทัดนี้
 db.execSQL("CREATE TABLE " + TABLE_NAME +" (_id INTEGER PRIMARY KEY AUTOINCREMENT, "
                + COL_NAME + " VARCHAR, " + COL_DESC + " TEXT, "
                + COL_COVER + " VARCHAR);");
และ บรรทัดนี้ครับ
db.execSQL("INSERT INTO " + TABLE_NAME + " (" + COL_NAME + ", " + COL_DESC
                + ", " + COL_COVER + ") VALUES ('American Horror Story Season 1', 'The first season of American Horror Story takes place in a haunted house', '1.png');");
        db.execSQL("INSERT INTO " + TABLE_NAME + " (" + COL_NAME + ", " + COL_DESC
                + ", " + COL_COVER + ") VALUES ('American Horror Story Season 2', 'A horror drama anthology, with each season as a self-contained story.','2.png');");
        db.execSQL("INSERT INTO " + TABLE_NAME + " (" + COL_NAME + ", " + COL_DESC
                + ", " + COL_COVER + ") VALUES ('American Horror Story Season 3', 'Coven is the subtitle for the third season, or miniseries, of American Horror Story', '3.png');");
        db.execSQL("INSERT INTO " + TABLE_NAME + " (" + COL_NAME + ", " + COL_DESC
                + ", " + COL_COVER + ") VALUES ('American Horror Story Season 4', 'A ventriloquist arrives at the freak show, bringing fresh horror and surprising arousal.', '4.png');");
        db.execSQL("INSERT INTO " + TABLE_NAME + " (" + COL_NAME + ", " + COL_DESC
                + ", " + COL_COVER + ") VALUES ('Game of Thrones Season 1', 'an American fantasy drama television series created for HBO', '5.png');");
        db.execSQL("INSERT INTO " + TABLE_NAME + " (" + COL_NAME + ", " + COL_DESC
                + ", " + COL_COVER + ") VALUES ('Game of Thrones Season 2', 'an American fantasy drama television series created for HBO', '6.png');");
        db.execSQL("INSERT INTO " + TABLE_NAME + " (" + COL_NAME + ", " + COL_DESC
                + ", " + COL_COVER + ") VALUES ('Game of Thrones Season 3', 'an American fantasy drama television series created for HBO', '7.png');");
        db.execSQL("INSERT INTO " + TABLE_NAME + " (" + COL_NAME + ", " + COL_DESC
                + ", " + COL_COVER + ") VALUES ('Game of Thrones Season 4', 'an American fantasy drama television series created for HBO', '8.png');");
เมื่อเสร็จแล้วเราจะได้ Class ของ Database ตัว SQLite เรามาใช้งานแล้ว ให้เราไปเปิดไฟล์ MainActivity.java ครับ
ทำการ Import ส่วนของ Header ดังนี้
import java.util.ArrayList;
import android.app.Activity;
import android.database.Cursor;
import android.database.sqlite.SQLiteDatabase;
import android.widget.ArrayAdapter;
import android.widget.ListView;
เปลี่ยนส่วนของ extends ของคลาส MainActivity ให้อ้างอิงกับ Activity ครับ
public class MainActivity extends Activity {
เราจะทำการดึง ตัวแปรบางอย่างจาก Class Database.java ของเรามาใช้งานร่วมกับ MainActivity แล้วโดยการตั้งค่าตัวแปรต่อไปนี้
SQLiteDatabase sqliteMyDB;
MyDbHelper myDataHelper;
Cursor myDBCursor;
Public Class ที่ชื่อ MyDbHelper ของ Database นั้นถูกระบุไว้ผ่านตัวแปรชื่อ myDataHelper ในการอ้างถึง ตามหลักของ OOP แล้วใช้ Cursor คลาสที่เป็น ตัวชี้(ตามชื่อ)แถวของข้อมูลว่าเป็นแถวที่เท่าไรและดึงข้อมูลอะไรไปบ้าง สุดท้าย SQLiteDatabase เป็นเหมือนเมธอดให้ MainActivity เข้าใจคำสั่ง SQL ของ SQLite นั่นเองครับ
ใช้บทเรียนเก่าๆ ทำการ Final ตัว ListView ให้เรียบร้อยแล้วเขียนคำสั่งต่อไปนี้ครับ
ListView listViewMovies = (ListView)findViewById(R.id.listView);
Code จะเป็นดังนี้
protected void onCreate(Bundle savedInstanceState) {
        super.onCreate(savedInstanceState);
        setContentView(R.layout.activity_main);

        //DB
        ListView listViewMovies = (ListView)findViewById(R.id.listView);
        myDataHelper = new MyDbHelper(this);

        sqliteMyDB = myDataHelper.getWritableDatabase();

        myDBCursor = sqliteMyDB.rawQuery("SELECT " + MyDbHelper.COL_NAME + ", "  + MyDbHelper.COL_DESC
                + ", " + MyDbHelper.COL_COVER + " FROM " + MyDbHelper.TABLE_NAME, null);

        ArrayList<String> dirArray = new ArrayList<String>();
        myDBCursor.moveToFirst();

        while ( !myDBCursor.isAfterLast() ){
           dirArray.add(myDBCursor.getString(myDBCursor.getColumnIndex(MyDbHelper.COL_NAME)));
            myDBCursor.moveToNext();
        }

        ArrayAdapter<String> adapterDir = new ArrayAdapter<String>(this, android.R.layout.simple_list_item_1, dirArray);
        listViewMovies.setAdapter(adapterDir);
    }
เราจะใช้ SQL command ผ่าน myDBCursor ของเราเป็นคำสั่ง SELECT โดยดึงค่า Cont จาก Database.java เป็นหลักครับ ถ้าเอาจริงคำสั่งนี้ก็น่าจะเป็น
SELECT title,description,cover FROM movies
ทำการ Bind ลง ArrayAdapter แล้ว Join เข้ากับ ListView เหมือนปรกติที่เคยทำกันมา
อย่าลืม SQL.close ด้วยนะครับกันการเรียกข้อมูลหนักๆ
@Override
    public void onPause() {
        super.onPause();
        myDataHelper.close();
        sqliteMyDB.close();
    }
ดังนั้นภาพรวมของ Code ในไฟล์ MainActivity.java จะเป็นดังนี้
package daydev.com.sqlitetut;

import android.support.v7.app.ActionBarActivity;
import android.os.Bundle;
import android.view.Menu;
import android.view.MenuItem;
//DB
import java.util.ArrayList;
import android.app.Activity;
import android.database.Cursor;
import android.database.sqlite.SQLiteDatabase;
import android.view.Window;
import android.widget.ArrayAdapter;
import android.widget.ListView;

public class MainActivity extends Activity {

    //DB
    SQLiteDatabase sqliteMyDB;
    MyDbHelper myDataHelper;
    Cursor myDBCursor;

    @Override
    protected void onCreate(Bundle savedInstanceState) {
        super.onCreate(savedInstanceState);
        setContentView(R.layout.activity_main);

        //DB
        ListView listViewMovies = (ListView)findViewById(R.id.listView);
        myDataHelper = new MyDbHelper(this);

        sqliteMyDB = myDataHelper.getWritableDatabase();

        myDBCursor = sqliteMyDB.rawQuery("SELECT " + MyDbHelper.COL_NAME + ", "  + MyDbHelper.COL_DESC
                + ", " + MyDbHelper.COL_COVER + " FROM " + MyDbHelper.TABLE_NAME, null);

        ArrayList<String> dirArray = new ArrayList<String>();
        myDBCursor.moveToFirst();

        while ( !myDBCursor.isAfterLast() ){
            dirArray.add(myDBCursor.getString(myDBCursor.getColumnIndex(MyDbHelper.COL_NAME)));
            myDBCursor.moveToNext();
        }

        ArrayAdapter<String> adapterDir = new ArrayAdapter<String>(this, android.R.layout.simple_list_item_1, dirArray);
        listViewMovies.setAdapter(adapterDir);
    }
    @Override
    public void onPause() {
        super.onPause();
        myDataHelper.close();
        sqliteMyDB.close();
    }

    @Override
    public boolean onCreateOptionsMenu(Menu menu) {
        // Inflate the menu; this adds items to the action bar if it is present.
        getMenuInflater().inflate(R.menu.menu_main, menu);
        return true;
    }

    @Override
    public boolean onOptionsItemSelected(MenuItem item) {
        // Handle action bar item clicks here. The action bar will
        // automatically handle clicks on the Home/Up button, so long
        // as you specify a parent activity in AndroidManifest.xml.
        int id = item.getItemId();

        //noinspection SimplifiableIfStatement
        if (id == R.id.action_settings) {
            return true;
        }

        return super.onOptionsItemSelected(item);
    }
}
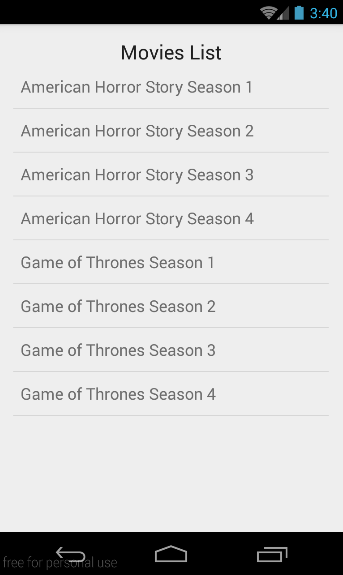
ทดสอบโดยการ Run ตัวแอพพลิเคชันของเรา
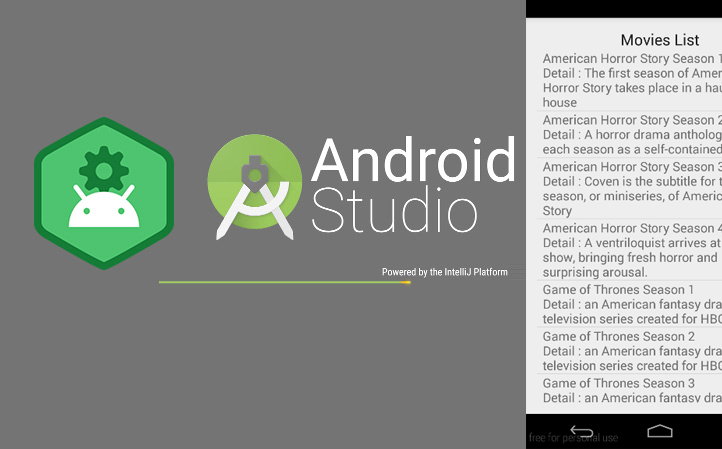
ถ้าต้องการนำ Detail จาก SQLite มาโชว์ด้วยก็ให้แก้ไข ส่วนของคำสั่ง while loop จากเดิม
dirArray.add(myDBCursor.getString(myDBCursor.getColumnIndex(MyDbHelper.COL_NAME)));
ให้เป็น
dirArray.add(myDBCursor.getString(myDBCursor.getColumnIndex(MyDbHelper.COL_NAME)) + "\n"
                    + "Detail : " + myDBCursor.getString(myDBCursor.getColumnIndex(MyDbHelper.COL_DESC)));
แล้วก็ลองทดสอบดูครับ

บทเรียนนี้น่าจะช่วยให้หลายๆ คนที่เริ่มพัฒนาแอพพลิเคชันบน Android เริ่มจะมีความหวังกับการใช้งานฐานข้อมูลร่วมกับแอพพลิเคชันของเราแล้วใช่ไหมครับ เอาเป็นว่าฝึกฝนกันเยอะๆ ครับ
[pdfex]