Tutorial การสร้างเกมบน iOS สำหรับ Game Developer มือใหม่ที่กำลังศึกษาการพัฒนาเกมผ่าน Cocos2D กับเทคนิคการลาก วางภาพกราฟิก (Drag and Drop) อย่างง่าย
เริ่มต้นพัฒนาเกมบน iOS ด้วย Cocos2D กับการลาก และวางรูปภาพ
สร้าง New Project ขึ้นมาใหม่ เลือก Template เป็น Cocos2d Application ทำการตั้งชื่อ Project ใหม่ว่า “DragDrop”

เตรียมความพร้อมด้วยรูปภาพที่เราจะนำมาใช้งาน คือไฟล์ภาพนามสกุล .png ที่เป็นแบบ Transparent มา 4 ภาพ ขนาด ขนาดความกว้าง 70 พิกเซล และความสูง 65 พิกเซล ในตัวอย่างผมเลือกไฟล์ภาพมา 3 ภาพคือ “1.png”,”2.png”,”3.png”,”4.png” พร้อมด้วยภาพฉากหลังขนาด ความกว้าง 802 พิกเซล และความสูง 320 พิกเซล ชื่อว่า “bg.png”


ทำการ นำภาพทั้งหมดที่เตรียมมาแล้วไปยัดลงใน Folder ของเกมที่เราได้เตรียมไว้ เลือกเป็น “Copy items into destination group’s folder (if needed)” ให้เสร็จสรรพ

ไปที่ไฟล์ HelloWorldLayer.h ทำการประกาศตัวแปรออกกลุ่มหนึ่งดังนี้ เหมือนตัวอย่าง
@interface HelloWorldLayer : CCLayer
{
    CCSprite * background;
    CCSprite * selSprite;
    NSMutableArray * movableSprites;
}
// returns a CCScene that contains the HelloWorldLayer as the only child
+(CCScene *) scene;
@end
ต่อมาให้เข้าไปแก้ไขที่ไฟล์ HelloWorldLayer.m ในส่วนของฟังก์ชัน init() ให้ทำการเคลียร์คำสั่งเดิมออกให้หมดแล้วใส่คำสั่งใหม่ลงไปจากเดิมดังนี้
-(id) init {
    if((self = [super init])) {
        CGSize winSize = [CCDirector sharedDirector].winSize;
        [CCTexture2D setDefaultAlphaPixelFormat:kCCTexture2DPixelFormat_RGB565];
        background = [CCSprite spriteWithFile:@"bg.png"];
        background.anchorPoint = ccp(0,0);
        [self addChild:background];
        [CCTexture2D setDefaultAlphaPixelFormat:kCCTexture2DPixelFormat_Default];
        movableSprites = [[NSMutableArray alloc] init];
        NSArray *images = [NSArray arrayWithObjects:@"1.png", @"2.png", @"3.png", @"4.png", nil];
        for(int i = 0; i < images.count; ++i) {
            NSString *image = [images objectAtIndex:i];
            CCSprite *sprite = [CCSprite spriteWithFile:image];
            float offsetFraction = ((float)(i+1))/(images.count+1);
            sprite.position = ccp(winSize.width*offsetFraction, winSize.height/2);
            [self addChild:sprite];
            [movableSprites addObject:sprite];
        }
    }
    return self;
}
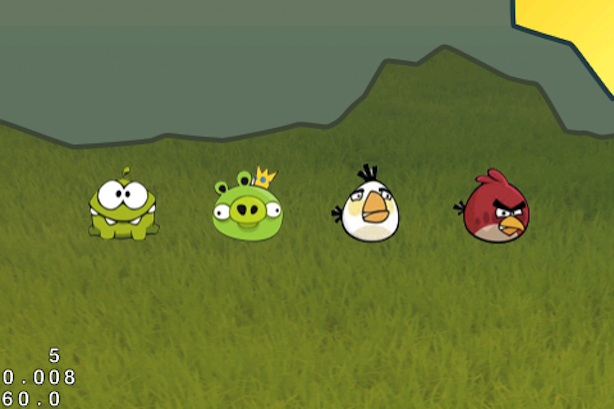
เพื่อเป็นการจับ Layer ของตัวละคร "1.png” ถึง "4.png” มาวางทับบน Layer ของ "bg.png” หากลองทำการ "Run" แอพพลิเคชันดูจะได้ผลลัพธ์หน้าจอดังต่อไปนี้

เมื่อมีการเรียกใช้งาน Cocos2D ร่วมกับกราฟิกไปแล้วต่อมาเราต้องทำการ เคลียร์หน่วยความจำของเกมเสมอ ค้นหาฟังก์ชันคลาสของ dealloc() เมื่อพบแล้วให้แทรก คำสั่งต่อไปนี้ลงไป
- (void) dealloc
{
    [movableSprites release];
     movableSprites = nil;
	[super dealloc];
}
ต่อมาให้เราลองทดสอบทำการ เช็คว่าถ้าเราเอานิ้วไปแตะที่ตัวกราฟิก แล้วจะเกิดแอนิเมชันให้มันขยับเล็กน้อย เราต้องแทรก คำสั่งตรวจสอบนี้ลงไปในฟังก์ชัน init() ก่อนที่จะปิดฟังก์ชันตำแหน่งนี้ครับ
[[CCTouchDispatcher sharedDispatcher] addTargetedDelegate:self priority:0 swallowsTouches:YES];
    }
    return self;
เพื่อเป็นการ ส่งค่าว่าเราได้แตะโดนตัวกราฟิกตัวไหน แล้วให้มันขยับ หรือสั่นเล็กน้อย โดยการเพิ่มฟังก์ชันใหม่ขึ้นมาใน HelloWorldLayer.m ดังนี้
- (void)selectSpriteForTouch:(CGPoint)touchLocation {
    CCSprite * newSprite = nil;
    for (CCSprite *sprite in movableSprites) {
        if (CGRectContainsPoint(sprite.boundingBox, touchLocation)) {
            newSprite = sprite;
            break;
        }
    }
    if (newSprite != selSprite) {
        [selSprite stopAllActions];
        [selSprite runAction:[CCRotateTo actionWithDuration:0.1 angle:0]];
        CCRotateTo * rotLeft = [CCRotateBy actionWithDuration:0.1 angle:-4.0];
        CCRotateTo * rotCenter = [CCRotateBy actionWithDuration:0.1 angle:0.0];
        CCRotateTo * rotRight = [CCRotateBy actionWithDuration:0.1 angle:4.0];
        CCSequence * rotSeq = [CCSequence actions:rotLeft, rotCenter, rotRight, rotCenter, nil];
        [newSprite runAction:[CCRepeatForever actionWithAction:rotSeq]];
        selSprite = newSprite;
    }
}
เป็นคำสั่งในการ ตรวจสอบว่ามีการแตะหน้าจอโดนพิกัดที่มีตัวกราฟิก Layer วางอยู่หรือไม่ หากว่าแตะโดนให้คำสั่ง CCRotate ออกมาทำงานประมวลผลให้ภาพกราฟิกตัวการ์ตูน ส่ายไปมาเล็กน้อย เบาๆ แน่นอนว่าอย่าลืมสั่งให้มันทำงานหลังจากที่เราเอานิ้วออกจากหน้าจอแล้วด้วย คำสั่งนี้
- (BOOL)ccTouchBegan:(UITouch *)touch withEvent:(UIEvent *)event {
    CGPoint touchLocation = [self convertTouchToNodeSpace:touch];
    [self selectSpriteForTouch:touchLocation];
    return TRUE;
}
ทำการ "Run” ตัวแอพพลิเคชันแล้วลองเอามือไปแตะที่ตัวกราฟิกการ์ตูนดู

ต่อมา เราต้องการที่จะเลื่อน ฉากหลัง ไปมาได้ ประกอบกับโยกย้ายตัวละครไปมาตำแหน่งต่างๆ ได้นั้นเราต้องใช้ฟังก์ชันดังต่อไปนี้ครับ
- (CGPoint)boundLayerPos:(CGPoint)newPos {
    CGSize winSize = [CCDirector sharedDirector].winSize;
    CGPoint retval = newPos;
    retval.x = MIN(retval.x, 0);
    retval.x = MAX(retval.x, -background.contentSize.width+winSize.width);
    retval.y = self.position.y;
    return retval;
}

- (void)panForTranslation:(CGPoint)translation {
    if (selSprite) {
        CGPoint newPos = ccpAdd(selSprite.position, translation);
        selSprite.position = newPos;
    } else {
        CGPoint newPos = ccpAdd(self.position, translation);
        self.position = [self boundLayerPos:newPos];
    }
}
- (void)ccTouchMoved:(UITouch *)touch withEvent:(UIEvent *)event {
    CGPoint touchLocation = [self convertTouchToNodeSpace:touch];

    CGPoint oldTouchLocation = [touch previousLocationInView:touch.view];
    oldTouchLocation = [[CCDirector sharedDirector] convertToGL:oldTouchLocation];
    oldTouchLocation = [self convertToNodeSpace:oldTouchLocation];

    CGPoint translation = ccpSub(touchLocation, oldTouchLocation);
    [self panForTranslation:translation];
}
เป็นคำสั่งเบื้องต้นให้เราสามารถเลื่อนฉากหลังไปมาได้ในพิกัดที่ไม่เกิน ความกว้างของภาพที่เตรียมมาโดยจะแสดงผลแบ่งความกว้างจริงๆ แค่ 480 พิเซลเท่านั้น เช่นกันหากว่าเราทำการแตะที่ตัวกราฟิกของการ์ตูนในแอพพลิเคชันของเราแล้ว ให้ลอกจับลากตัวการ์ตูนของเราไปวางในที่ต่างๆ ดูจะเห็นว่าสามารถทำได้โดยง่าย

ในการพัฒนาแอพพลิเคชันกึ่งเกมผ่าน Cocos2D นั้นกับการเคลื่อนย้ายตัวกราฟิกไปมาอาจจะจบลงในส่วนนี้ เป็นการแนะนำให้ทำงานร่วมกับภาพกราฟิก และการเคลื่อนไหวที่เกิดขึ้นจากการระบุพิกัด และคืนค่าตำแหน่งของหน้าจอนั่นเอง
อยากได้ Source Code ดาวน์โหลดที่นี่ครับ! : http://code.google.com/p/daydev/downloads/detail?name=DragDrop.zip