รอบนี้จะเป็นการนำคำสั่ง ng-include มาใช้ร่วมกับ AngularJS ครับ เพียงแค่จะเปลี่ยนเรื่องของ Layout เล็กน้อยเพราะเอา MDL (Material Design Lite) มาปรับแต่งกัน
ก่อนอื่นให้เราไปดาวน์โหลด MDL ของ Google Developes กันครับที่
เลือกแบบดาวน์โหลดมาเก็บไว้ในงานของเราก็ได้ครับ
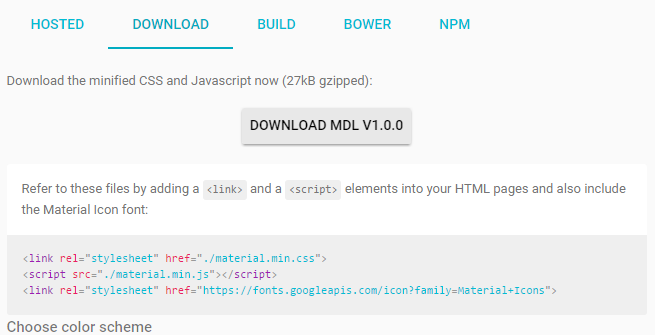
การใช้งานผมว่ามันง่ายมาก Class ต่างๆ JS ต่างๆ ศึกษาในเว็บเค้านั่นแหละ คงไม่ยากเกินพยายาม
ต่อมาเราจะสร้าง SPA โดย AngularJS กันแล้วครับ หากยังไม่เข้าใจการทำงานไปศึกษาบทความก่อนหน้าที่นี่ได้ครับ
- การเขียน Single Page Application ด้วย AngularJS
- AngularJS กับการวนซ้ำข้อมูลด้วย ng-repeat และกรองด้วย Filter
- AngularJS การแยก Controller และทำงานร่วมกับ Table
- AngularJS กับการทำงานร่วมกับ Web Service JSON
- AngularJS กับ POST ข้อมูลลง MySQL ผ่าน Web Service
- AngularJS กับการ GET ข้อมูล http เพื่อเปลี่ยนหน้าด้วย $location
- AngularJS การ Edit ข้อมูลรายการผ่าน Web Service และ MySQL
- AngularJS กับการสร้างหน้า Login และทำงานร่วมกับ Session API
ให้เราสร้างหน้าใหม่ขึ้นมาเป็น View ชื่อว่า Sample.html ประกาศ ng-app = “sampleModules” และ ng-controller = “sampleController” พร้อมสร้างไฟล์ controller ใน controller/sample.js ให้เรียบร้อยครับ
เพียงแค่เพิ่มในส่วนของ MDL เข้าไปเล็กน้อย
<link rel="stylesheet" href="mdl/material.min.css">
	<script src="mdl/material.min.js"></script>
	<script src="js/angular.min.js"></script>
	<link rel="stylesheet" href="https://fonts.googleapis.com/icon?family=Material+Icons">
Code html หน้า view “sample.html” จะเป็นดังนี้ครับ
<!doctype html>
<html ng-app="sampleModules">
<head>
<meta charset="utf-8">
<meta http-equiv="X-UA-Compatible" content="IE=edge">
<meta name="viewport" content="width=device-width, initial-scale=1">
<title>AngularJS</title>
<link rel="stylesheet" href="mdl/material.min.css">
<script src="mdl/material.min.js"></script>
<script src="js/angular.min.js"></script>
<link rel="stylesheet" href="https://fonts.googleapis.com/icon?family=Material+Icons">
</head>
<body ng-controller="sampleController">
<div class="mdl-layout mdl-js-layout mdl-layout--fixed-header">
<div class="mdl-layout mdl-js-layout mdl-layout--fixed-header">
<header class="mdl-layout__header">
<div class="mdl-layout__header-row">
<!-- Title -->
<span class="mdl-layout-title">AngularJS SPA</span>
<!-- Spacer-->
<div class="mdl-layout-spacer"></div>
<!-- Navigation-->
<nav class="mdl-navigation mdl-layout--large-screen-only"></nav>
</div>
</header>
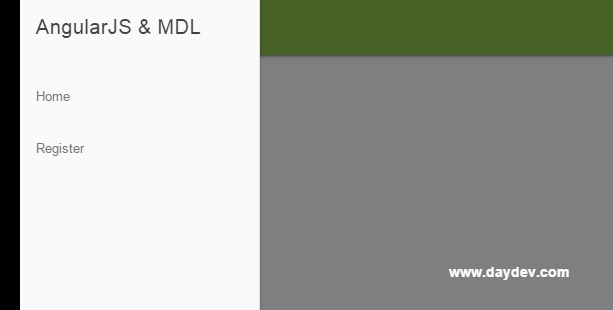
<div class="mdl-layout__drawer">
<span class="mdl-layout-title">AngularJS & MDL</span>
<nav class="mdl-navigation">
<a class="mdl-navigation__link" href="index.html">Home</a>
<a class="mdl-navigation__link" href="register.html">Register</a>
</nav>
</div>
<main class="mdl-layout__content">
<div class="page-content">
<!-- Your include AngularJS -->
</div>
</main>
</div>
</div>
<script src="controller/sample.js"></script>
</body>
</html>
ทดสอบดูหน่อยแล้วกัน

ส่วน controller ไฟล์ sample.js นั้นเป็น Code ดังนี้
angular.module('sampleModules', [])
.controller('sampleController', function($scope, $http, $location) {
    $http.get("http://localhost/AngularJS/api/listdriver.php")
    .success(function (response) {$scope.driver = response.drivers;});
});
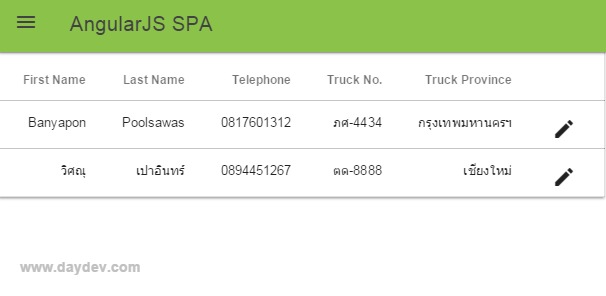
ต่อมาให้เราสร้างไฟล์ view ใหม่มาอีกตัวชื่อ “dataTable.html” ครับ แนบส่วนของ <table> และ ng-repeat ไปในนี้เลยครับ
<table class="mdl-data-table mdl-js-data-table mdl-data-table--selectable mdl-shadow--2dp">
  <thead>
	<tr>
		<th>First Name</th>
		<th>Last Name</th>
		<th>Telephone</th>
		<th>Truck No.</th>
		<th>Truck Province</th>
		<th></th>
	</tr>
  </thead>
  <tbody>
	<tr ng-repeat="user in driver">
		<td>{{user.first_name}}</td>
		<td>{{user.last_name}}</td>
		<td>{{user.tel}}</td>
		<td>{{user.TruckNo}}</td>
		<td>{{user.TruckPV}}</td>
		<td>
		  <button class="mdl-button mdl-js-button mdl-button--icon" ng-click="editdata(user.id)">
			 <i class="material-icons">edit</i>
		  </button>
		</td>
	</tr></tbody>
</table>
เสร็จแล้วให้ไปเพิ่มการใช้งาน ng-include ที่ไฟล์ Sample.html ดังนี้ในส่วนของ <main>
<main class="mdl-layout__content">
   <div class="page-content">
       <!-- Your include AngularJS -->
       <div ng-include="'dataTable.html'"></div>
    </div>
</main>
ทดสอบหน้า SPA ของเราหน่อย
ต่อมาให้สร้างหน้า View เพิ่มเข้ามาคือส่วนของ Form ที่จะให้กรอกข้อมูล หรือ แก้ไขข้อมูล ตั้งชื่อ view ว่า “form.html” ครับ
<div class="mdl-card mdl-shadow--3dp demo-card-wide" style="margin-top: 20px !important; margin:0 auto;">
  <div class="mdl-card__title">
    <h2 class="mdl-card__title-text" ng-show="edit">Add New Driver</h2>
	<h2 class="mdl-card__title-text" ng-hide="edit">Edit Driver</h2>
  </div>
  <div class="mdl-card__supporting-text">
    Please Insert Data Below...
  </div>
  <div class="mdl-card__actions mdl-card--border">
	<form action="#">
		<div class="mdl-textfield mdl-js-textfield textfield-demo">
			<input class="mdl-textfield__input" type="text" id="first_name" ng-model="first_name" name="first_name" />
			<label class="mdl-textfield__label" for="first_name">First Name...</label>
		</div>
		<div class="mdl-textfield mdl-js-textfield textfield-demo">
			<input class="mdl-textfield__input" type="text" id="last_name" ng-model="last_name" name="last_name" />
			<label class="mdl-textfield__label" for="last_name">Last Name...</label>
		</div>
		<div class="mdl-textfield mdl-js-textfield textfield-demo">
			<input class="mdl-textfield__input" type="text" id="tel" ng-model="tel" name="tel" />
			<label class="mdl-textfield__label" for="tel">Telephone...</label>
		</div>
		<div class="mdl-textfield mdl-js-textfield textfield-demo">
			<input class="mdl-textfield__input" type="text" id="TruckNo" ng-model="TruckNo" name="TruckNo" />
			<label class="mdl-textfield__label" for="TruckNo">Truck Number...</label>
		</div>
		<div class="mdl-textfield mdl-js-textfield textfield-demo">
			<input class="mdl-textfield__input" type="text" id="TruckPV" ng-model="TruckPV" name="TruckPV" />
			<label class="mdl-textfield__label" for="TruckPV">Truck Province...</label>
		</div>
		<div class="mdl-textfield mdl-js-textfield textfield-demo">
			<button class="mdl-button mdl-js-button mdl-button--raised mdl-button--accent" ng-disabled="error || incomplete">
				Save Changes
			</button>
		</div>
	</form>
  </div>
  <div class="mdl-card__menu">
    <button class="mdl-button mdl-js-button mdl-button--fab">
      <i class="material-icons">add</i>
    </button>
  </div>
</div>
โดยเพิ่มการทำงานรอไว้ก่อนคือ การใช้ ng-show, ng-hide ไว้เป็นเงื่อนไขเปลี่ยน status ของการทำงานในหน้า ให้เลือกว่าโชว์อยู่ก็ซ่อน ถ้าซ่อนอยู่ก็จะโชว์ครับ
<h2 class="mdl-card__title-text" ng-show="edit">Add New Driver</h2>
<h2 class="mdl-card__title-text" ng-hide="edit">Edit Driver</h2>
ไปที่ไฟล์ Sample.html ไปเขียนคำสั่ง ng-include เพิ่มที่ <main> ต่อว่า
<main class="mdl-layout__content">
   <div class="page-content">
   <!-- Your include AngularJS -->
   <div ng-include="'dataTable.html'"></div>
   <div ng-include="'form.html'"></div>
   </div>
</main>
เราจะได้ หน้า form มา include ดังนี้
ให้เราไปที่ไฟล์ controller/sample.js ครับ เพิ่มคำสั่งนี้เข้าไป
angular.module('sampleModules', [])
.controller('sampleController', function($scope, $http, $location) {
    $http.get("http://localhost/AngularJS/api/listdriver.php")
    .success(function (response) {$scope.driver = response.drivers;});

	$scope.edit = true;
	$scope.error = false;
	$scope.incomplete = false;
	$scope.editdata = function(id) {
		$scope.edit = false;
	};
});
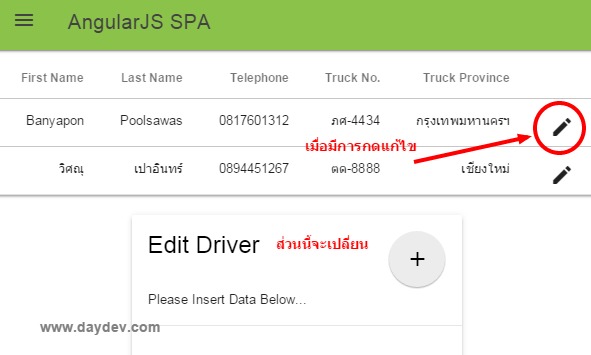
เป็นการกำหนด action เมื่อคลิกที่ปุ่ม edit บน table ครับจะทำการเรียกฟังก์ชัน editdata() โดยส่งค่า user.id ตามมาเช็ค แต่ใน $scope ของ edit (ชื่อ ng-show และ ng-hide) จะมีการเปลี่ยนเป็น true false มีผลที่หน้า view ครับ
ทดสอบหน่อย
ทำการเพิ่มส่วนของ ตัวแปร $scope ลงไปใน sample.js เป็นค่าเริ่มต้น
$http.get("http://localhost/AngularJS/api/listdriver.php")
    .success(function (response) {$scope.driver = response.drivers;});

	$scope.first_name = '';
	$scope.last_name = '';
	$scope.tel = '';
	$scope.TruckNo = '';
	$scope.TruckPV = '';
ตามด้วยการ เก็บ ค่า $scope มา Binding เมื่อกด editdata จาก table
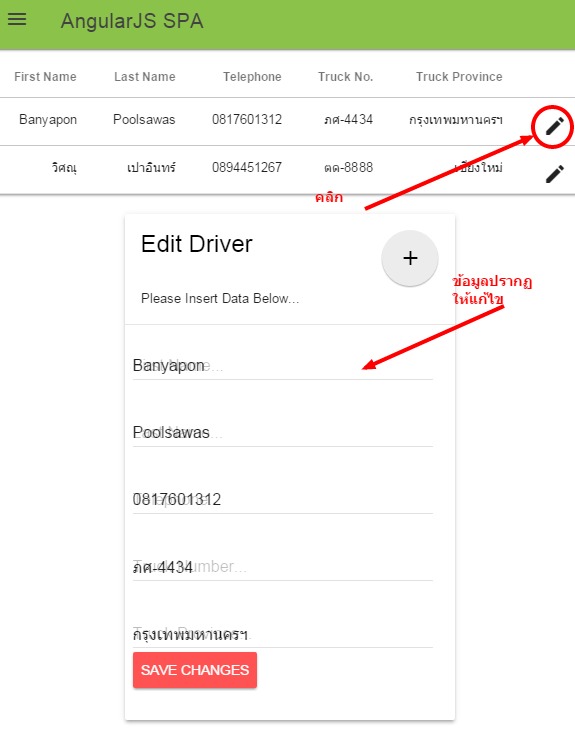
$scope.editdata = function(id) {
		$scope.edit = false;
		$scope.first_name = $scope.driver[id-1].first_name;
		$scope.last_name = $scope.driver[id-1].last_name;
		$scope.tel = $scope.driver[id-1].tel;
		$scope.TruckNo = $scope.driver[id-1].TruckNo;
		$scope.TruckPV = $scope.driver[id-1].TruckPV;
};
ทดสอบอีกครั้งกด Edit บน ตาราง ฟอร์มข้างล่างจะมีค่าให้แก้ไข
หลังจากนั้นก็ไปเอาบทเรียนที่สอนไว้ครับ บทเรียนเกี่ยวกับ
มาประยุคใช้ก็เป็นอันจบ ไม่ยากอะไรสำหรับบทเรียนนี้นะครับ สงสัยอะไรทักกันที่ http://www.facebook.com/daydevthailand