

การเขียนแอพพลิเคชันบนแพลตฟอร์ม Android ด้วย Android Studio ในการดึงข้อมูล JSON Webservice และโหลดรูปภาพ Image จาก Serve ผ่าน Cache เพิ่มความเร็ว ด้วย Volley
แรกเริ่มเดิมทีเราเลยเขียนแอพพลิเคชันในการดึง ข้อมูลจาก JSON Web Service มาบ้างแล้วกัยบทเรียนเหล่านี้
- เขียนแอพ Android เรียก JSON Web service แสดงบน ListView
- เขียนแอพ Android ร่วมกับ JSON แสดงภาพบน ListView และ Intent
หรือ ทบทวนทั้งหมดก่อนที่นี่
จะเห็นว่าตัวอย่างที่เคยทำมาจะมีปัญหาในเรื่องของการแสดงผลรูปภาพของ ListView นั่นคือ อาการกระตุก ไม่ Smooth เมื่อมีการ Scrolling หน้าจอของ ListView หลักๆ เป็นเพราะเราต้องเสียเวลาในการโหลด Image จาก URL ที่อยู่ใน JSON ทุกทั้งที่มีการแสดงผล ซึ่งถ้าจะให้เร็ว และ Smooth นั้นมีทางเดียวคือต้องจัดการเก็บ Cache ของมันสำหรับโหลดภาพ หรือ Image ทีหลัง ซึ่งทางนักพัฒนาก็มี ส่วนเสริมมากมายหลากหลายให้เราเลือกใช้ ตัวเลือกหนึ่งที่คิดว่าไม่น่าจะลำบากมากน่าจะเป็น Volley ครับ
เริ่มต้นพัฒนากันดีกว่า เปิด Android Studio ขึ้นมาครับ (ตัวอย่างใช้ SDK 23.0.1)
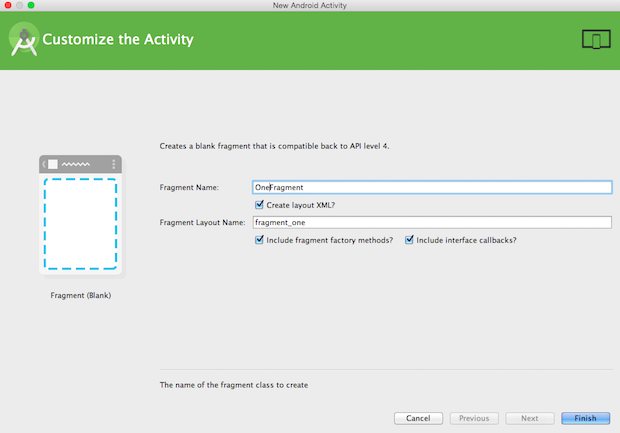
เลือกรูปแบบเป็น Blank Activity ปรกติครับ เสร็จแล้วดาวน์โหลด ไฟล์ volley.jar มาใช้กับ Project ของเรา
https://drive.google.com/file/d/0B08PZSOd4UmOTFBLbW1sQUlYVHc/view?usp=sharing
วิธีการวางไฟล์ .jar ไว้ใช้กับ Project ของเราให้ทำดังนี้ครับ
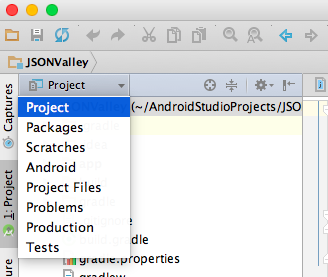
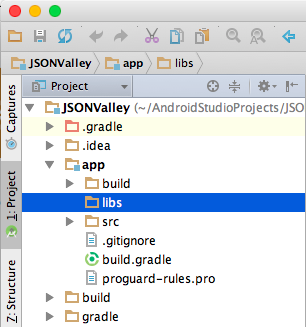
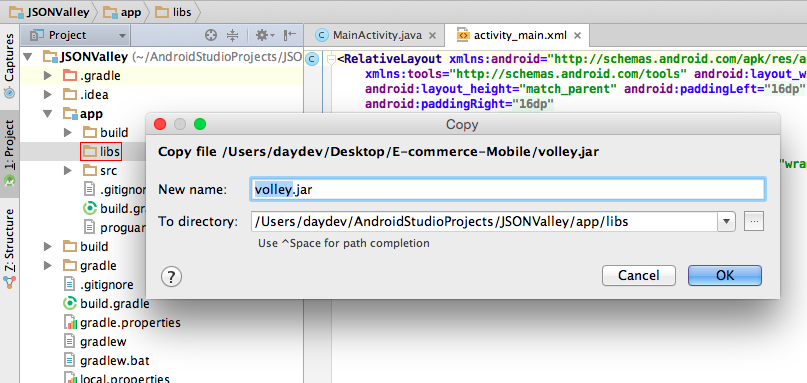
คลิกที่ “Android” ตำแหน่งดังภาพข้างบนเลือกเป็น “Project” แล้วลากไฟล์ volley.jar ที่ดาวน์โหลดมาไปวางในโฟลเดอร์ “app/libs” ของ Project ของเราให้เรียบร้อย แล้ว คลิกเปลี่ยน “Project” เป็น “Android” เช่นเดิมครับ
เมื่อเสร็จแล้วเปิด Gradle (build) ออกมาทำการเขียนคำสั่ง Compile Gradle เข้าไปครับ
dependencies {
   compile fileTree(dir: 'libs', include: ['*.jar'])
   compile 'com.android.support:appcompat-v7:23.0.1'
   compile files('libs/volley.jar')
}
นั่นคือการเพิ่ม
compile files('libs/volley.jar')
ไปแค่บรรทัดเดียว ทำการ Sync ให้เรียบร้อย และ Clean Project ครับต่อมาให้เราไปที่ Folder “res/values” สร้างไฟล์ colors.xml ขึ้นมา เพื่อกำหนด value ของชุดสีที่ต้องการจะใช้
<?xml version="1.0" encoding="utf-8"?>
<resources>
   <color name="author">#32a546</color>
   <color name="cate">#32a546</color>
   <color name="list_divider">#d9d9d9</color>
   <color name="list_row_start_color">#ffffff</color>
   <color name="list_row_end_color">#ffffff</color>
   <color name="list_row_hover_start_color">#ebeef0</color>
   <color name="list_row_hover_end_color">#ebeef0</color>
</resources>
แก้ไขไฟล์ dimens.xml ให้เป็นดังนี้
<resources>
   <!-- Default screen margins, per the Android Design guidelines. -->
   <dimen name="activity_horizontal_margin">16dp</dimen>
   <dimen name="activity_vertical_margin">16dp</dimen>
   <dimen name="title">17dp</dimen>
   <dimen name="author">15dip</dimen>
   <dimen name="genre">13dip</dimen>
   <dimen name="year">12dip</dimen>
</resources>
เมื่อเรียบร้อยแล้วให้เราสร้าง Values ใน โฟลเดอร์ “res/drawables” โดยสร้างไฟล์ขึ้นมา 3 ไฟล์ตามนี้ คือ list_row_bg.xml, list_row_bg_hover.xml และ list_row_selector.xml
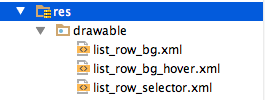
แก้ไขแต่ละไฟล์ครับ เป็นการวางค่า Layout บางอย่างเวลามีการกระทำที่ Row ของ ListView
<?xml version="1.0" encoding="utf-8"?>
<shape xmlns:android="http://schemas.android.com/apk/res/android"
   android:shape="rectangle">
   <gradient
       android:startColor="@color/list_row_start_color"
       android:endColor="@color/list_row_end_color"
       android:angle="270" />
</shape>
<?xml version="1.0" encoding="utf-8"?>
<shape xmlns:android="http://schemas.android.com/apk/res/android"
   android:shape="rectangle" >
   <gradient
       android:angle="270"
       android:endColor="@color/list_row_hover_end_color"
       android:startColor="@color/list_row_hover_start_color" />
</shape>
<?xml version="1.0" encoding="utf-8"?>
<selector xmlns:android="http://schemas.android.com/apk/res/android">
   <item android:drawable="@drawable/list_row_bg" android:state_pressed="false" android:state_selected="false"/>
   <item android:drawable="@drawable/list_row_bg_hover" android:state_pressed="true"/>
   <item android:drawable="@drawable/list_row_bg_hover" android:state_pressed="false" android:state_selected="true"/>
</selector>
ต่อมาให้เรานำ ListView ไปใส่ใน Layout ของ MainActivity นั่นคือไฟล์ activity_main.xml
<RelativeLayout xmlns:android="http://schemas.android.com/apk/res/android"
   xmlns:tools="http://schemas.android.com/tools"
   android:layout_width="match_parent"
   android:layout_height="match_parent"
   tools:context=".MainActivity" >

   <ListView
       android:id="@+id/list"
       android:layout_width="fill_parent"
       android:layout_height="wrap_content"
       android:divider="@color/list_divider"
       android:dividerHeight="1dp"
       android:listSelector="@drawable/list_row_selector" />

</RelativeLayout>
โดย ListView ที่แทรกเข้าไปชื่ “list” นั้นจะมีการแสดงผล แถวแต่ละแถวตามตัวอย่างก่อนหน้านี้ คือมีภาพประกอบ และ ชื่อหัวข้อ เราต้องสร้าง Layout ของแถว ชื่อ “list_row.xml” ขึ้นมา
<RelativeLayout xmlns:android="http://schemas.android.com/apk/res/android"
   xmlns:tools="http://schemas.android.com/tools" android:layout_width="match_parent"
   android:layout_height="match_parent" android:paddingLeft="@dimen/activity_horizontal_margin"
   android:paddingRight="@dimen/activity_horizontal_margin"
   android:paddingTop="@dimen/activity_vertical_margin"
   android:paddingBottom="@dimen/activity_vertical_margin" tools:context=".MainActivity">

   <com.android.volley.toolbox.NetworkImageView
       android:id="@+id/thumbnail"
       android:layout_width="match_parent"
       android:layout_height="172dp"
       android:layout_alignParentTop="true"
       android:layout_centerHorizontal="true"
       android:maxHeight="172dp" />

   <TextView
       android:layout_width="fill_parent"
       android:layout_height="wrap_content"
       android:textAppearance="?android:attr/textAppearanceLarge"
       android:text="Large Text"
       android:id="@+id/title"
       android:layout_below="@+id/thumbnail"
       android:layout_alignStart="@+id/thumbnail"
       android:width="300dp" />
<TextView
       android:layout_width="fill_parent"
       android:layout_height="wrap_content"
       android:textAppearance="?android:attr/textAppearanceSmall"
       android:text="Small Text"
       android:id="@+id/author"
       android:textColor="@color/author"
       android:layout_below="@+id/title"
       android:layout_alignEnd="@+id/title"
       android:width="300dp" />
   <TextView
       android:layout_width="fill_parent"
       android:layout_height="wrap_content"
       android:textAppearance="?android:attr/textAppearanceSmall"
       android:text="Small Text"
       android:id="@+id/categories"
       android:textColor="@color/cate"
       android:layout_below="@+id/author"
       android:layout_alignEnd="@+id/author"
       android:width="300dp" />
</RelativeLayout>
สังเกตจะเห็นว่าส่วนของรูปภาพเราจะไม่ใช้ ImageView เหมือนตัวอย่างก่อนๆ แต่จะเป็น
<com.android.volley.toolbox.NetworkImageView
       android:id="@+id/thumbnail"
       android:layout_width="match_parent"
       android:layout_height="172dp"
       android:layout_alignParentTop="true"
       android:layout_centerHorizontal="true"
       android:maxHeight="172dp" />
ส่วนของ NetworkImageView ที่มากับเข้า Valley นั่นเอง
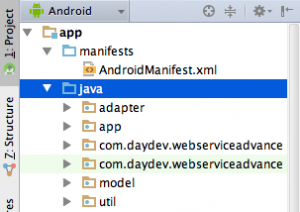
สร้าง Package สำหรับ Project ของเราเพิ่มขึ้นมาคือ app, model, adapter และ util
ไปที่ package “util” ทำการสร้าง Class ใหม่ขึ้นมาชื่อว่า LruBitmapCache.java” ซึ่งจะเป็นคำสั่งของ Volley ในการโหลดรูปภาพมาเก็บใน Cache ทีหลังจากการโหลดข้อมูล และเมื่อมาดูใหม่อีกครั้งจะไม่เกิดการโหลดรูปภาพจาก URL อีกเพราะอยู่ใน Cache เป็นที่เรียบร้อยแล้ว
package util;
import com.android.volley.toolbox.ImageLoader.ImageCache;
import android.graphics.Bitmap;
import android.support.v4.util.LruCache;

public class LruBitmapCache extends LruCache<String, Bitmap> implements ImageCache
 {
   public static int getDefaultLruCacheSize() {
       final int maxMemory = (int) (Runtime.getRuntime().maxMemory() / 1024);
       final int cacheSize = maxMemory / 8;
       return cacheSize;
   }
   public LruBitmapCache() {
       this(getDefaultLruCacheSize());
   }
   public LruBitmapCache(int sizeInKiloBytes) {
       super(sizeInKiloBytes);
   }
   @Override
   protected int sizeOf(String key, Bitmap value) {
       return value.getRowBytes() * value.getHeight() / 1024;
   }
   @Override
   public Bitmap getBitmap(String url) {
       return get(url);
   }
   @Override
   public void putBitmap(String url, Bitmap bitmap) {
       put(url, bitmap);
   }
}
ไปที่ Package “app” สร้าง Class ใหม่ชื่อว่า “AppController.java” เพื่อทำการเรียก util ที่เราสร้างไว้เมื่อมีการโหลดข้อมูล และเป็นการควบคุมการเรียกโหลดข้อมูลว่าสิ่งไหนควรโหลดหลัง หรือโหลดก่อนหน้า
package app;
import android.app.Application;
import android.text.TextUtils;
import com.android.volley.Request;
import com.android.volley.RequestQueue;
import com.android.volley.toolbox.ImageLoader;
import com.android.volley.toolbox.Volley;

import util.LruBitmapCache;

public class AppController extends Application {

   public static final String TAG = AppController.class.getSimpleName();
   private RequestQueue mRequestQueue;
   private ImageLoader mImageLoader;
   private static AppController mInstance;

   @Override
   public void onCreate() {
       super.onCreate();
       mInstance = this;
   }
   public static synchronized AppController getInstance() {
       return mInstance;
   }
   public RequestQueue getRequestQueue() {
       if (mRequestQueue == null) {
           mRequestQueue = Volley.newRequestQueue(getApplicationContext());
       }

       return mRequestQueue;
   }
public ImageLoader getImageLoader() {
       getRequestQueue();
       if (mImageLoader == null) {
           mImageLoader = new ImageLoader(this.mRequestQueue,
                   new LruBitmapCache());
       }
       return this.mImageLoader;
   }

   public <T> void addToRequestQueue(Request<T> req, String tag) {
       // set the default tag if tag is empty
       req.setTag(TextUtils.isEmpty(tag) ? TAG : tag);
       getRequestQueue().add(req);
   }

   public <T> void addToRequestQueue(Request<T> req) {
       req.setTag(TAG);
       getRequestQueue().add(req);
   }

   public void cancelPendingRequests(Object tag) {
       if (mRequestQueue != null) {
           mRequestQueue.cancelAll(tag);
       }
   }
}
เปิด Permission ของ AndroidManifest.xml ในส่วนของการ INTERNET และใช้ android:name ให้ควบคุมโดย AppController
<uses-sdk
       android:minSdkVersion="11"
       android:targetSdkVersion="18" />
   <uses-permission android:name="android.permission.INTERNET" />
และ
 <application
       ...
       android:name="app.AppController">
ไฟล์ AndroidManifest.xml จะเป็นดังนี้
<?xml version="1.0" encoding="utf-8"?>
<manifest xmlns:android="http://schemas.android.com/apk/res/android"
   package="com.daydev.webserviceadvance" >
   <uses-sdk
       android:minSdkVersion="11"
       android:targetSdkVersion="18" />
   <uses-permission android:name="android.permission.INTERNET" />
   <application
       android:allowBackup="true"
       android:icon="@mipmap/ic_launcher"
       android:label="@string/app_name"
       android:theme="@style/AppTheme"
       android:name="app.AppController">
       <activity
           android:name=".MainActivity"
           android:label="@string/app_name" >
           <intent-filter>
               <action android:name="android.intent.action.MAIN" />

               <category android:name="android.intent.category.LAUNCHER" />
           </intent-filter>
       </activity>
   </application>

</manifest>
จัดการส่วนของ model ใน package “model” สร้าง Class “Movie.java” ขึ้นมาเพื่อดึง Key ของ Web Service ที่เราต้องการเรียกซึ่งผมจะใช้ตัวอย่างเดิมคือ
รูปแบบของ JSON เป็นดังนี้
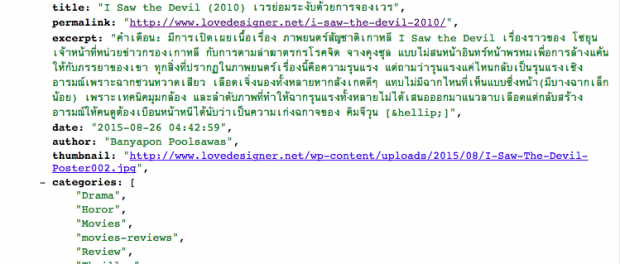
ดังนั้น Movie.java ต้องใช้คำสั่ง Mapping Key ตามนี้
package model;

import java.util.ArrayList;

public class Movie {
   private String title, thumbnailUrl;
   private String date;
   private String author;
   private ArrayList<String> categories;

   public Movie() {
   }
   public Movie(String name, String thumbnailUrl,
               String date, String author,
                ArrayList<String> categories) {
       this.title = name;
       this.thumbnailUrl = thumbnailUrl;
       this.date = date;
       this.author = author;
       this.categories = categories;
   }
   public String getTitle() {
       return title;
   }
   public void setTitle(String name) {
       this.title = name;
   }
   public String getThumbnailUrl() {
       return thumbnailUrl;
   }
public void setThumbnailUrl(String thumbnailUrl) {
       this.thumbnailUrl = thumbnailUrl;
   }

   public String getYear() {
       return date;
   }

   public void setDate(String date) {
       this.date = date;
   }

   public String getAuthor() {
       return author;
   }

   public void setAuthor(String author) {
       this.author = author;
   }

   public ArrayList<String> getGenre() {
       return categories;
   }

   public void setCategories(ArrayList<String> categories) {
       this.categories = categories;
   }
}
ไปที่ package “adapter” สร้าง Class ตัวสุดท้ายขึ้นมาคือ Adapter ไว้จัดการข้อมูล “CustomListAdapter.java” ทำงานร่วมกับ Movie.java
package adapter;

import java.util.List;
import app.AppController;
import model.Movie;

import android.app.Activity;
import android.content.Context;
import android.view.LayoutInflater;
import android.view.View;
import android.view.ViewGroup;
import android.widget.BaseAdapter;
import android.widget.TextView;
import com.android.volley.toolbox.ImageLoader;
import com.android.volley.toolbox.NetworkImageView;
import com.daydev.webserviceadvance.R;
public class CustomListAdapter extends BaseAdapter {
   private Activity activity;
   private LayoutInflater inflater;
   private List<Movie> movieItems;
   ImageLoader imageLoader = AppController.getInstance().getImageLoader();
   public CustomListAdapter(Activity activity, List<Movie> movieItems) {
       this.activity = activity;
       this.movieItems = movieItems;
   }
   @Override
   public int getCount() {return movieItems.size();}
   @Override
   public Object getItem(int location) {return movieItems.get(location);}
   @Override
   public long getItemId(int position) {return position;}
@Override
   public View getView(int position, View convertView, ViewGroup parent) {
       if (inflater == null)
           inflater = (LayoutInflater) activity
                   .getSystemService(Context.LAYOUT_INFLATER_SERVICE);
       if (convertView == null)
           convertView = inflater.inflate(R.layout.list_row, null);
       if (imageLoader == null)
           imageLoader = AppController.getInstance().getImageLoader();
       NetworkImageView thumbNail = (NetworkImageView) convertView
               .findViewById(R.id.thumbnail);
       TextView title = (TextView) convertView.findViewById(R.id.title);
       TextView author = (TextView) convertView.findViewById(R.id.author);
       TextView genre = (TextView) convertView.findViewById(R.id.categories);
       // getting movie data for the row
       Movie m = movieItems.get(position);
       // thumbnail image
       thumbNail.setImageUrl(m.getThumbnailUrl(), imageLoader);
       // title
       title.setText(m.getTitle());
       // rating
       author.setText("Rating: " + String.valueOf(m.getAuthor()));
       // genre
       String genreStr = "";
       for (String str : m.getGenre()) {
           genreStr += str + ", ";
       }
       genreStr = genreStr.length() > 0 ? genreStr.substring(0,
               genreStr.length() - 2) : genreStr;
       genre.setText(genreStr);
       return convertView;
   }
}
ต่อมาคือการแสดงผล ListView ที่เราตั้ง id ว่า “list” ให้แสดงผลของ CustomeList และเก็บ Cache Image ครับแก้ไขไฟล์ Class “MainActivity.java” ดังนี้
package com.daydev.webserviceadvance;

import android.support.v7.app.AppCompatActivity;
import android.os.Bundle;
import android.view.Menu;
import android.view.MenuItem;

import adapter.CustomListAdapter;
import app.AppController;
import model.Movie;

import java.util.ArrayList;
import java.util.List;

import org.json.JSONArray;
import org.json.JSONException;
import org.json.JSONObject;

import android.app.Activity;
import android.app.ProgressDialog;
import android.graphics.Color;
import android.graphics.drawable.ColorDrawable;

import android.widget.ListView;

import com.android.volley.Response;
import com.android.volley.VolleyError;
import com.android.volley.VolleyLog;
import com.android.volley.toolbox.JsonArrayRequest;

import android.util.Log;

public class MainActivity extends Activity {

   // Log tag
   private static final String TAG = MainActivity.class.getSimpleName();

   // Movies json url
   private static final String url = "http://lovedesigner.net/feed/json";
   private ProgressDialog pDialog;
   private List<Movie> movieList = new ArrayList<Movie>();
   private ListView listView;
   private CustomListAdapter adapter;

   @Override
   protected void onCreate(Bundle savedInstanceState) {
       super.onCreate(savedInstanceState);
       setContentView(R.layout.activity_main);

       listView = (ListView) findViewById(R.id.list);
       adapter = new CustomListAdapter(this, movieList);
       listView.setAdapter(adapter);

       pDialog = new ProgressDialog(this);
       // Showing progress dialog before making http request
       pDialog.setMessage("กำลังโหลดข้อมูล...");
       pDialog.show();
JsonArrayRequest movieReq = new JsonArrayRequest(url,
           new Response.Listener<JSONArray>() {
               @Override
               public void onResponse(JSONArray response) {
                   Log.d(TAG, response.toString()); hidePDialog();
                   for (int i = 0; i < response.length(); i++) {                    // Parsing json
                       try {
                           JSONObject obj = response.getJSONObject(i);
                           Movie movie = new Movie();
                           movie.setTitle(obj.getString("title"));
                           movie.setThumbnailUrl(obj.getString("thumbnail"));
                           movie.setAuthor(obj.getString("author"));
                           movie.setDate(obj.getString("date"));
                           // Genre is json array
                           JSONArray cateArry = obj.getJSONArray("categories");
                           ArrayList<String> getCate = new ArrayList<String>();
                           for (int j = 0; j < cateArry.length(); j++) {
                               getCate.add((String) cateArry.get(j));
                           }
                           movie.setCategories(getCate);
                           // adding movie to movies array
                           movieList.add(movie);

                       } catch (JSONException e) {e.printStackTrace(); }
                   }
                   adapter.notifyDataSetChanged();
               }
           }, new Response.ErrorListener() {
       @Override
       public void onErrorResponse(VolleyError error) {
           VolleyLog.d(TAG, "Error: " + error.getMessage());
           hidePDialog();
       }
   });
   AppController.getInstance().addToRequestQueue(movieReq);
}
@Override
   public void onDestroy() {
       super.onDestroy();
       hidePDialog();
   }

   private void hidePDialog() {
       if (pDialog != null) {
           pDialog.dismiss();
           pDialog = null;
       }
   }

   @Override
   public boolean onCreateOptionsMenu(Menu menu) {
       // Inflate the menu; this adds items to the action bar if it is present.
       getMenuInflater().inflate(R.menu.menu_main, menu);
       return true;
   }

   @Override
   public boolean onOptionsItemSelected(MenuItem item) {
       // Handle action bar item clicks here. The action bar will
       // automatically handle clicks on the Home/Up button, so long
       // as you specify a parent activity in AndroidManifest.xml.
       int id = item.getItemId();

       //noinspection SimplifiableIfStatement
       if (id == R.id.action_settings) {
           return true;
       }

       return super.onOptionsItemSelected(item);
   }
}
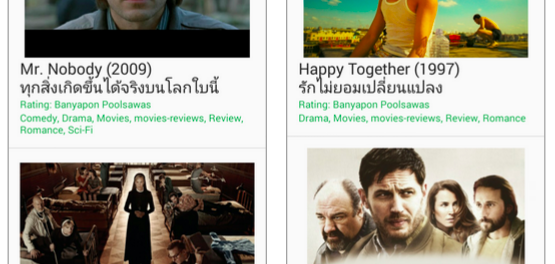
ทดสอบการโหลดข้อมูลผ่าน Emulator หรือเครื่องสมาร์ทโฟนของเราดู จะเห็นว่า การ Scrolling ส่วนของ ListView จะเร็ว และ Smooth ไม่เกิดอาการกระตุก
แหล่งข้อมูลเพิ่มเติม stackoverflow.com, https://github.com/mcxiaoke/android-volley


One Comment