บทเรียนการทำ Machine Learning โดยใช้ OpenCV ในการวัด (Measuring) ขนาดของ Machine Learning ใช้ Python และ OpenCV ทำระบบ Measuring Size ขนาดของวัตถุในภาพ ด้วย Python
เห็น Tutorial มากมายจากใน Medium หรือ PyImageSearch ทำนู่นนี่มากมายทั้งระบบล้ำๆ รอบนี้ก็เลยอยากลองหาวิธีการทำมาตรวัด Measure หรือระบบ Measuring ขนาด กว้าง x ยาว ของวัตถุที่ปรากฏในภาพถ่ายบ้างหน่อยก็เลยลองทำ Tutorial ที่ย่อย และยำใหม่ให้เข้าใจง่ายตามเดิม
บทเรียนก่อนหน้านี้:
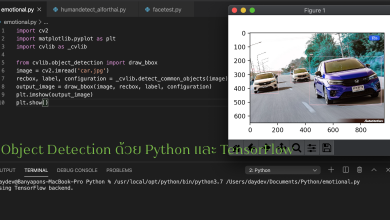
- Object Detection ตรวจจับวัตถุด้วย Python และ TensorFlow ร่วมกับ MatplotLib
- Review: บริการ AI for Thai มาทดสอบระบบการระบุตำแหน่งบุคคลในภาพ (Person Detection) ด้วย Python กัน
- Python กับ OpenCV เทคนิคการทำ Inpainting ตกแต่งภาพที่เสียหาย
สำหรับระบบให้เราลองสร้างไฟล์ Python ชื่อว่าอะไรก็ได้เช่น test.py หลังจากนั้นสร้างโฟลเดอร์ชื่อ images ขึ้นมาใส่ภาพสิ่งของที่วางบนพื้นเรียบๆ หน่อย
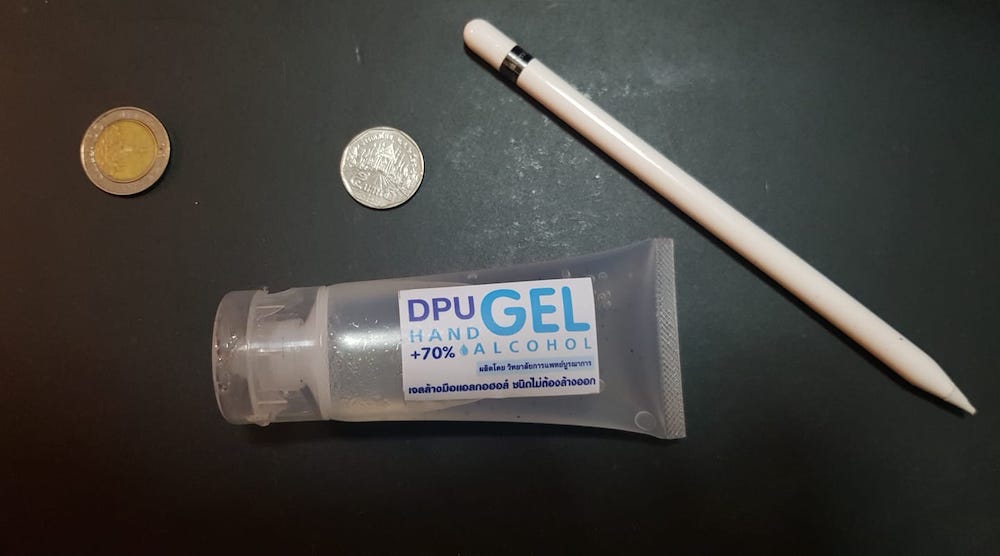
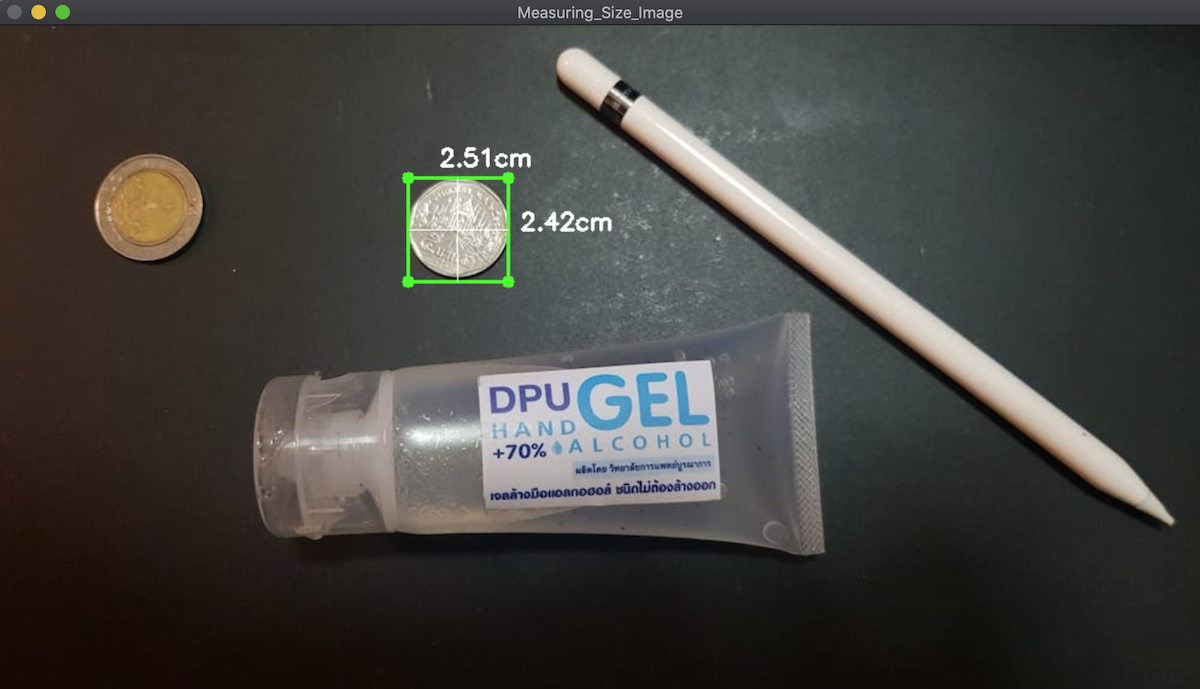
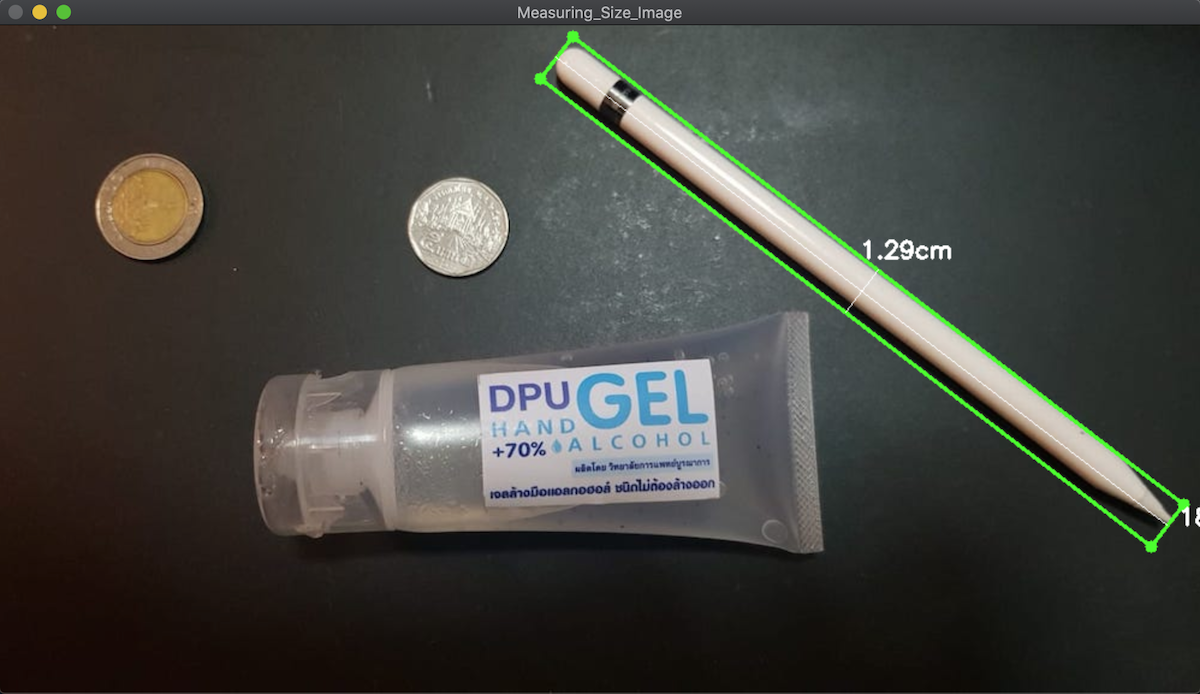
ในภาพมี เหรียญ 10 บาท เหรียญ 5 บาท ขวดเจลแอลกอฮอล 70% ทำใช้เองในมหาวิทยาลัย และ Apple Pencil ในภาพเราต้องกำหนด Reference Image ไว้ชิ้นหนึ่งทางด้านซ้ายซึ่งผมเลือก เหรียญ 10 ดังนั้นต้องหาข้อมูลสำหรับ Carlibrate หน่อยคือ ขนาด 2.6cm x 2.6cm (เส้นผ่าศูนย์กลาง 2.6 cm) ตีเป็นนิ้ว (Inch) คือ 1.02362205
โอเคให้ประกาศ Header ดังนี้:
from scipy.spatial import distance as dist
from imutils import perspective
from imutils import contours
import numpy as np
import imutils
from cv2 import cv2
พิจารณา ฟังก์ชันของ scipy เป็นการหาระยะห่างระหว่างจุดหรือหลักของ Euclidean distance (งานวิจัยผมค่อนข้างเยอะเลยที่ใช้กฏนี้) Python สำหรับ Machine Learning นั้นพระเอกหลักของบทเรียนนี้คือการคำนวณระยะห่างระหว่างจุดข้อมูล Euclidean distance (วิธีการเพื่อนบ้านใกล้สุด k ตัว, วิธีการ k เฉลี่ย) ซึ่งคำสั่ง Module ทั้งหลายอยู่ใน scipy.spatial.distance ของ scipy ที่เราประกาศนี่แหละ และบทเรียนนี้เลือก distance มาใช้
ในระบบนี้จะทำงานส่วนของ imutils เราจะเรียกใช้ perspective และ contours ของมันมาใช้ ถามว่าคืออะไรให้นึกถึง library ของการประมวลผลรูปภาพ (image processing) เช่น กลับภาพ Flip หมุนภาพ Rotate หรือ ปรับขนาด Scale Image และวาก contours (เส้นรูปร่าง) มาใช้ในงานนี้
ทำการวางฟังก์ชัน midpoint ไว้หาจุดกึ่งกลางที่เราจะทำเส้นตัดของเส้นผ่านศูนย์กลางแนวดิ่งและระนาบ
def midpoint(ptA, ptB):
	return ((ptA[0] + ptB[0]) * 0.5, (ptA[1] + ptB[1]) * 0.5)
โหลดไฟล์รูปภาพของเรา “images/sample.jpeg” ทำกแปลงเป็นสีเทาและทำ Gaussian Blur เบลอเล็กน้อย
image = cv2.imread("./images/sample.jpeg")
gray = cv2.cvtColor(image, cv2.COLOR_BGR2GRAY)
gray = cv2.GaussianBlur(gray, (7, 7), 0)
ทำการตรวจจับเส้นขอบจากภาพขาวดำ เมื่อจับส่วนของขอบได้แล้วจากนั้นทำการขยาย และ การรอยกร่อนให้กับมัน เมื่อเสร็จแล้ว ให้ปิดช่องว่างระหว่างขอบวัตถุ
edged = cv2.Canny(gray, 50, 100)
edged = cv2.dilate(edged, None, iterations=1)
edged = cv2.erode(edged, None, iterations=1)
ค้นหาส่วนที่ทำ contours ภาพร่างจากกระบวนการข้างต้น
cnts = cv2.findContours(edged.copy(), cv2.RETR_EXTERNAL,
	cv2.CHAIN_APPROX_SIMPLE)
cnts = imutils.grab_contours(cnts)
จับ Contours มาประมวลผล จัดเรียงภาพร่างจากซ้ายไปขวา กำหนดตัวแปรการเปรียบเทียบ Calibration ซึ่งมาจากการคำนวณของ Pixels ต่อ Metric หน่วยที่คำนวณ เก็บลงตัวแปรชื่อเดียวกัน
(cnts, _) = contours.sort_contours(cnts)
pixelsPerMetric = None
contours สีที่ต่างกันเพื่อหาภาพร่างของวัตถุ ซึ่งถ้าเจอจุดสีต่างใน contours ให้วาด แต่ถ้าหาก Contours ไม่ได้ใหญ่มากเป็นจุดต่างเล็กๆ ก็ไม่ต้องนำมาพิจารณาเก็บค่า
for c in cnts:
	if cv2.contourArea(c) < 100:
		continue
คำนวณเพื่อสร้าง Box จากขอบเขตของภาพ contours ที่ได้ กำหนดทิศทางการหมุน scipy ของรูปร่างวัตถุ
orig = image.copy()
	box = cv2.minAreaRect(c)
	box = cv2.cv.BoxPoints(box) if imutils.is_cv2() else cv2.boxPoints(box)
	box = np.array(box, dtype="int")
เรียงลำดับ Point ที่จับได้รูปร่าง contours ซ้ายบน ขวาบน ล่างขวา ล่างซ้าย เรียงเสร็จจากนั้นวาดโครงร่างของขอบเขตที่หมุน ด้วย Box ครอบตำแหน่งทั้งหมดของวัตถุ:
box = perspective.order_points(box)
	cv2.drawContours(orig, [box.astype("int")], -1, (0, 255, 64), 2)
สี RGB(0,255,64) สีเขียวความหนาสัก 2 ทำการ Loop หา Original Point จาก contours ในวัตถุอื่นๆ ไปเรื่อยๆ เพื่อสร้าง Box ให้กับมัน
for (x, y) in box:
		cv2.circle(orig, (int(x), int(y)), 5, (0, 255, 64), -1)

	(tl, tr, br, bl) = box
	(tltrX, tltrY) = midpoint(tl, tr)
	(blbrX, blbrY) = midpoint(bl, br)

	(tlblX, tlblY) = midpoint(tl, bl)
	(trbrX, trbrY) = midpoint(tr, br)
ทีนี้มาทำเส้นตัดศูนย์กลางอ้างอิง midpoint กันดีกว่า ใช้เส้นบางหน่อย:
cv2.circle(orig, (int(tltrX), int(tltrY)), 0, (0, 255, 64), 0)
cv2.circle(orig, (int(blbrX), int(blbrY)), 0, (0, 255, 64), 0)
cv2.circle(orig, (int(tlblX), int(tlblY)), 0, (0, 255, 64), 0)
cv2.circle(orig, (int(trbrX), int(trbrY)), 0, (0, 255, 64), 0)
วาดเส้นขาวตัดกลางทั้งแกนระนาบ และแนวดิ่งเลย
cv2.line(orig, (int(tltrX), int(tltrY)), (int(blbrX), int(blbrY)),
		(255, 255, 255), 1)
cv2.line(orig, (int(tlblX), int(tlblY)), (int(trbrX), int(trbrY)),
		(255, 255, 255), 1)
คำนวณหาระยะห่างระหว่างจุดด้วย Euclidian Distance:
dA = dist.euclidean((tltrX, tltrY), (blbrX, blbrY))
	dB = dist.euclidean((tlblX, tlblY), (trbrX, trbrY))

	if pixelsPerMetric is None:
		pixelsPerMetric = dB / 1.02362205

	dimA = dA / pixelsPerMetric
	dimB = dB / pixelsPerMetric
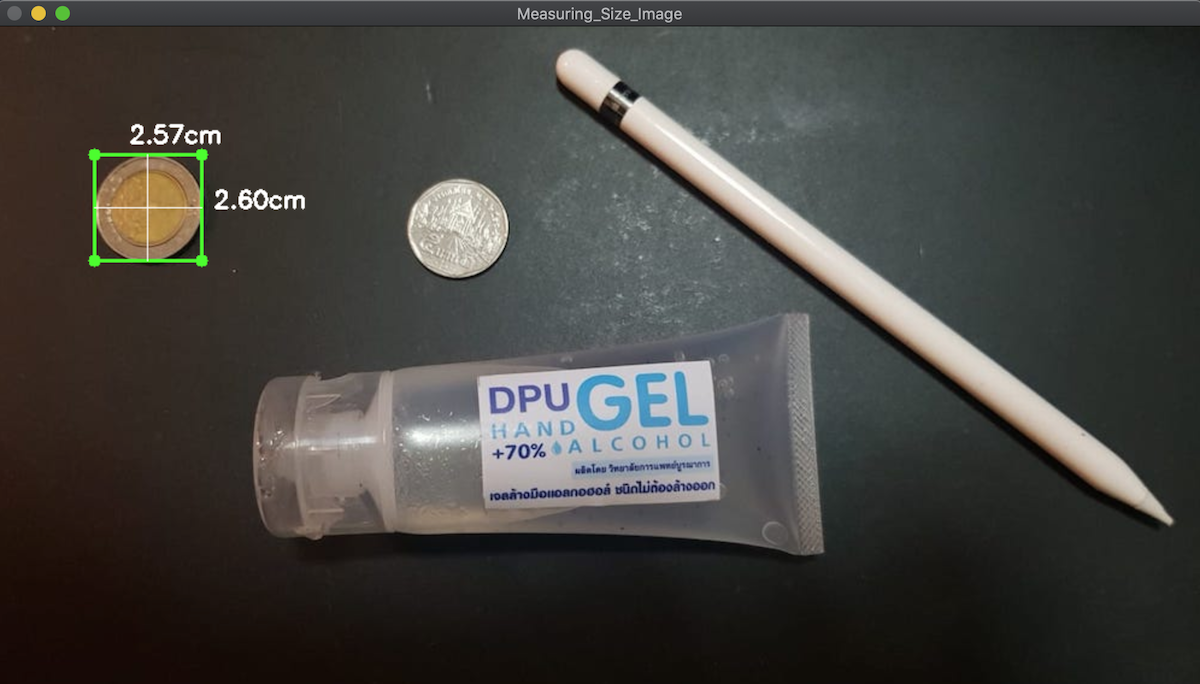
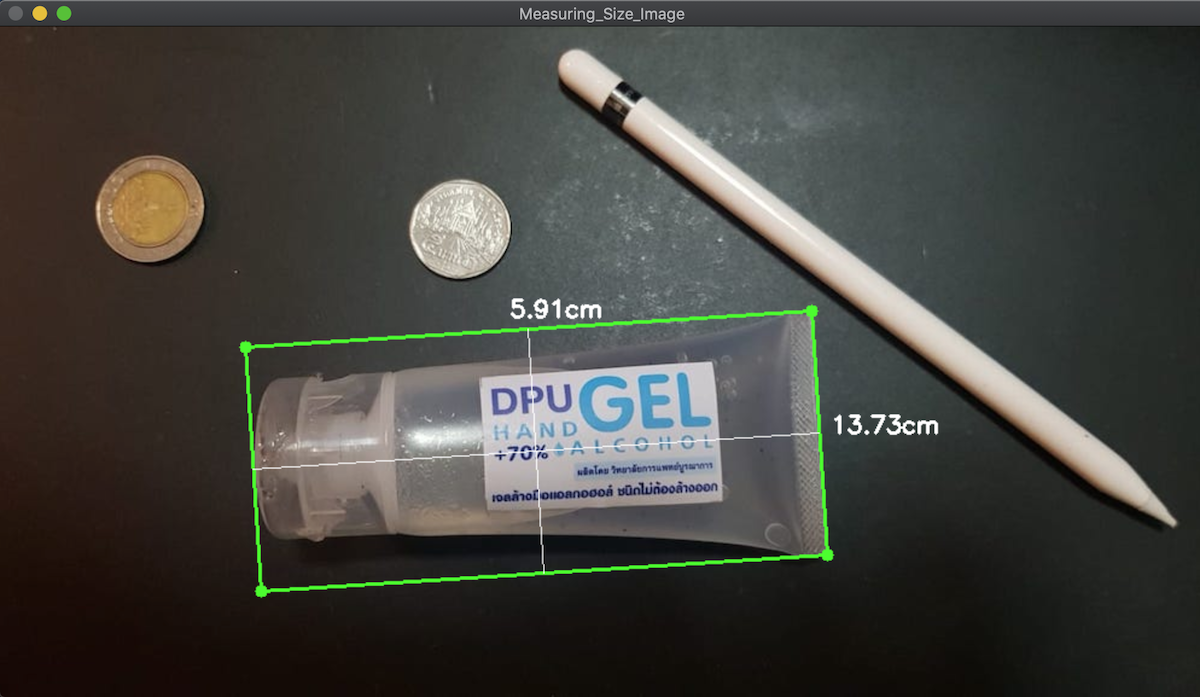
ได้ค่า dimA,dimB ที่คำนวณจาก pixelsPerMetric อ้างอิง ขนาดของเหรียญ 10 บาท (1.02362205 นิ้วหรือ 2.6 เซ็นติเมตร โดยประมาณ) เอามาคำนวณค่า inch นิ้วเป็น cm (คูณกับ 2.54) วาด Text ให้กับภาพ
cv2.putText(orig, "{:.2f}cm".format(dimA * 2.54),
		(int(tltrX - 15), int(tltrY - 10)), cv2.FONT_HERSHEY_SIMPLEX,
		0.65, (255, 255, 255), 2)
cv2.putText(orig, "{:.2f}cm".format(dimB * 2.54),
		(int(trbrX + 10), int(trbrY)), cv2.FONT_HERSHEY_SIMPLEX,
		0.65, (255, 255, 255), 2)
แสดง Output มาหน่อยดีกว่าเพื่อกดอะไรก็ได้ก็จะย้ายตำแหน่ง contours ไปเรื่อยๆ
cv2.imshow("Measuring_Size_Image", orig)
cv2.waitKey(0)
ดังนั้นภาพรวม source code นี้จะเป็นแบบนี้:
from scipy.spatial import distance as dist
from imutils import perspective
from imutils import contours
import numpy as np
import imutils
import cv2

def midpoint(ptA, ptB):
	return ((ptA[0] + ptB[0]) * 0.5, (ptA[1] + ptB[1]) * 0.5)

image = cv2.imread("./images/sample.jpeg")
gray = cv2.cvtColor(image, cv2.COLOR_BGR2GRAY)
gray = cv2.GaussianBlur(gray, (7, 7), 0)

edged = cv2.Canny(gray, 50, 100)
edged = cv2.dilate(edged, None, iterations=1)
edged = cv2.erode(edged, None, iterations=1)

cnts = cv2.findContours(edged.copy(), cv2.RETR_EXTERNAL,
	cv2.CHAIN_APPROX_SIMPLE)
cnts = imutils.grab_contours(cnts)

(cnts, _) = contours.sort_contours(cnts)
pixelsPerMetric = None

for c in cnts:
	if cv2.contourArea(c) < 100:
		continue

	orig = image.copy()
	box = cv2.minAreaRect(c)
	box = cv2.cv.BoxPoints(box) if imutils.is_cv2() else cv2.boxPoints(box)
	box = np.array(box, dtype="int")

	box = perspective.order_points(box)
	cv2.drawContours(orig, [box.astype("int")], -1, (0, 255, 64), 2)

	for (x, y) in box:
		cv2.circle(orig, (int(x), int(y)), 5, (0, 255, 64), -1)

	(tl, tr, br, bl) = box
	(tltrX, tltrY) = midpoint(tl, tr)
	(blbrX, blbrY) = midpoint(bl, br)

	(tlblX, tlblY) = midpoint(tl, bl)
	(trbrX, trbrY) = midpoint(tr, br)

	cv2.circle(orig, (int(tltrX), int(tltrY)), 0, (0, 255, 64), 0)
	cv2.circle(orig, (int(blbrX), int(blbrY)), 0, (0, 255, 64), 0)
	cv2.circle(orig, (int(tlblX), int(tlblY)), 0, (0, 255, 64), 0)
	cv2.circle(orig, (int(trbrX), int(trbrY)), 0, (0, 255, 64), 0)

	cv2.line(orig, (int(tltrX), int(tltrY)), (int(blbrX), int(blbrY)),
		(255, 255, 255), 1)
	cv2.line(orig, (int(tlblX), int(tlblY)), (int(trbrX), int(trbrY)),
		(255, 255, 255), 1)

	dA = dist.euclidean((tltrX, tltrY), (blbrX, blbrY))
	dB = dist.euclidean((tlblX, tlblY), (trbrX, trbrY))

	if pixelsPerMetric is None:
		pixelsPerMetric = dB / 1.02362205

	dimA = dA / pixelsPerMetric
	dimB = dB / pixelsPerMetric

	cv2.putText(orig, "{:.2f}cm".format(dimA * 2.54),
		(int(tltrX - 15), int(tltrY - 10)), cv2.FONT_HERSHEY_SIMPLEX,
		0.65, (255, 255, 255), 2)
	cv2.putText(orig, "{:.2f}cm".format(dimB * 2.54),
		(int(trbrX + 10), int(trbrY)), cv2.FONT_HERSHEY_SIMPLEX,
		0.65, (255, 255, 255), 2)

	# show output
	cv2.imshow("Measuring_Size_Image", orig)
	cv2.waitKey(0)
แสดงผลหน่อยจะได้แบบนี้ กด Next ไปเรื่อยๆ
หมดละ คราวนี้ก็ลองไปทำอะไรกับของที่มันใหญ่ๆ กว่านี้ล่ะกันนะครับ