

ขั้นตอนการสร้างเกมด้วย Unity โดยใช้ Cloud เก็บข้อมูลผู้เล่นและเข้าระบบ โดยเลือก SDK ของ Firebase มาใช้งานร่วมกับการเขียนเกมในส่วนของ Authentication สมัครสมาชิก และเข้าระบบ
สำหรับ Firebase นั้นเว็บ Daydev.com ก็ได้มีบทเรียนมากมายให้ศึกษาแล้วทั้ง เว็บไซต์ และ ระบบปฏิบัติการ Android ในตอนนี้ก็คงต้องเข้าถึงส่วนของการพัฒนาเกมสักที ก็คงไม่ต้องอธิบายอะไรมากมายสำหรับคุณสมบัติที่น่าสนใจและดีสุดๆ ของ Firebase บทเรียนแรกประเดิมการเขียนเกม Unity นั้นคงต้องเป็นการทำหน้า Login นั่นเอง
ประกอบกับช่วงนี้ทำวิจัยเกี่ยวกับ Gamification ในการนำกลไกด้านเกมมาใช้กับการศึกษา เพื่อทำ EdTech ตัวหนึ่งชื่อว่า ClassQuest (เริ่มวางแผนมาได้สักพักละ) ก็เลยหยิบ Module บางส่วนมาอธิบายกัน
สมัคร Firebase ให้เรียบร้อยหากยังไม่เคยใช้ อ่านได้ที่บทความนี้: https://www.daydev.com/category/firebase
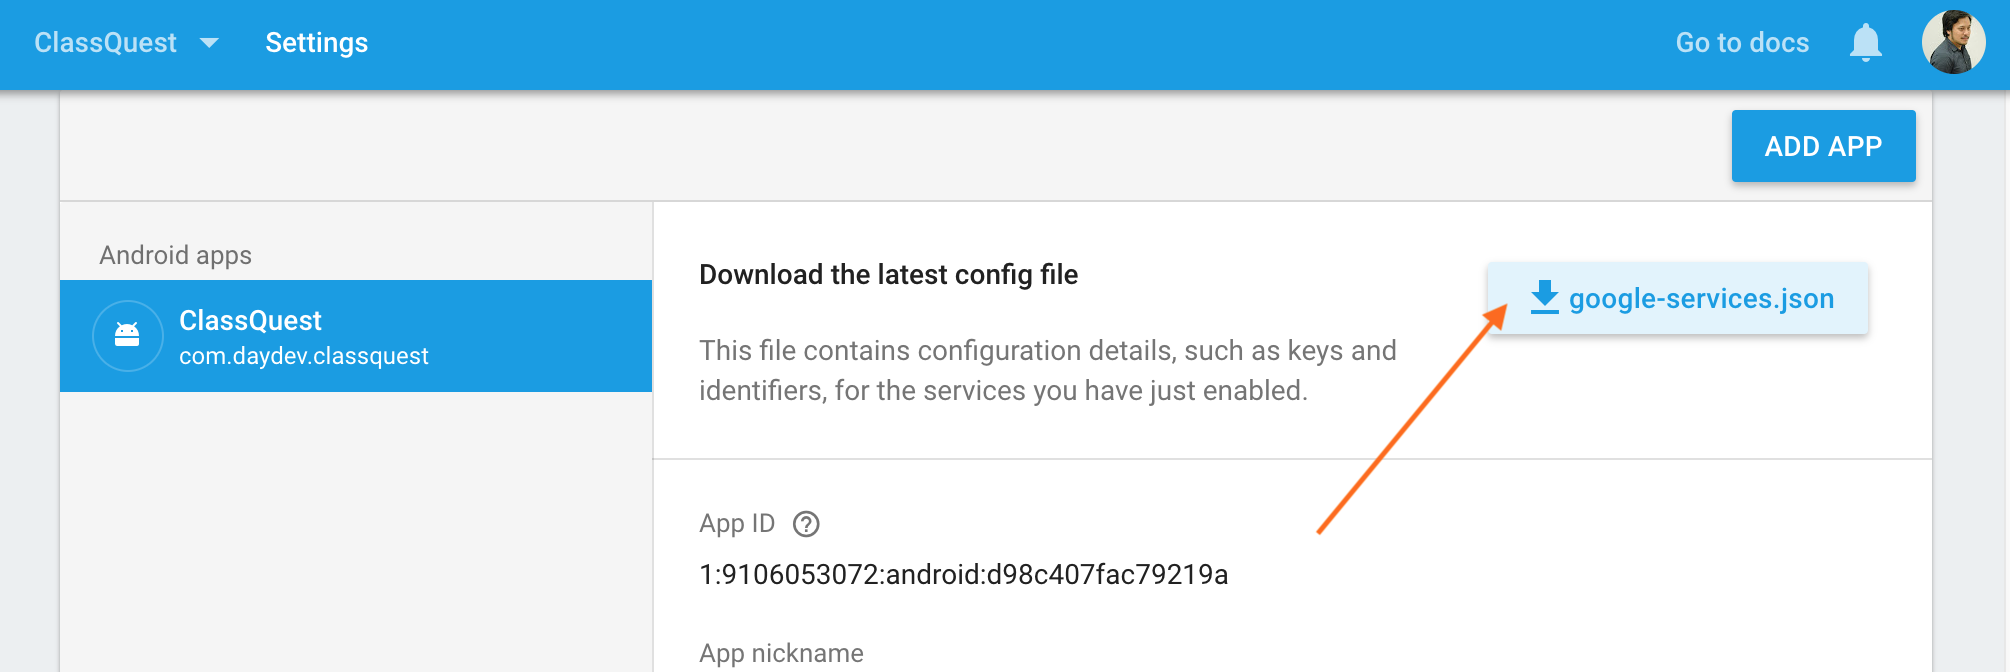
ขั้นตอนต่อไปคือ ไป Register App เพื่อได้ไฟล์ google-services.json สำหรับใช้กับ Android หรือ googleService-Info.plist สำหรับ iOS มาไว้ใน Folder ชื่อ Assets
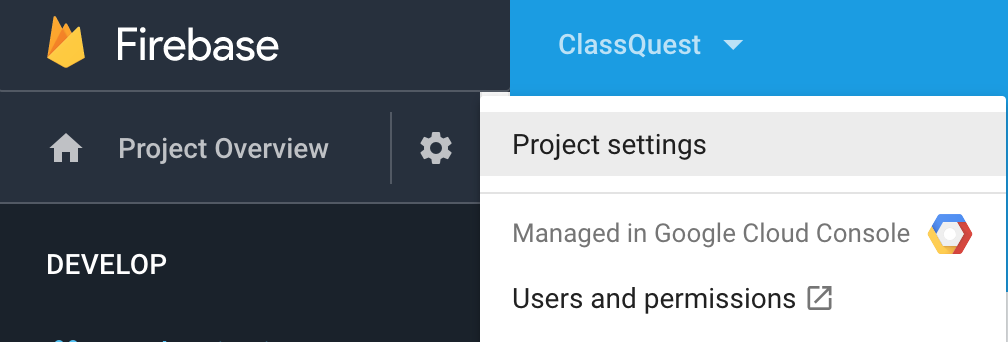
หลังสร้าง Project บน firebase เสร็จให้ไปที่ Project Setting
ทำการลงทะเบียนตามแพลตฟอร์มที่ต้องการสำหรับบทความนี้เน้นที่ Android ก่อนให้ Register แอพ ซึ่งเราต้องมี Bundle ID แน่นอนให้สร้าง Unity Project เปิดโปรแกรม Unity ขึ้นมา
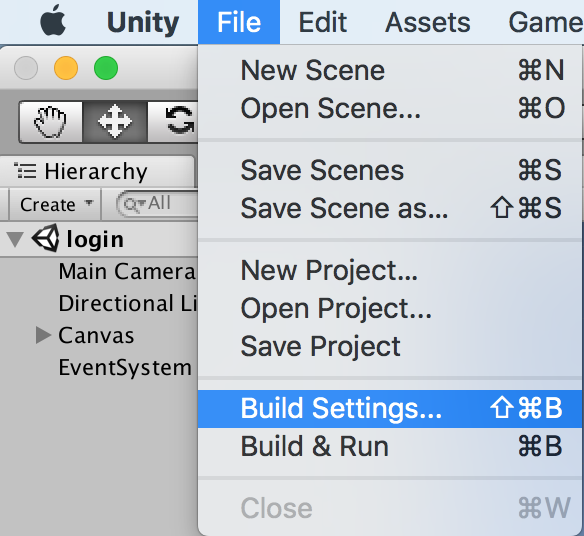
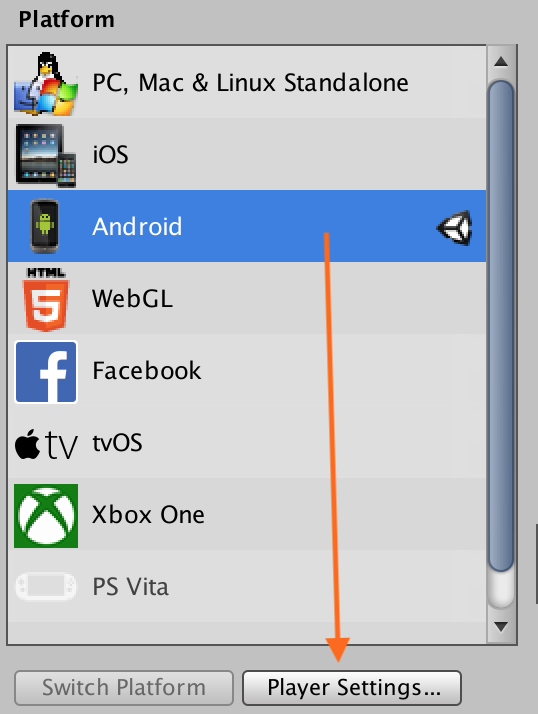
เมื่อพร้อมแล้วให้ไปที่ File->Build Setting เลือก android แล้วกด Player Setting
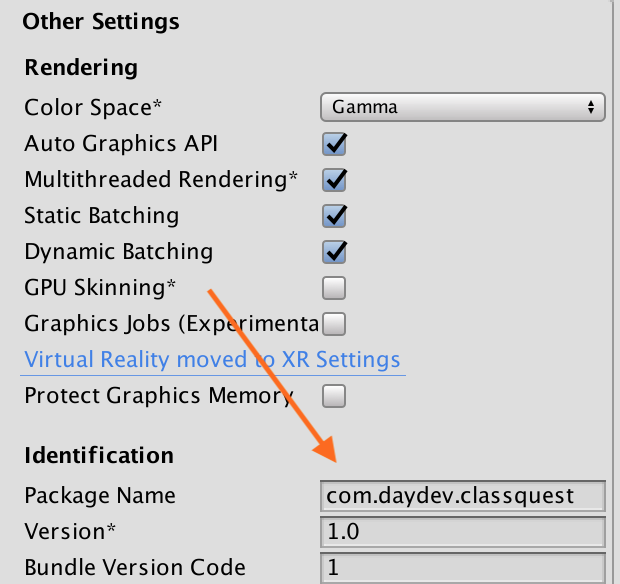
ปรับค่าของ Other Setting ส่วนของ Identification ของ Bundle ID เป็น com.xxx.app ในตัวอย่างคือ com.daydev.classquest (ก็เปลี่ยนกันเอาเองนะครับ)
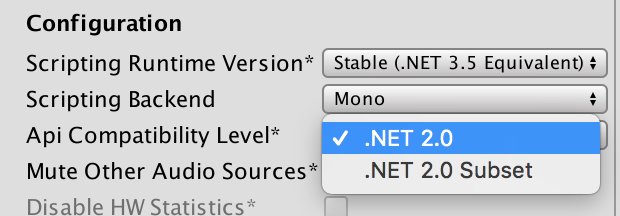
เลื่อนลงไปอีกเล็กน้อย ปรับค่า Api Compatibility Level ใน Configuration จาก .Net 2.0 Subset เป็น .NET 2.0 ปกติ
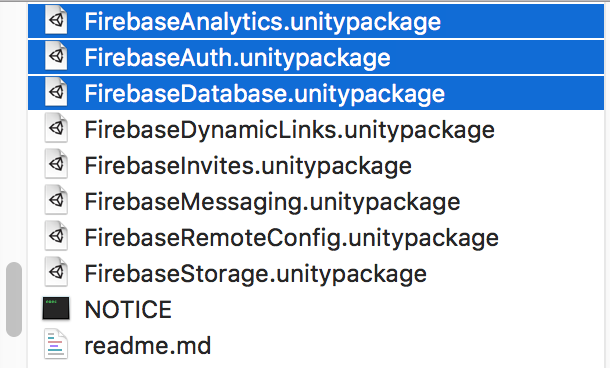
ดาวน์โหลด Assets Packages SDK ของ Firebase ที่: https://firebase.google.com/docs/unity/setup แตกโฟลเดอร์ออกมาจะพบ Assets ให้เลือกเยอะมาก ในตัวอย่างแรก Import Custom Assets แค่ Analytics, Auth และ Database ก็พอ
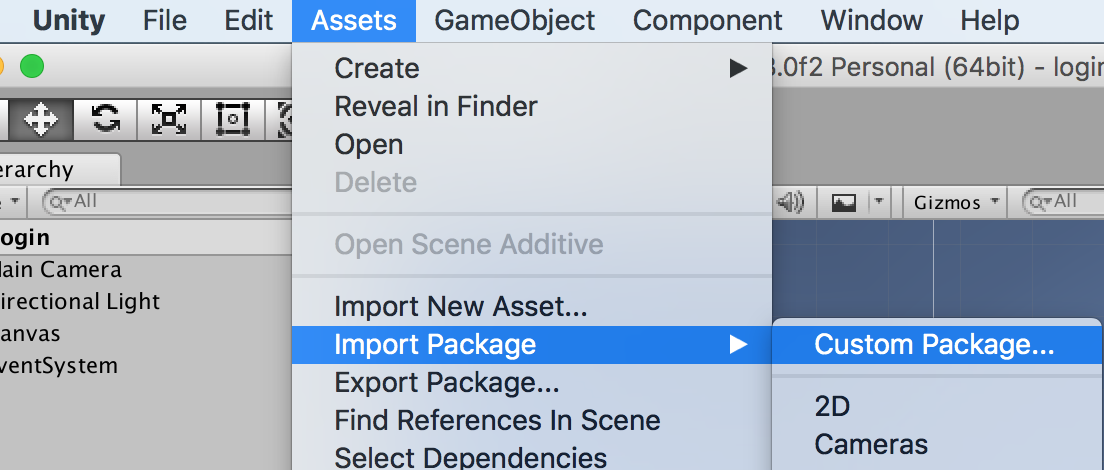
 วิธีติดตั้ง Custom Package ก็คือ Assets -> Import Package เลือก Custom Package ทีละตัวไปเรื่อยๆ น่าจะทำกันเป็นนะครับ
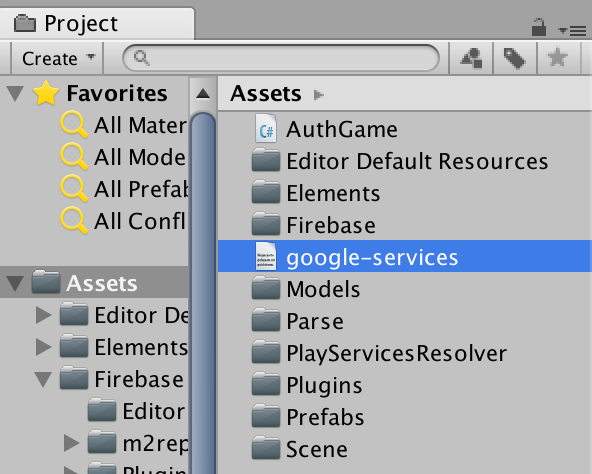
กลับไปที่ Firebase Console เอา Bundle ID ของเราไปลงทะเบียนแอพฯ เพื่อดาวน์โหลดไฟล์ google_services.json ไปวางใน Folder ชื่อ Assets ของ Unity
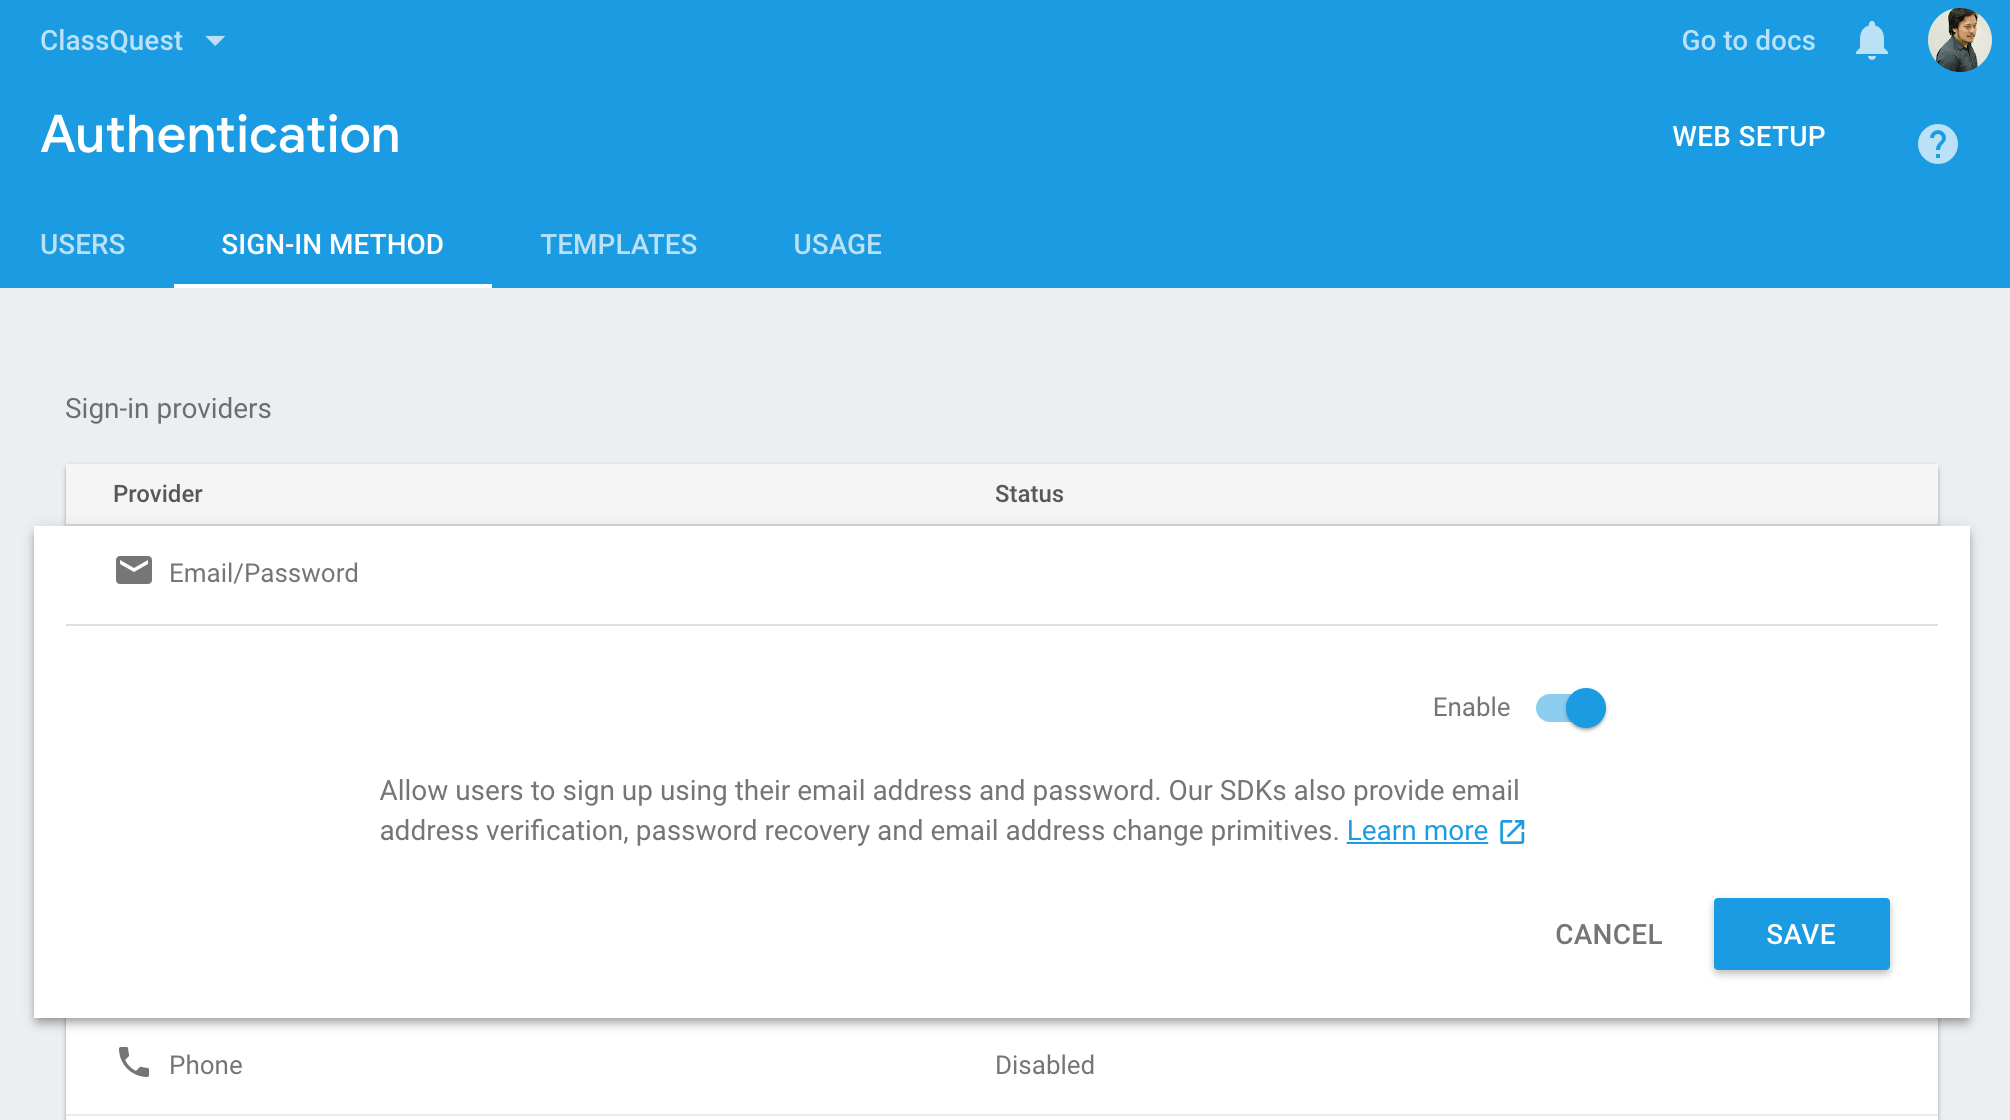
ไปที่ เมนู Authentication ของ Firebase Console ทำการเพิ่ม Sign-in Method ใหม่เข้าไปคือ Email/Password ให้ไปเปิดเสีย
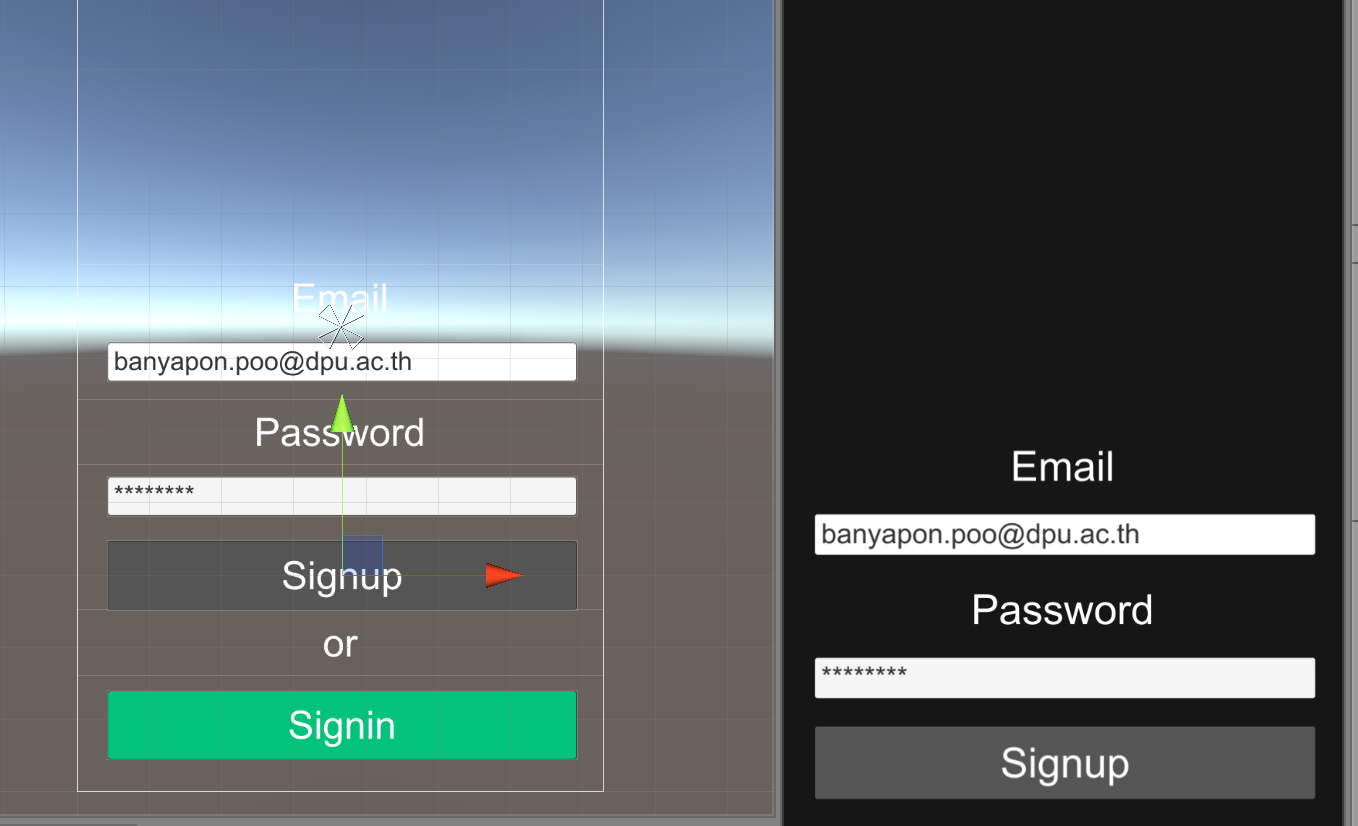
ให้ออกแบบ Scene ขึ้นมา 2 Scene โดย Scene แรกชื่อ login และอีก Scene ชื่อ main โดยหน้า login นั้นให้สร้าง UI ขึ้นมาและตั้งชื่อตามตัวอย่างดังนี้:
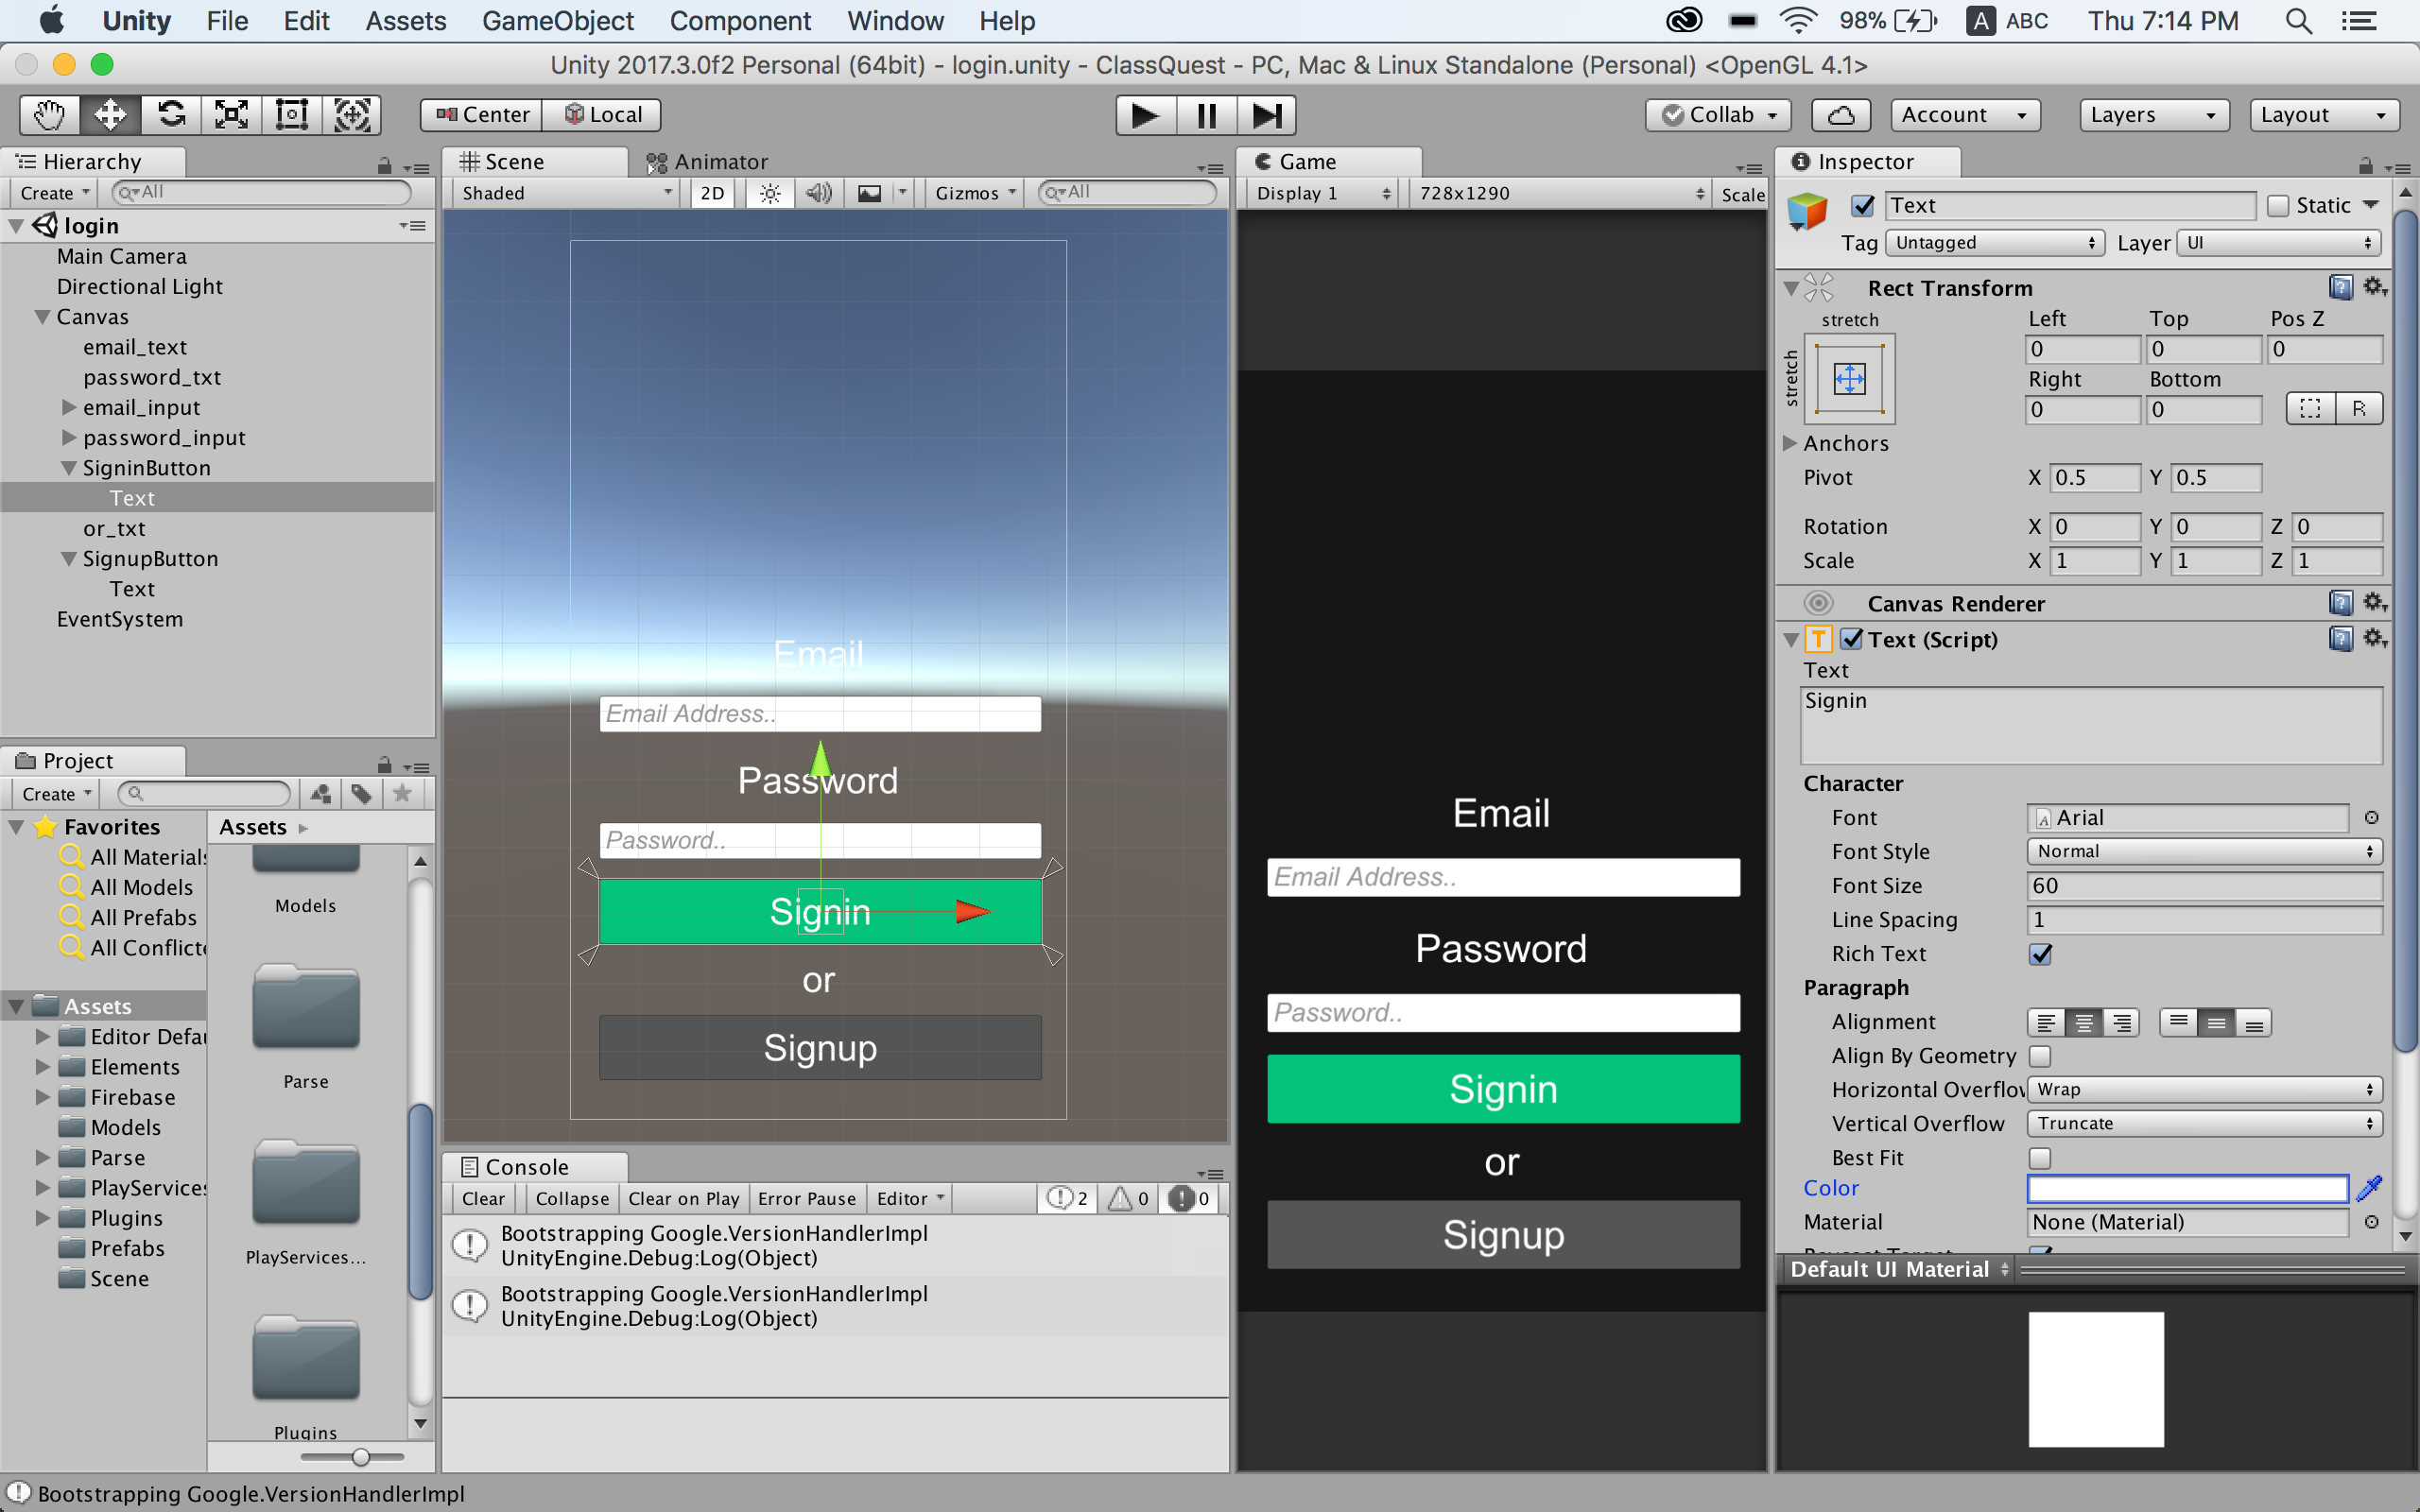
การทำงานหลักๆ คือ inputfield สองตัวตัวหนึ่งเป็น normal อีกตัวเป็น password

ตั้งชื่อ Input Field ทั้งสองว่า email_input และ password_input ตามลำดับ หลังจากนั้นเพิ่ม Button UI เข้าไปชื่อว่า Signupbutton และ Signinbutton
หลังจากนั้นให้สร้าง C# Script ขึ้นมาเป็น Component หนึ่งใน Main Camera ชื่อว่า AuthGame.cs โดยกำหนด Header ดังนี้:
using System.Collections;
using System.Collections.Generic;
using UnityEngine;
using Firebase.Auth;
using UnityEngine.UI;
using UnityEngine.SceneManagement;
using System;
จะมีการทำงานร่วมกับ firebase และ ui เป็นหลัก พร้อมการเปลี่ยน Scene ด้วย SceneManagement ประกาศ Global var ดังนี้:
private FirebaseAuth auth;
public InputField email_input, password_input;
public Button SignupButton, SigninButton;
public Text ErrorText;
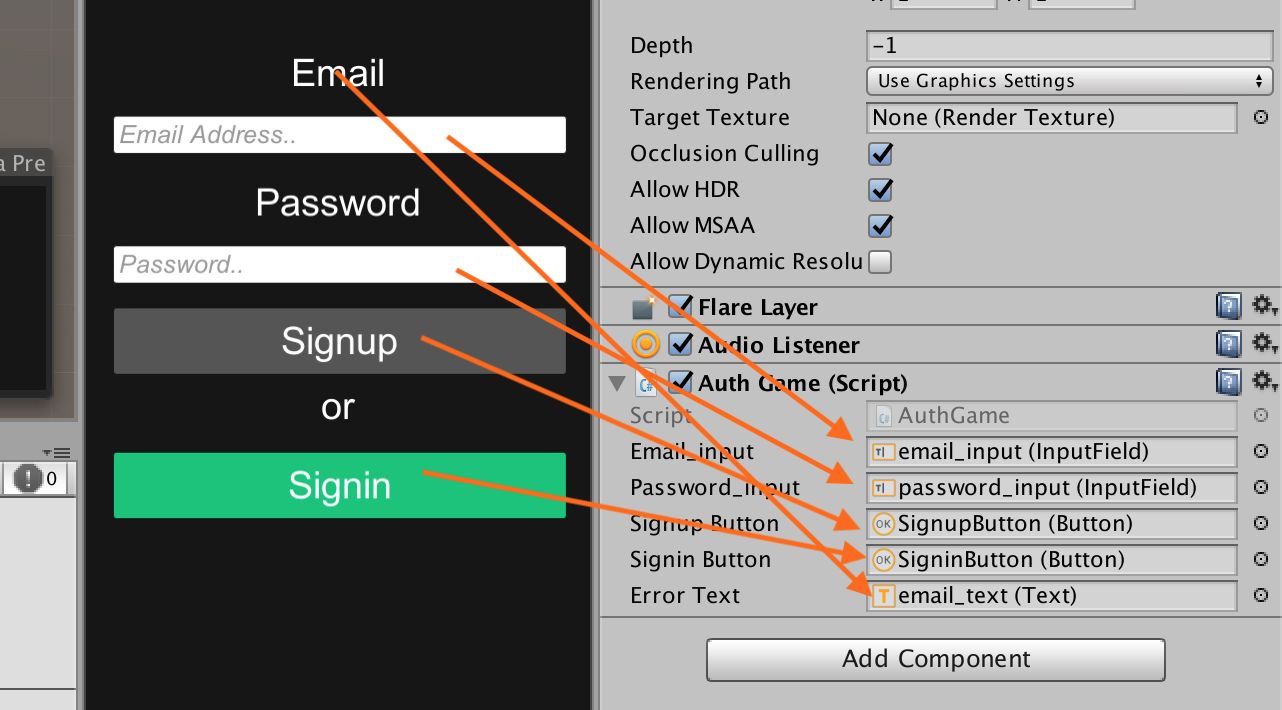
หลังจากนั้นไปที่ Inspector ลาก UI ทุกตัวไปวางใน Component C# ตัว AuthGame ใน MainCamera
กลับมาเขียน code ในเมธอด Start กำหนด onListener สำหรับกดปุ่มดังนี้:
public void Start () {
	auth = FirebaseAuth.DefaultInstance;

        SignupButton.onClick.AddListener(() => Signup(email_input.text, password_input.text));
        SigninButton.onClick.AddListener(() => LoginAction(email_input.text, password_input.text));
}
จะเห็นว่าเมื่อทำ AddListener ด้วย onClick ทั้งสองปุ่มจะมีการเรียกเมธอดชื่อ Signup และ LoginAction พร้อมส่ง Parameter ไป 2 ตัวคือ ค่า value ที่กรอกจาก email_input และ password_input
เรามาดูส่วนคำสั่งของ firebase กันดีกว่า เมธอดแรกคือ Signup เมื่อกดสมัครจะทำการส่งค่าไปที่ firebase auth ทันที
public void Signup(string email, string password)
    {
        if (string.IsNullOrEmpty(email) || string.IsNullOrEmpty(password)){
            //Error handling
            return;
        }

        auth.CreateUserWithEmailAndPasswordAsync(email, password).ContinueWith(task =>
        {
            if (task.IsCanceled)
            {
                Debug.LogError("CreateUserWithEmailAndPasswordAsync was canceled.");
                return;
            }
            if (task.IsFaulted)
            {
                Debug.LogError("CreateUserWithEmailAndPasswordAsync error: " + task.Exception);
                if (task.Exception.InnerExceptions.Count > 0)
                    UpdateErrorMessage(task.Exception.InnerExceptions[0].Message);
                return;
            }

            FirebaseUser newUser = task.Result; // Firebase user has been created.
            Debug.LogFormat("Firebase user created successfully: {0} ({1})",
                newUser.DisplayName, newUser.UserId);
            UpdateErrorMessage("Signup Success");
        });
    }
การทำงานปกติเหมือนตอนทำ Android หรือ Web JS เลย ต่อมาก็ส่วนของ LoginAction
public void LoginAction(string email, string password)
    {
        auth.SignInWithEmailAndPasswordAsync(email, password).ContinueWith(task =>
        {
            if (task.IsCanceled)
            {
                Debug.LogError("SignInWithEmailAndPasswordAsync canceled.");
                return;
            }
            if (task.IsFaulted)
            {
                Debug.LogError("SignInWithEmailAndPasswordAsync error: " + task.Exception);
                if (task.Exception.InnerExceptions.Count > 0)
                    UpdateErrorMessage(task.Exception.InnerExceptions[0].Message);
                return;
            }

            FirebaseUser user = task.Result;
            Debug.LogFormat("User signed in successfully: {0} ({1})",
                user.DisplayName, user.UserId);

            PlayerPrefs.SetString("LoginUser", user != null ? user.Email : "Unknown");
            StartCoroutine(LoadNewScene());
        });
    }
    IEnumerator LoadNewScene() {

        yield return new WaitForSeconds(3);

        AsyncOperation async = SceneManager.LoadSceneAsync("main");
        while (!async.isDone) {
            yield return null;
        }
    }
การทำงานคือเมื่อ Signup ผ่านก็จะ Login อัตโนมัติ โดยมีการหน่วงเวลา 3 วินาทีก่อนเปลี่ยน Scene ไป main ว่าแล้วก็เก็บส่วนของ ErrorHandle กันหน่อยใช้ Libary ของ firebase ไปเลยคือ:
    private void UpdateErrorMessage(string message)
    {
        ErrorText.text = message;
        Invoke("ClearErrorMessage", 3);
    }

    void ClearErrorMessage()
    {
        ErrorText.text = "";
    }
ดังนั้น Code ทั้งหมดจะเป็นดังนี้:
using System.Collections;
using System.Collections.Generic;
using UnityEngine;
using Firebase.Auth;
using UnityEngine.UI;
using UnityEngine.SceneManagement;
using System;

public class AuthGame : MonoBehaviour {
	private FirebaseAuth auth;
    public InputField email_input, password_input;
    public Button SignupButton, SigninButton;
    public Text ErrorText;
	// Use this for initialization
	public void Start () {
		auth = FirebaseAuth.DefaultInstance;

        SignupButton.onClick.AddListener(() => Signup(email_input.text, password_input.text));
        SigninButton.onClick.AddListener(() => LoginAction(email_input.text, password_input.text));
	}
	public void Signup(string email, string password)
    {
        if (string.IsNullOrEmpty(email) || string.IsNullOrEmpty(password)){
            //Error handling
            return;
        }

        auth.CreateUserWithEmailAndPasswordAsync(email, password).ContinueWith(task =>
        {
            if (task.IsCanceled)
            {
                Debug.LogError("CreateUserWithEmailAndPasswordAsync was canceled.");
                return;
            }
            if (task.IsFaulted)
            {
                Debug.LogError("CreateUserWithEmailAndPasswordAsync error: " + task.Exception);
                if (task.Exception.InnerExceptions.Count > 0)
                    UpdateErrorMessage(task.Exception.InnerExceptions[0].Message);
                return;
            }

            FirebaseUser newUser = task.Result; // Firebase user has been created.
            Debug.LogFormat("Firebase user created successfully: {0} ({1})",
                newUser.DisplayName, newUser.UserId);
            UpdateErrorMessage("Signup Success");
        });
    }

    private void UpdateErrorMessage(string message)
    {
        ErrorText.text = message;
        Invoke("ClearErrorMessage", 3);
    }

    void ClearErrorMessage()
    {
        ErrorText.text = "";
    }
    public void LoginAction(string email, string password)
    {
        auth.SignInWithEmailAndPasswordAsync(email, password).ContinueWith(task =>
        {
            if (task.IsCanceled)
            {
                Debug.LogError("SignInWithEmailAndPasswordAsync canceled.");
                return;
            }
            if (task.IsFaulted)
            {
                Debug.LogError("SignInWithEmailAndPasswordAsync error: " + task.Exception);
                if (task.Exception.InnerExceptions.Count > 0)
                    UpdateErrorMessage(task.Exception.InnerExceptions[0].Message);
                return;
            }

            FirebaseUser user = task.Result;
            Debug.LogFormat("User signed in successfully: {0} ({1})",
                user.DisplayName, user.UserId);

            PlayerPrefs.SetString("LoginUser", user != null ? user.Email : "Unknown");
            StartCoroutine(LoadNewScene());
        });
    }
    IEnumerator LoadNewScene() {

        yield return new WaitForSeconds(3);

        AsyncOperation async = SceneManager.LoadSceneAsync("main");
        while (!async.isDone) {
            yield return null;
        }
    }
}
หมายเหตุ: อธิบายละเอียดแล้ว ถ้า Copy ไปยัง Bug ก็รบกวนแก้ปัญหากันเองก่อนนะครับ มีหลายคนทักมาทาง Page แล้วปัญหาคือไม่อ่านละเอียดเอง
ทดสอบกันหน่อยดีกว่า
แนะนำว่าให้ลอง Build ลง android จริงๆ จะทดสอบได้ดีกว่านะครับ ใน Editor บางทีได้ บางทีไม่ได้ แต่ อ่าน Log ได้:
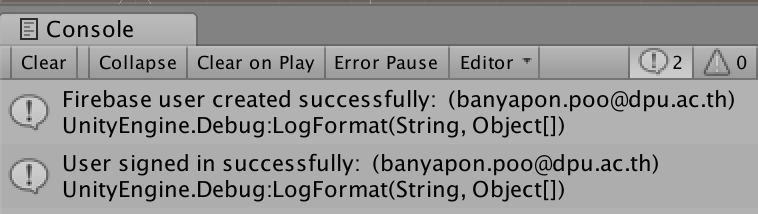
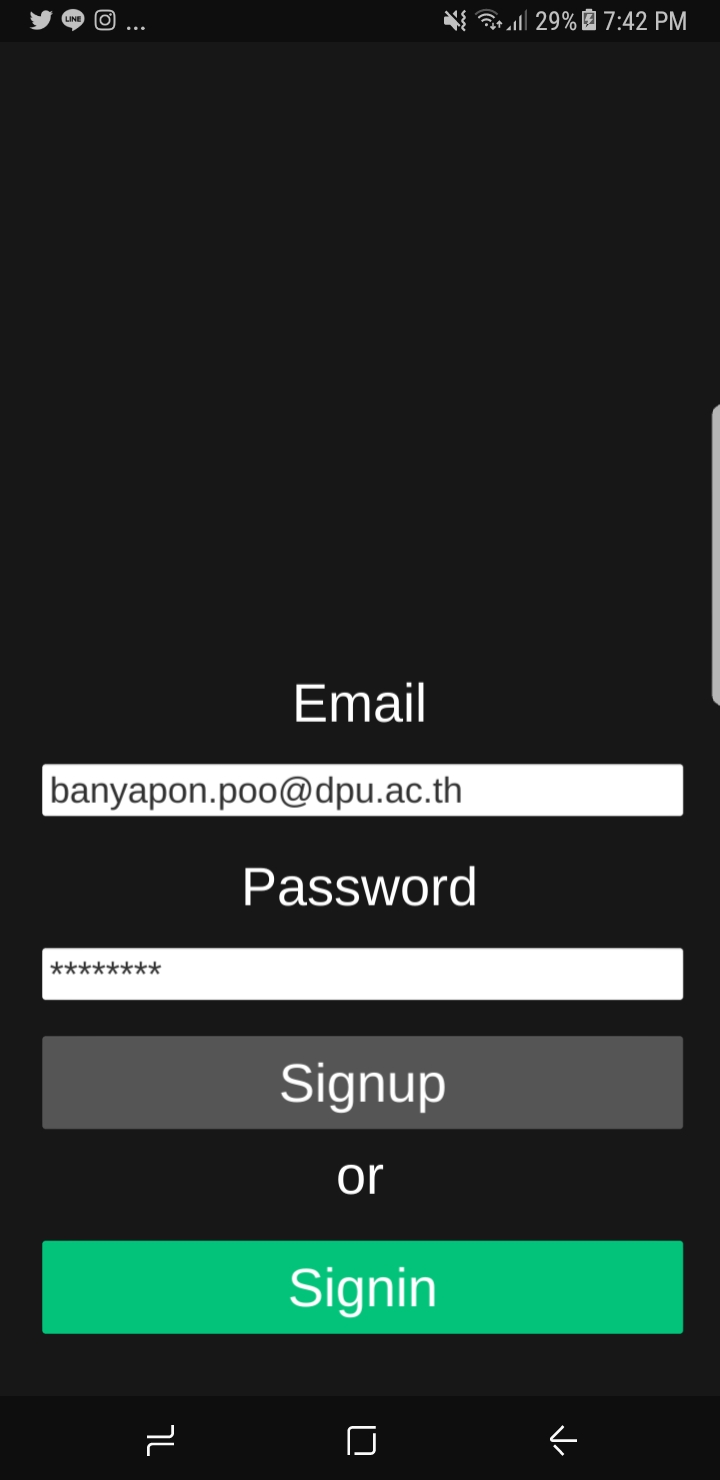
ทดสอบระบบหน่อยดีกว่า บนเครื่องจริงๆ
 |
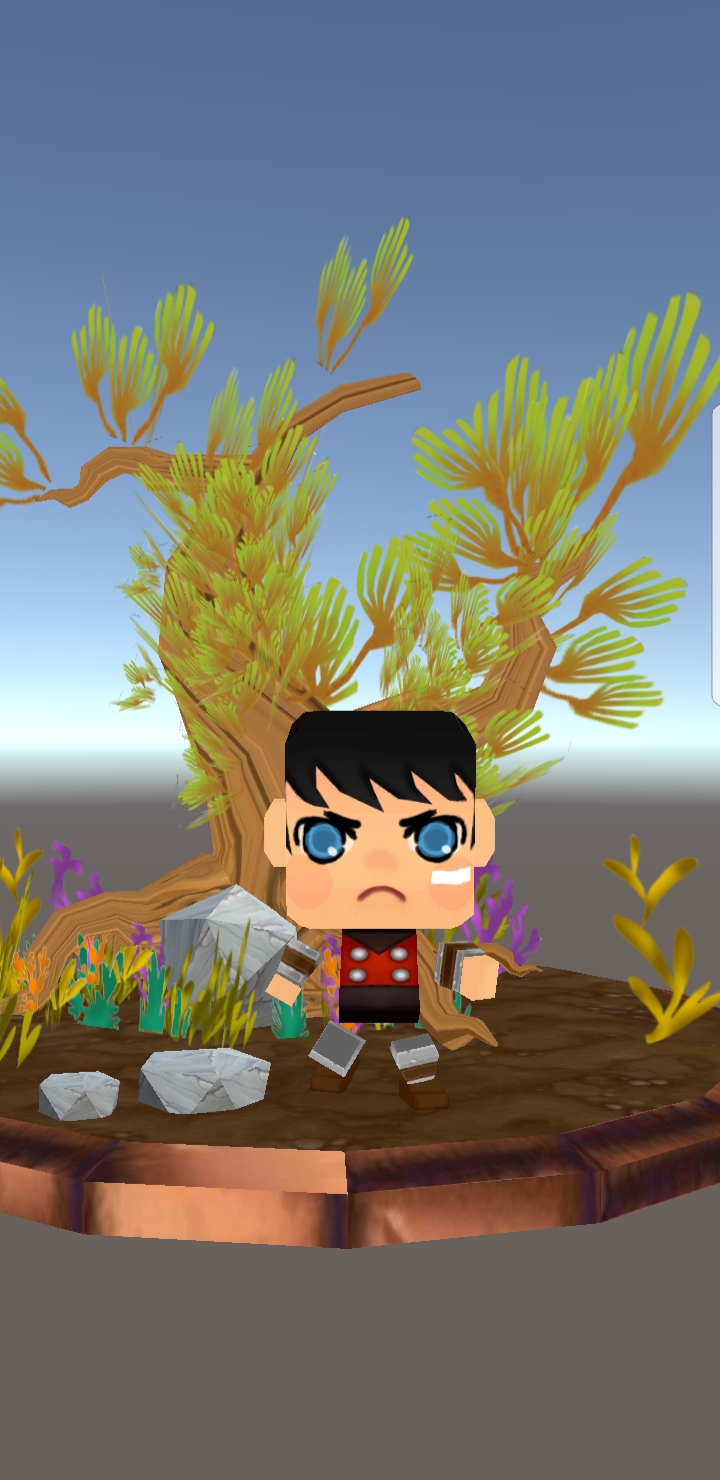 |
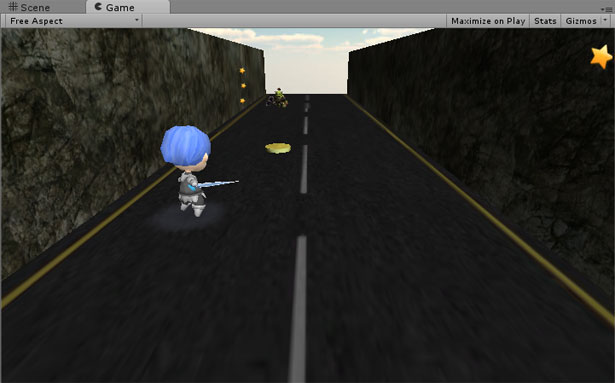
Login แล้วก็ต้องเข้าเกมสินะ
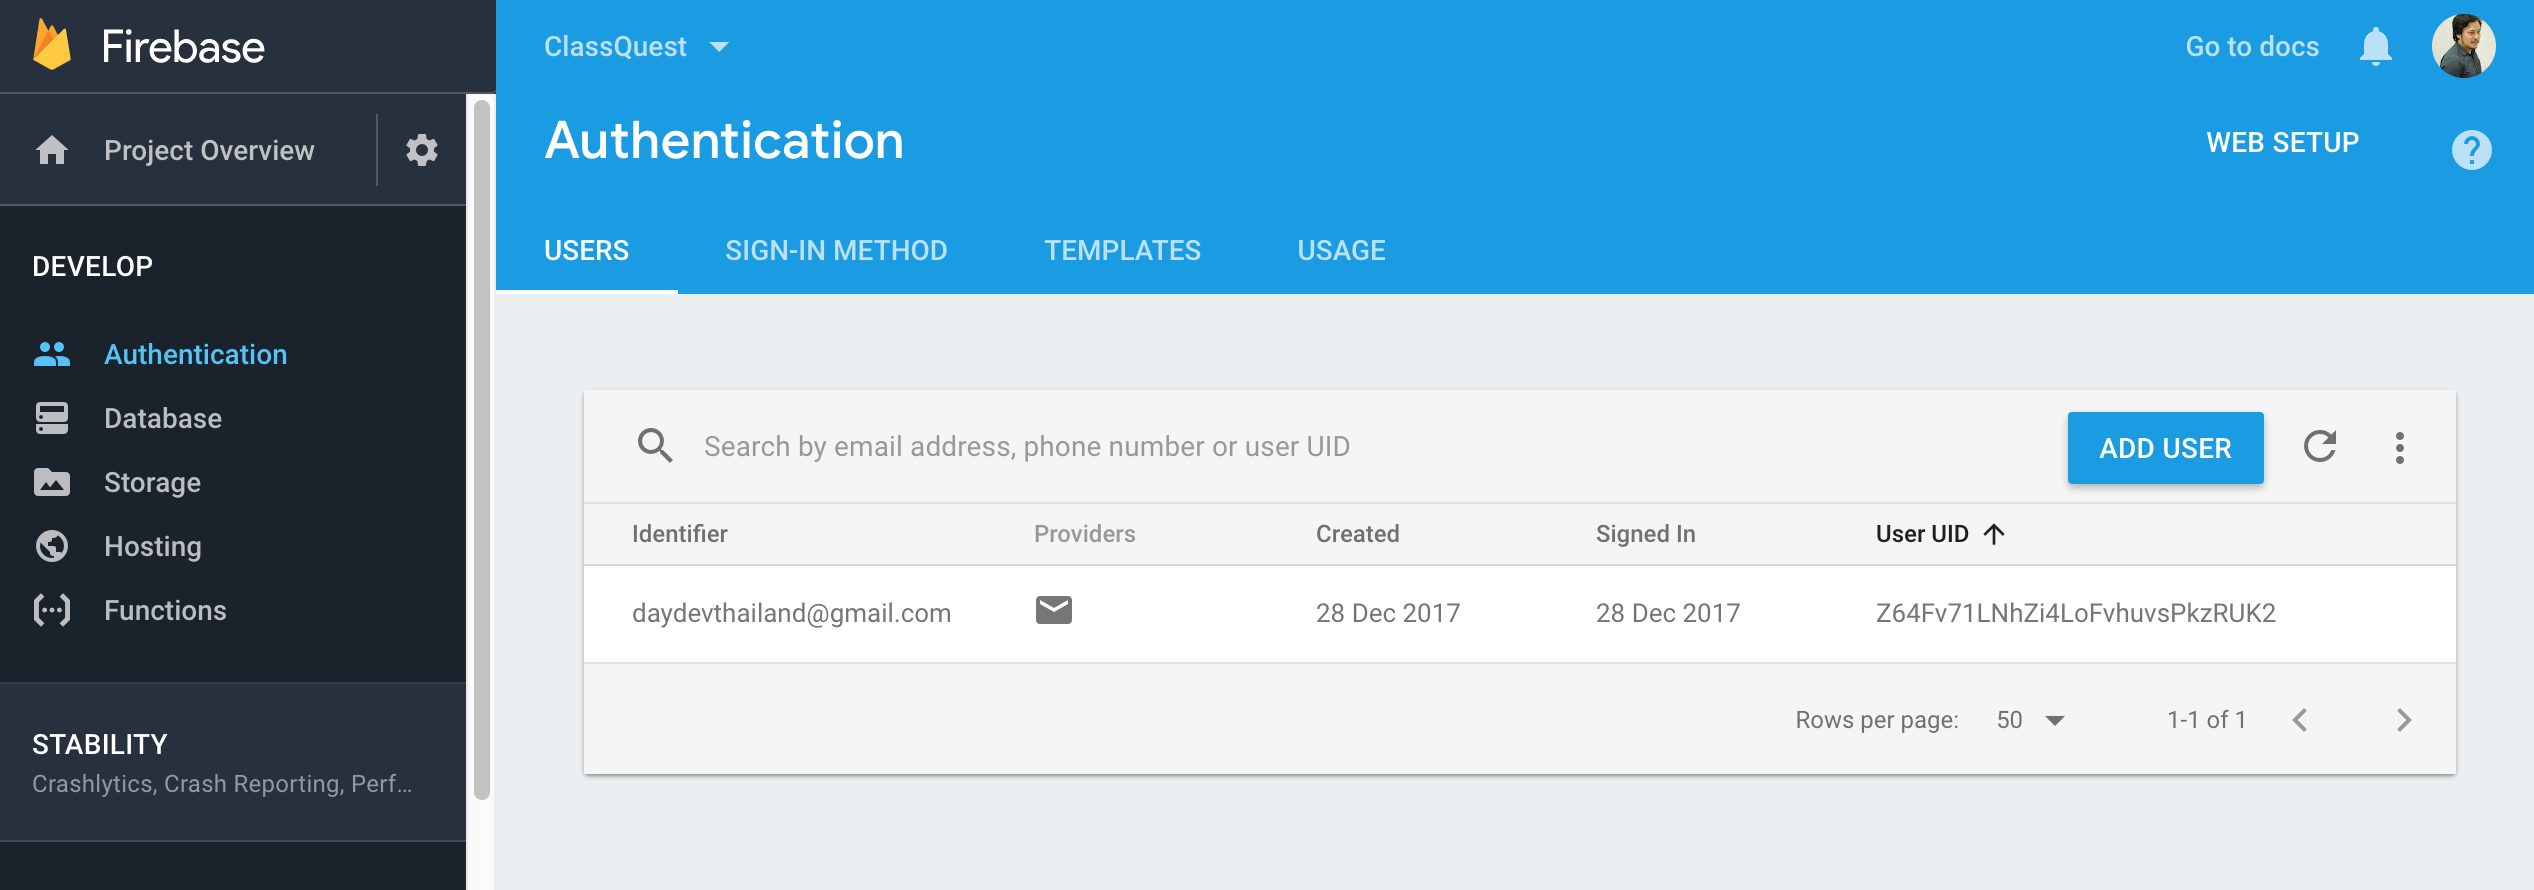
ข้อมูลขึ้นไปบน Firebase แล้ว!
จบบทเรียนเริ่มต้นการพัฒนาเกมด้วย Unity ร่วมกับ firebase สำหรับมือสมัครเล่นนะครับ 🙂 ไปลองทดสอบกันดู


One Comment